Welcome to Move Play Grow ©
This user guide will get you started using Move Play Grow © in the UnitusTI cloud system.
Welcome to Move Play Grow (MPG © ) 😊. I’m Deborah Ferguson, the program author. MPG © is your resource for designing program goals and tracking progress for clinical and functional objectives addressing movement, sensory processing, emotional regulation, play, communication and self-care tasks for your pediatric clients. The more than 200 templates included in MPG © are drawn from the wide variety of developmental perspectives that inform occupational therapy and align well with the various ways that pediatric therapists and educators from various disciplines clinically think about and measure progress. Move Play Grow © is inspired by more than 35 years of experience working in the variety of settings where children learn, play and grow. I'm excited to share this program with you.
Using Move Play Grow © you can:
- Easily translate your assessment results into individualized treatment programs with measurable goals that you can share with parents and professionals
- Set up a program, track data from each session, and quickly create daily treatment notes and customized reports that communicate your child’s progress.
- Create and assign programs specifically to parents, educators, classroom paraprofessionals, interventionists, and occupational therapy students for whom you provide consultation and/or supervision. Program templates include suggestions for materials, intervention options, and the ability to add video and program instruction
Take the time to become thoroughly familiar with MPG © using this guide and the training provided by UnitisTI. I recommend that initially you print out this guide and keep it beside you so that you can reference it during your initial training period when working in your UnitusTI account. Soon using the program will become second nature.
Thank you for subscribing to Move Play Grow © . Within a short time, you will find that MPG © will assist you with your planning and documentation process saving you hours of paperwork time. My hope is that you use this time to do what you really love as a therapist !
Deborah Ferguson MHS OTR/L Program Author MPG ©
TABLE OF CONTENTS
B. Overview of MPG© Categories
C. Working with Program Templates
2. Search By Program Title or Subtitle
D. Using MPG© to Assign Programs To Clients
1. Assigning Programs to Individual Clients
STEP 3: Create a New Program List
STEP 5: Review Program Details
STEP 7: Setting up a Rating Scale
STEP 8: Choose Program Parameters
STEP 9: Select Rates for Rating Scale
STEP 11: Recording Prompt Data
STEP 12: Recording Optional Information
STEP 13: Finish Program List Creation
STEP 14: Add Additional Programs and/or Program Lists
2. Assigning Programs to Groups of Clients
STEP 4: Confirm Program List Set Up
E. Using MPG© to Document Client Sessions
STEP 3: Review Program Details
2. Working with Multiple Programs Lists/Clients
(a) Creating a Session Note in My Clients
(b) Creating a Session Note in Run Programs
Select and print notes from your list by clicking on the download icon.
STEP 3: Preparing Graphs for Reports
STEP 5: Review and Download Report
G. Working with Other Data Collection Types
1. Recording Discrete Trial Data
2. Recording Duration/Time Data
H. Updating MPG© Subscription Programs
I. Customizing and Creating Programs
1. Cloning and Customizing Programs
2. Creating New Program Categories
3. Creating New Program Templates
Getting Started
- Open a new web browser and enter in the URL address (find the URL for your account region here )
- Enter in your login info: UnitusTI ID#, username, password
The UnitusTI ID# is your account number. For example “12345”. This number will also serve as the HIPAA compliant password for opening any communication you send to parents, teachers, etc.
B. Overview of MPG © Categories
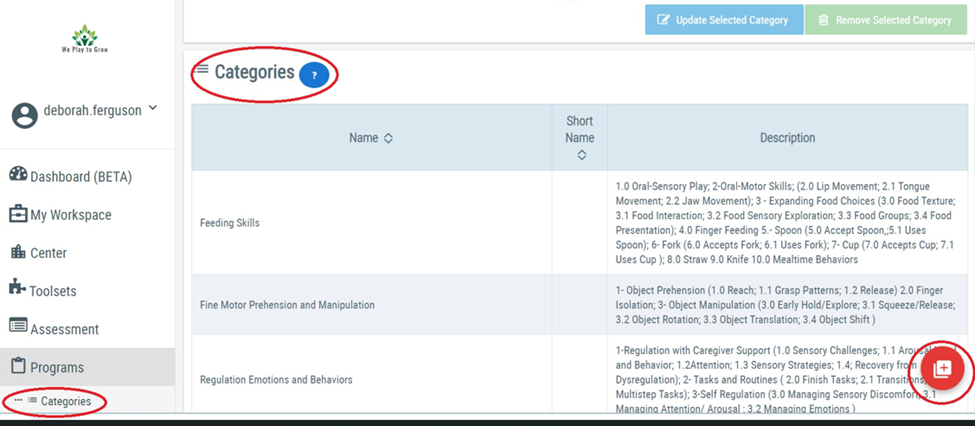
MPG © is organized according to the following skill areas or Program Categories which can be viewed by clicking on Categories under the Program pull down menu The Categories page is like a table of contents that provides you with the big picture of what’s in MPG © and how information is organized. Program Categories currently include:
- Feeding 9. Dressing
- Fine Motor Prehension and Manipulation 10. Fine Motor Developmental Tasks
- Regulation of Emotions and Behavior 11. Fine Motor Functional Tasks
- Visual Motor 12. Play
- Balance and Locomotion 13. Sensory Discrimination
- Balance and Postural Control 14. Sensory Sensitivity
- Bilateral Coordination and Sequencing 15. Toileting
- Challenging Environments 16. Executive Functions
On the Categories screen you will find the Names of each of the broad skill areas on the left. Under the Description column on the right you will find a list of the Program Templates associated with each category. All of the available programs can be viewed by using the right scroll bar. Every item under the Description column has a customizable program template for creating and tracking treatment goals and objectives.
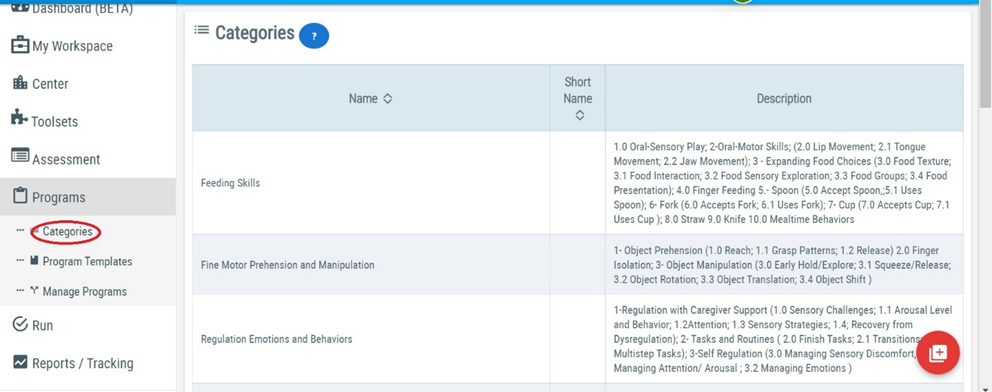
Because as therapists we may differ in how we categorize skills depending on our frame of reference, the Categories page is very useful because it provides you with a quick overview of how programs and objectives are organized within MPG. ©
In brief, the organization of categories and program goals and objectives in MPG © are influenced by theory, models of treatment, standardized tests, developmental checklists, and functional skills. Some goals are addressed in more than one category. So for example various aspects of dressing skills are addressed under the Categories of Dressing, Fine Motor Developmental Goals, and Sensory Sensitivity depending upon how you conceptualize the nature of the child’s difficulties.
As you explore MPG © in greater depth you will recognize how various objectives align with assessment and treatment models you utilize as a therapist. Happily, you will soon learn that this is a highly flexible program with multiple search tools and ways to customize your programs. Although much of this program is informed by my work as an occupational therapist, these goals will be familiar and may be adapted for use by varied professionals who work in child development depending upon your experience and scope of practice
More information on how to customize existing programs or create new ones can be found later in this guide. However, the first step is for you to explore the Program Templates and familiarize yourself with the programs and the many customizable options that are already part of your subscription.
C. Working with Program Templates
MPG © Program Templates are a c ollection of preloaded therapy goals and objectives you can assign to your client for treatment planning and collection of evidence-based quantitative and qualitative data. These program templates can be assigned to your clients in their original form or cloned and customized to suit the needs and requirements of your individual clients and/or therapy practice. There are over 200 program templates and hundreds of objectives included within MPG © .
Becoming familiar with the program templates including goals ( Client Response ) and objectives ( Targets ) associated with them will help you to assign the right programs to your clients. All programs, goals, and targets can be viewed within the Template Catalog by searching in a variety of fields.
You will find Program Templates below the Programs section under the far left drop down menu.
When you open the screen you will note that there is a pull down menu for Category and there is Template Catalog within which all the programs and targets can be searched and viewed in detail.
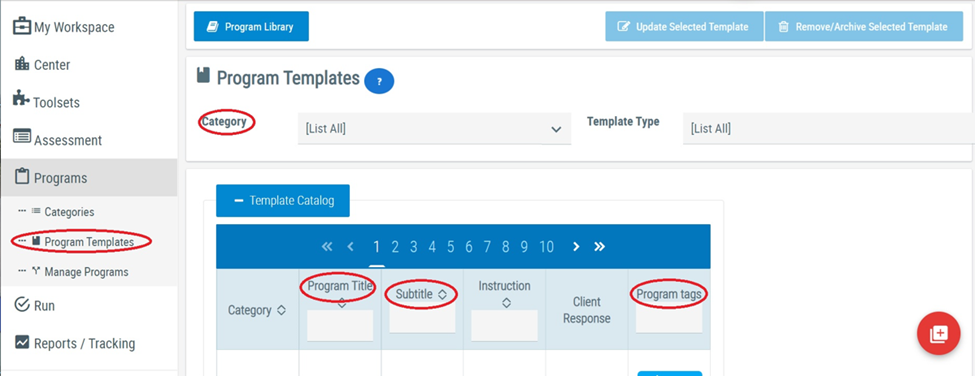
There are many fields you can utilize to search for specific program templates. You can filter using:
- Category
- Program Title or Subtitle
- Program Tags
1. Search By Category
Scroll the Categories (skill domains) available in the drop down menu under Category. Select the one you’d like to preview.
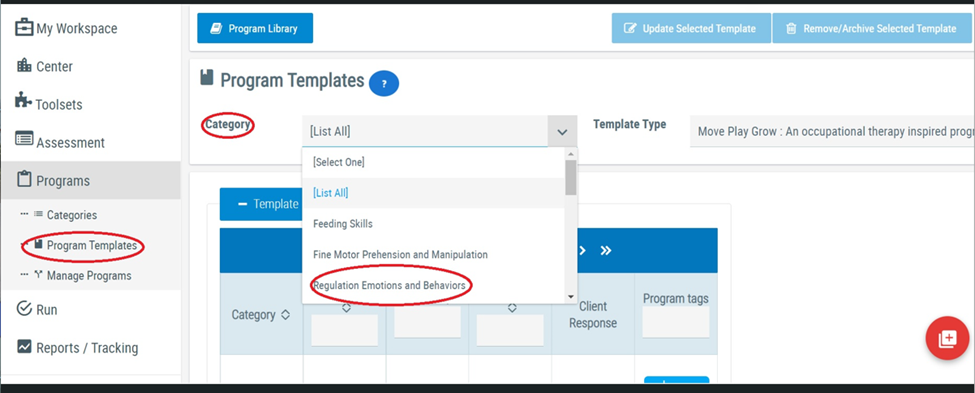
Once you do this, the list of program templates within the category you have selected will become visible below the category box.
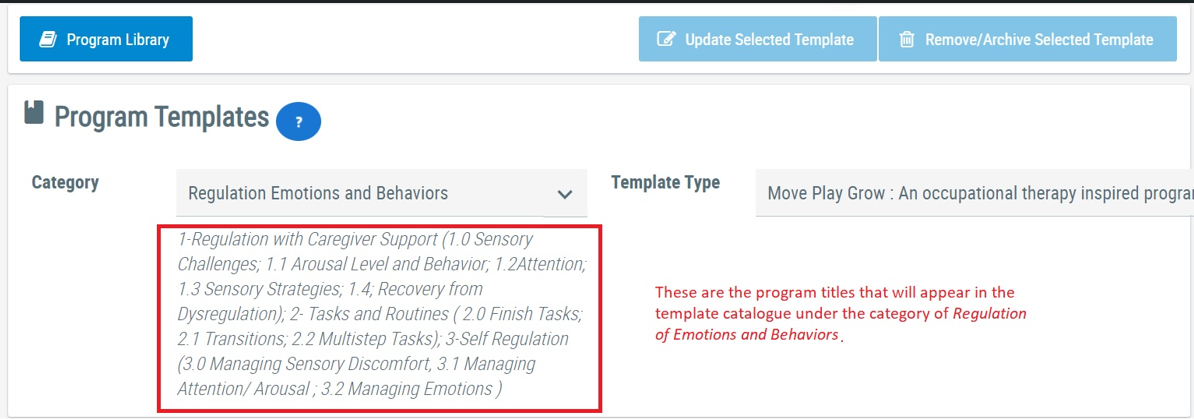
Each of these programs can be viewed in the Template Catalog by scrolling through it. Note: Selecting a Category is the first way you can limit the field of your search. If you do not select a category and remain in “list all”, every program in your subscription can be viewed by scrolling through the template catalog.
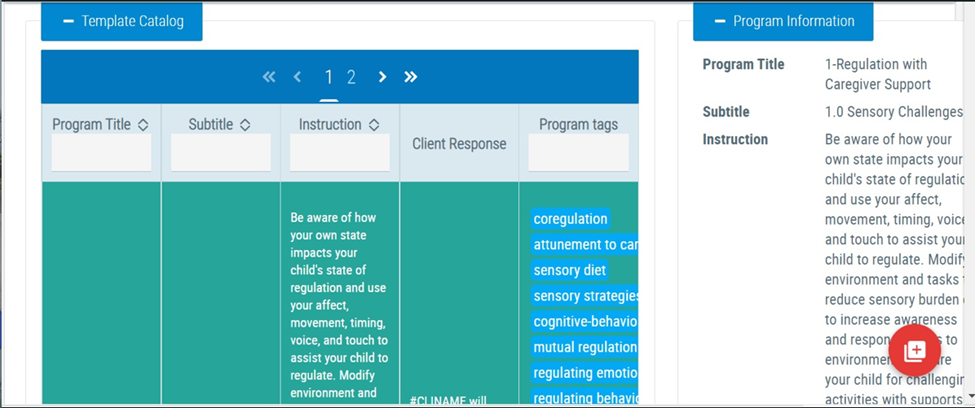
You can scroll through the Template Catalog to view a description of each of the programs and the desired client response. You can also click on any program and explore a more detailed description. When you select a Program in the Template Catalog , the area to the left becomes green and a Program Information window becomes available on the right. Scrolling further will provide you with more information about the program you have selected including instructions, materials, procedures, and a list of all the possible Targets you could assign to your client within this template.
2. Search By Program Title or Subtitle
To narrow your search and reduce scrolling you can search by Program Title or Subtitle by typing them in the corresponding field of the Template Catalog . Remember, P rogram Titles and Subtitles are listed under the c ategory you have selected from the drop down menu.
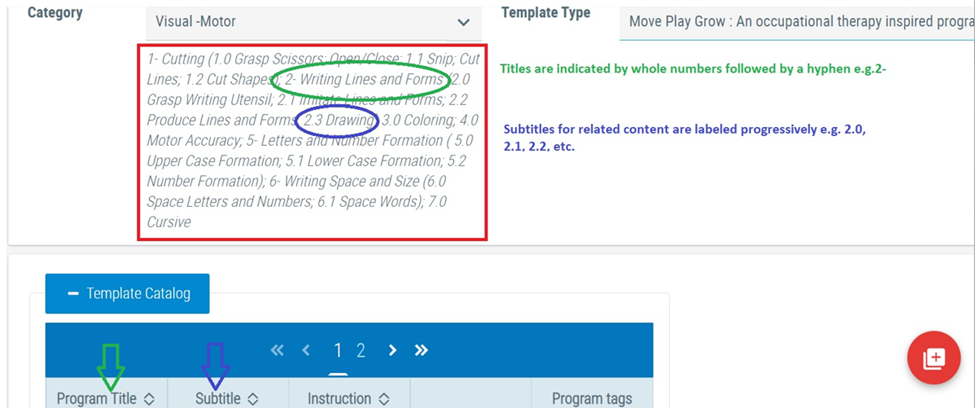
Searching by Program Title will display all the related program template listed as subtitles. In the example above, searching by Writing Lines and Forms will display the program templates for: Grasp Writing Utensil, Imitate Lines and Forms, Produce Lines and Forms, and Drawing. You could scroll all of these and/or select ones to view in depth. However if you search using a subtitle it will only display that template. So for example, if you type Drawing in the subtitle field you will only be able to view that program template. Tip: When searching by title or subtitle it is not necessary to type the numbers in the search field .
3. Search By Program Tags
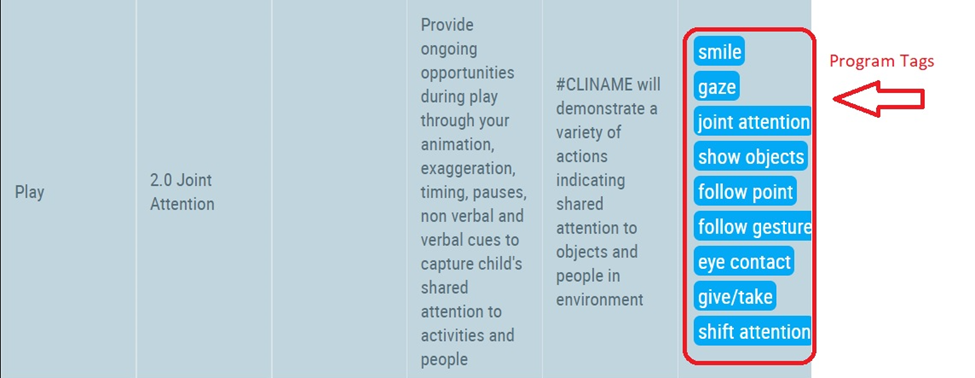
Think of Program Tags like a Google search. This is particularly helpful because as noted earlier, it is possible for related goals to show up in a number of categories depending upon how you conceptualize the problem. For example, if you are looking for goals associated with attention but are unclear what program templates address this you can type the word “attention” into the Program Tags field.
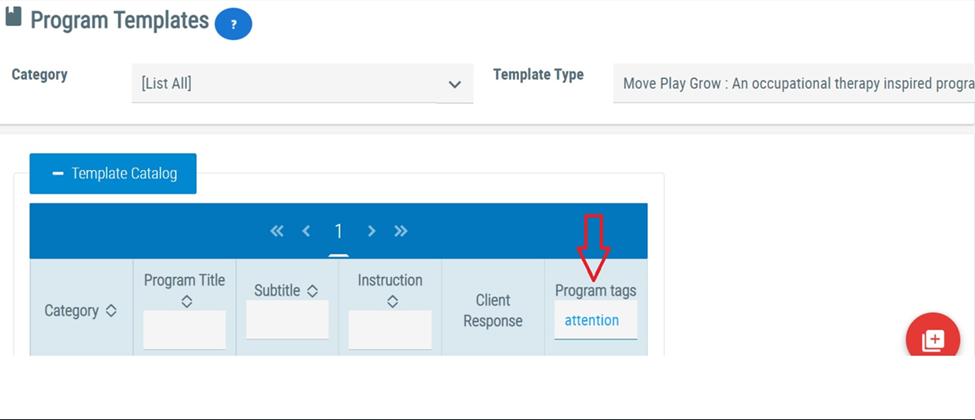
When you type in a tag word such as “ attention ” all the program templates that involve elements of attention will display within the Template Catolog under different categories allowing you to review and refine your selection of programs and goals. For example, below you can see that typing “attention” under Program Tags takes you to the Joint Attention Program Template in the Play category. If you scroll further you will see that other categories and program templates that address attention appear in your Template Catalog.
D. Using MPG © to Assign Programs To Clients
1. Assigning Programs to Individual Clients
STEP 1: Review and Prepare
You will be assigning programs and target goals to clients in the Manage Programs section under the Program drop down menu on the left of your screen. However, when you are first familiarizing yourself with MPG © programs and targets, it may be easier for you to review your options under the Program Templates section using the search methods outlined above. This allows you to see a full description of the targets associated with the program you selected by scrolling through the Program Information screen on the right as we reviewed above. When working in Manage Programs you will not see your target options until you select the program and these will be in an abbreviated form. However you can still exit and search again before assigning a program if you do not see targets that apply to your treatment concerns, or you can customize and add targets as we will review later in this manual. If you decide to prepare by reviewing the program templates, have a paper and pencil ready and make note of the program titles and subtitles that you would like to assign.
STEP 2: Select Client
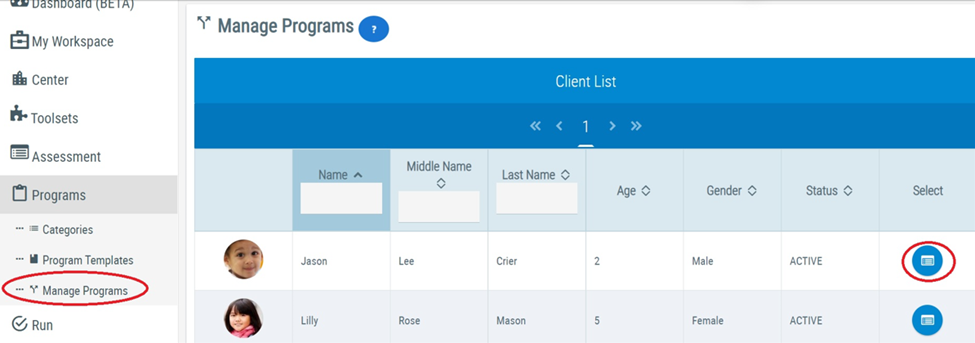
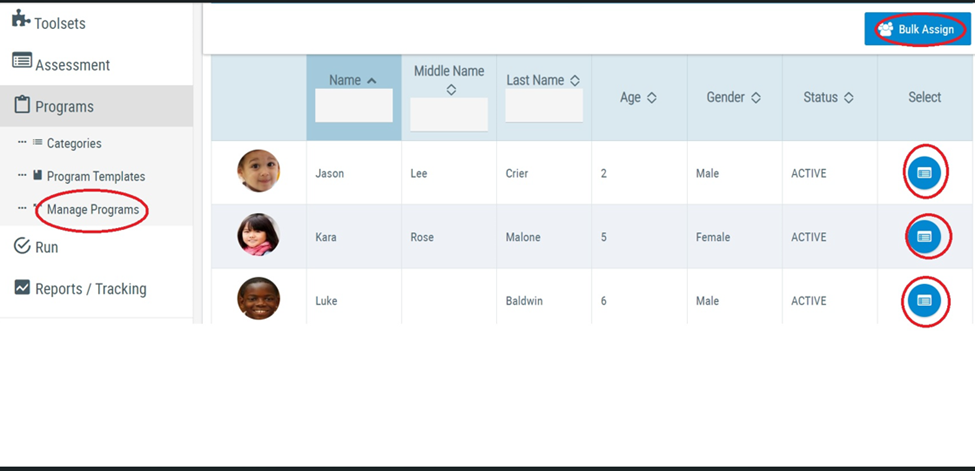
When you have an idea of the programs and goals ( targets) you will be working on for a specific client, go to Manage Programs and select the client for whom you are creating a program by clicking on the blue round icon under the Select column.
STEP 3: Create a New Program List
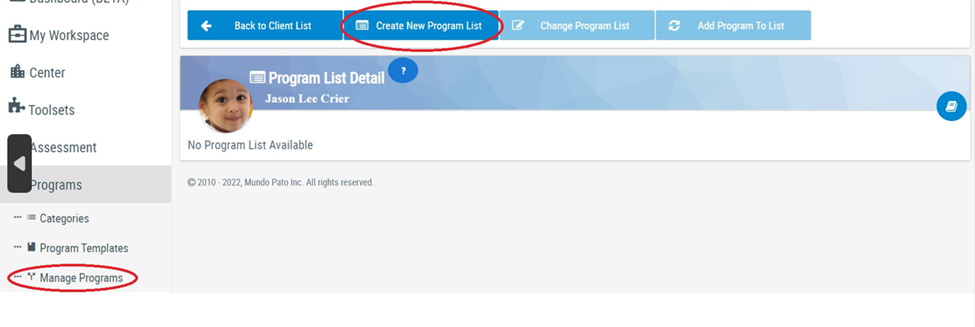
Programs are assigned to clients by creating various program lists. This allows you to be creative and assign sets of goals in various ways, for example by location ( e.g. clinic, home, school, community, group), by types of programs (e.g. fine motor, gross motor) or by time frames (e.g. summer program, school year etc.) More information about this is included in Step 14.
To start this process click Create New Program List .
STEP 4: Select Program
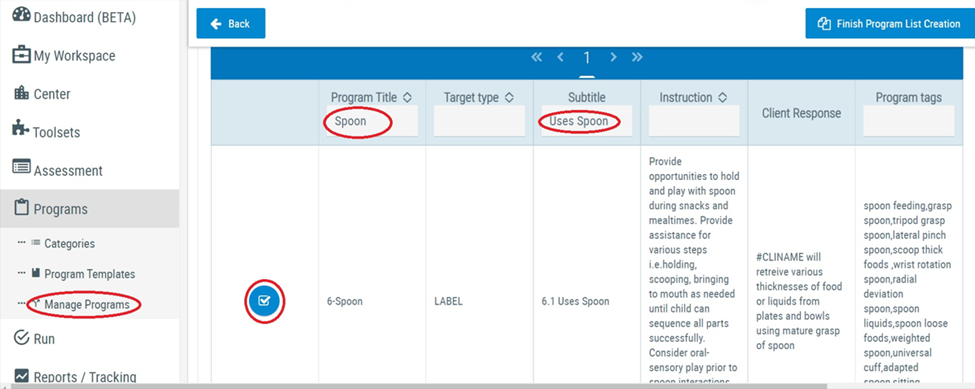
Type in the specific Program Title and/or Subtitle you are looking for in the correct fields at the top of the Template Catalog. If you type only the Program Title, you will be able to view all programs with subtitles associated with this skill. If you type in the subtitle you will see only the template associated with the subtitle. If you are not yet clear what program you are going to select, you can search the by writing in tag words. This process is the same as described on pages 6-8 of working with program templates in the previous section.
Select your program from the Template Catalog by clicking on the blue checkmark button in the left column.
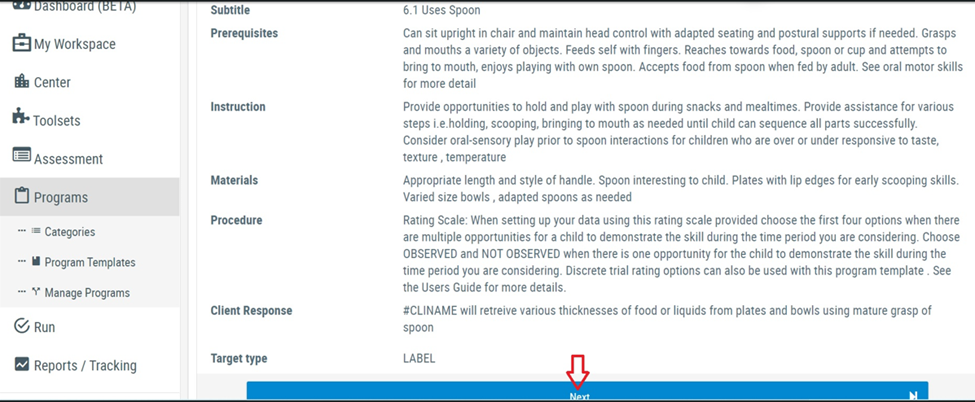
STEP 5: Review Program Details
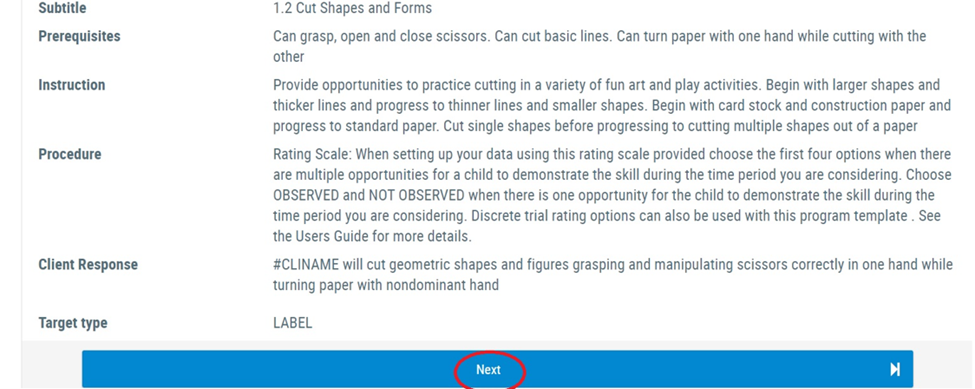
Read the Program Details to ensure this is the correct program to assign to the client. If you are satisfied with your choice, click Next to select this program template. This takes you to the screen for customizing targets.
STEP 6: Select Targets
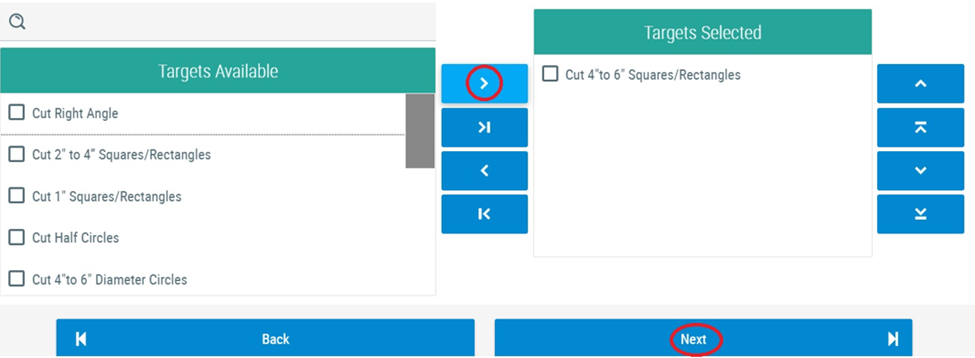
Checkmark the targets you want to assign. Use the middle arrows bar to move them over from the Targets Available box into the Targets Selected box. You can move them back and forth individually by clicking on > and <, or move them as a group by clicking on >I and I<. The order of the targets can be rearranged with the arrows to the far right or simply by clicking and dragging the targets to move them within the Targets Selected window.
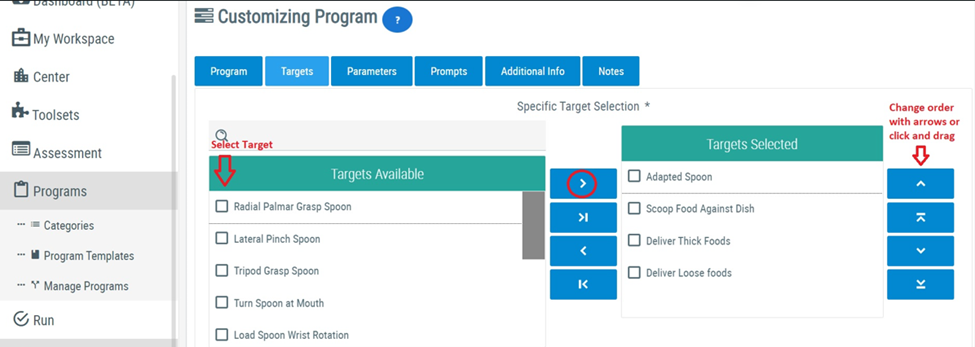
Note: The targets appear in an abbreviated form in the targets available window. To see the complete target description you will need to view them in the Program Template section of MPG © as previously described.
Once you have selected your targets click Next . This will take you to a screen that allows you to choose and customize the type of data you will collect. UnitusTI provides a variety of options for customizing data collection depending upon how you prefer to collect data and whether you prefer to collect data in real time (during sessions) or following the session. Most MPG © programs are preset for a rating scale but can be assigned to other data collection types if preferred. We will begin by exploring rating scales. For other data collection types, please refer to the section Working with Other Data Collection Types later in this manual and/or watch the Video Tutorials in the UnitusTI Help Section
STEP 7: Setting up a Rating Scale
In this section we will discuss how to set up a Rating Scale as this is familiar to most therapists. Here are the Rating Scale definitions used in MPG
©
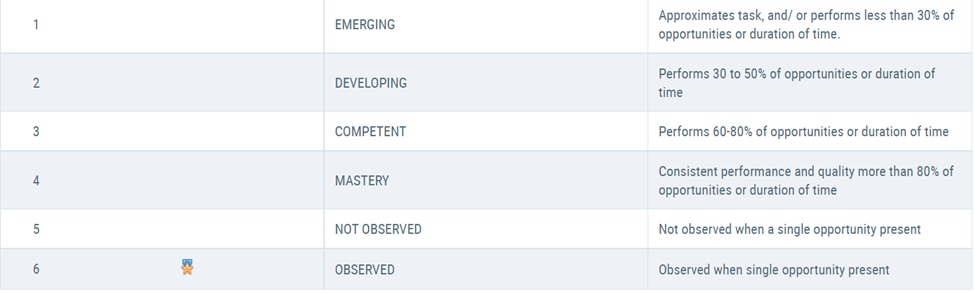
This scale allows you to choose a 4 -point scale from Emerging to Mastery or a two point scale: Not Observed or Observed. For example, if you want to track the percentage of opportunities or duration of time a client demonstrates a skill during a session you could select the 4 point scale: Emerging, Developing, Competent, Mastery. On the other hand if you have only one opportunity to work on a skill each visit, for example putting on a coat for recess, then you could choose the two-point scale and record whether it was Observed or Not Observed . Note: Not observed means that the child did not meet the goal successfully when the opportunity was present. If there was no opportunity then you would simply not enter data on the target objective.
The rating scale is fairly adaptable in terms of specificity. For example, if you are tracking the number of opportunities you have given your client to pick up a pencil correctly, and they do so 6 out of 10 times you could note this as 60 percent of opportunities or Competent for that session. If you estimate that your client paid attention to other children approximately half the time during the session you would note it as Developing. If a parent is tracking a home program and told you that their child sat down to dinner 4 out of 5 opportunities that week ( 80%) then you would rate that as Competent.
Rating scales are familiar to most therapists and make it quick and easy to document after a session is complete. It is important to consider how you will be taking the data and with what frequency so that the information is meaningful and understood by all parties.
To set up a Rating Scale, select it from the drop down menu next to Data Acquisition Type
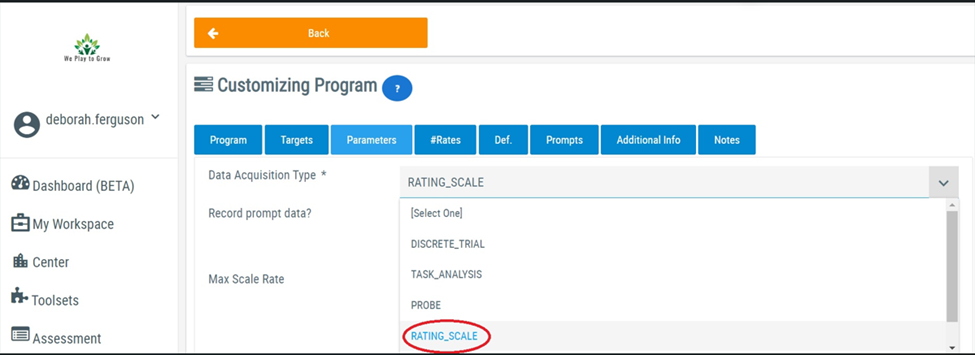
Scroll down your screen to choose your program parameters.
STEP 8: Choose Program Parameters
A) Click and drag the dials to set the Maximum Scale Rate. and the Scale Mastery at “4” if you are planning to use the 4 Point scale or 2 if you are using the 2 point scale (Not Observed/Observed) to track each session.
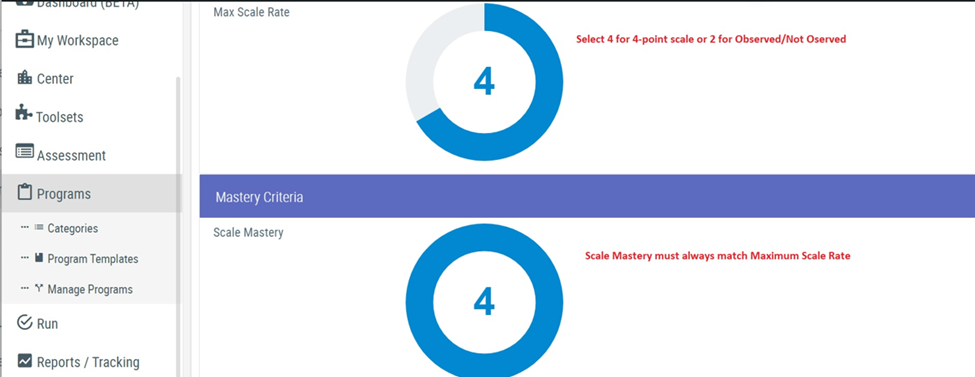
B) Enter in the number of Consecutive Sessions you want your client to meet the target at Mastery level before you consider the program mastered (typically this is 3-5 sessions). It can, however, be any number of consecutive sessions you’d like to track this skill. For example, you may have programs in your practice or center that run a specific number of weeks (ie.16 weeks), and you may want to track data on this skill for the entire 16 weeks, whether or not mastery occurs earlier on. Thus, you would type in the number “16”. You may have skills for which you would like to collect data over a long period of time because of inherent variability, for example emotional regulation targets, so you could set a number that reflects the time period you will be working with a client.
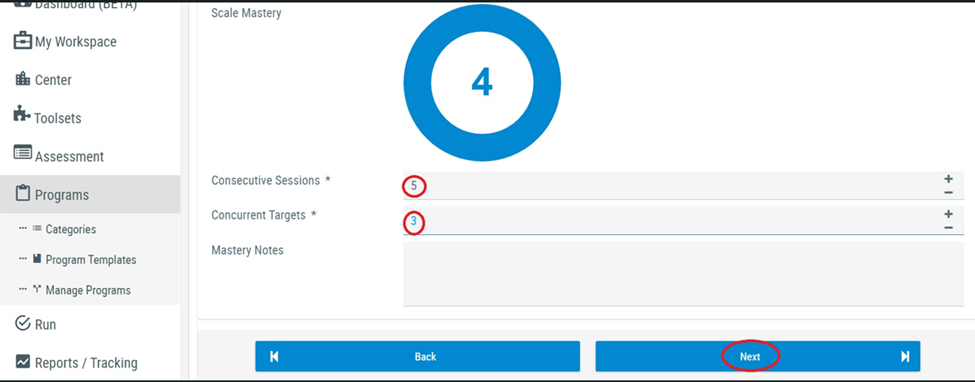
C) Enter in the number of Concurrent Targets you want to work on at a time. If you plan to work on every target each session then type the number corresponding to the number of targets you selected. However, if you have selected targets that have a developmental trajectory, for example the developmental progression of cutting, then you can set concurrent targets to 1 and let UnitusTI progress the targets once mastered for the number of consecutive sessions you identified. This is helpful because you can set up a number of goals when assigning the program, but do not have to rewrite your program once each step is mastered.
Click Next when you have completed these steps.
STEP 9: Select Rates for Rating Scale
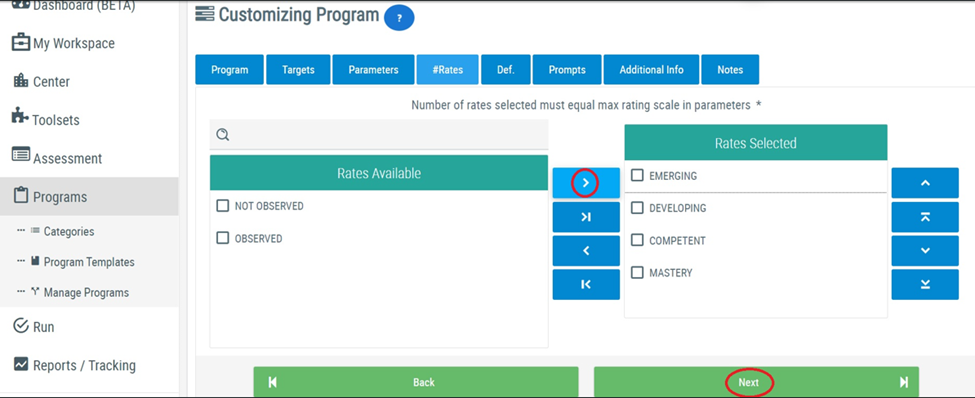
In this step you will choose to implement either a 4 point or 2 point rating scale as reviewed above. Move the rates over from the Rates Available box to the Rates Selected box. Make sure they appear in the correct order in the Rates Selected box. In the screenshot below I have moved the rates associated with the 4 point scale to the right in the Rates Selected column. When using the 4 point scale, select Emerging, Developing, Competent and Mastery and organize them in that order. Leave Not observed and Observed in the left hand column. If you are choosing a 2- point scale move only Not Observed and Observed to the Right in that order. It is important to organize the scales in the correct order as these are associated with sequential numbers in data collection - so 4 ( Mastery) is greater than 2 ( Developing).
STEP 10: Review Rating Scale
Selecting your rates and pressing Next will take you to a screen that describes the rates you have selected. The definitions for the scale rates you have selected will show up when you run the program as a reminder when collecting data. Press Next to continue.
STEP 11: Recording Prompt Data
MPG © gives you the option to record prompt data if you would like to track the cues you provide. There are a variety of prompts available in the pull down menu that you can select and move from the Prompts Available to the Prompts Selected box.
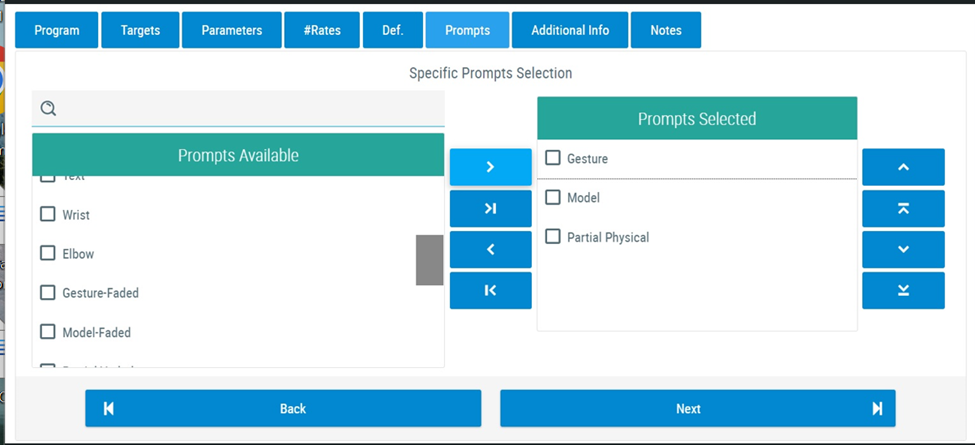
When considering recording prompts within a Rating Scale you have the following options:
- Do not collect prompt data . Press Next to skip prompt selection and continue.
- Record prompts which impact how your client’s performance is rated. If you select prompts and press Next , then a 0 will be added to your rating scale and any time you record a prompt when collecting data, the program will consider that your client has not successfully performed the task and rate it 0. For example if your goal is for your client to remember to hang up their coat without a verbal prompt, then when you record a verbal prompt they have not met the goal and the system records a 0.
- Record prompts for informational purposes . If you simply want to observe whether prompts are decreasing as your client gains skill then you will need to return to the Parameters Screen where you set the criteria for your rating scale. Press the blue Back button until you return to the correct screen. Turn on the Record Prompt Data button. This allows you to collect prompts without impacting your rating scale. When you create a report, the graphs will record prompts separately from your targets and you can observe whether prompts are decreasing as your client gains skills.
Note: Every prompt you select will be displayed in its own line in the graph generated by the program. It is helpful to keep it simple and not select so many that your graph becomes difficult to read !
Below is a shot of the Parameters screen where you will see the record prompt data button :
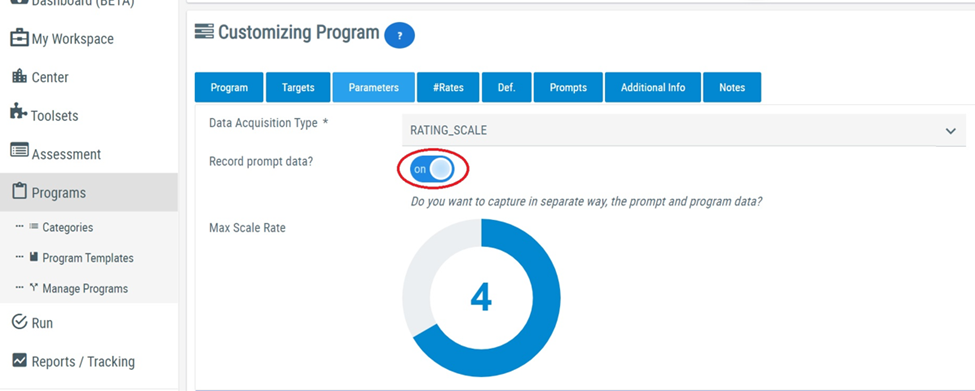
Once you are familiar with your data collection options you can make the decision about whether to record prompts and how you wish to note them when setting up your rating scale and not have to toggle back through your screens.
When you have completed setting up your prompts, or are ready to move forward without prompts press the Next button on the Prompt Selection page to move forward.
STEP 12: Recording Optional Information
UnitusTI provides you with many different options for collecting and storing information. This field opens up windows with fields for extensive narrative information that may be useful to include in the program for those implementing it.
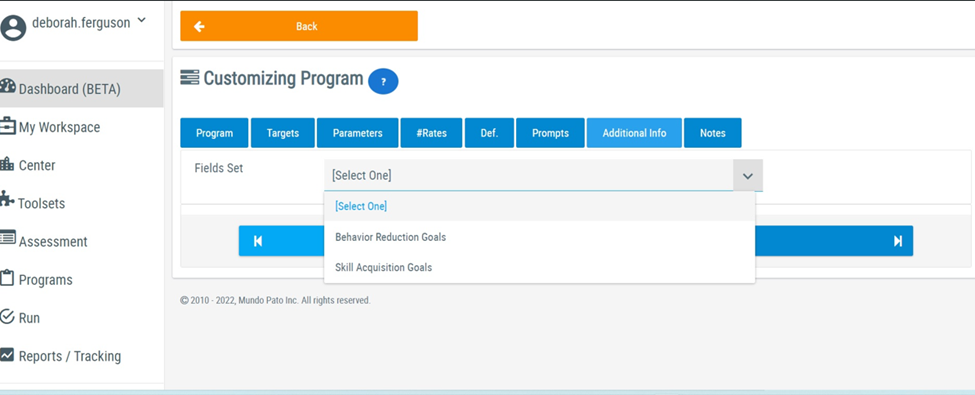
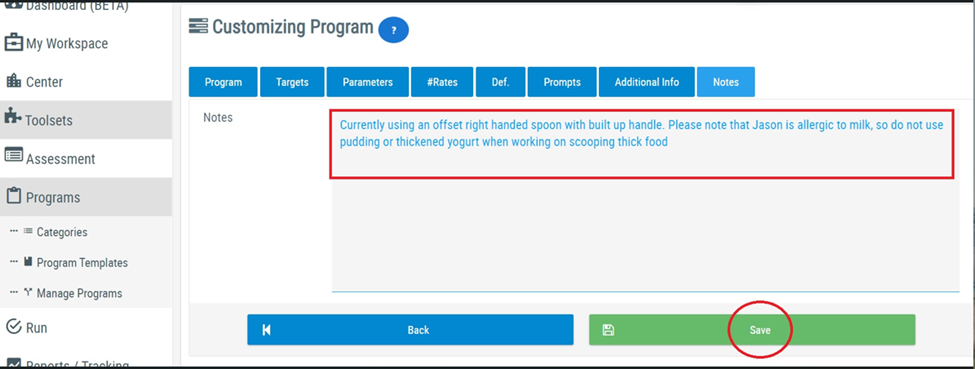
For example the Notes window can be used to provide individualized information about the interventions used to target the goal, special considerations for materials, client preferences, treatment sequence or other individualized information that is helpful for yourself or others conducting the program to know. You can also leave this area blank if you feel there is enough information in the program template, or you are the one providing therapy and do not need additional Information. Keep in mind these are not treatment notes - these are notes to yourself or other interventionists that guide intervention. Here is an example:
STEP 13: Finish Program List Creation
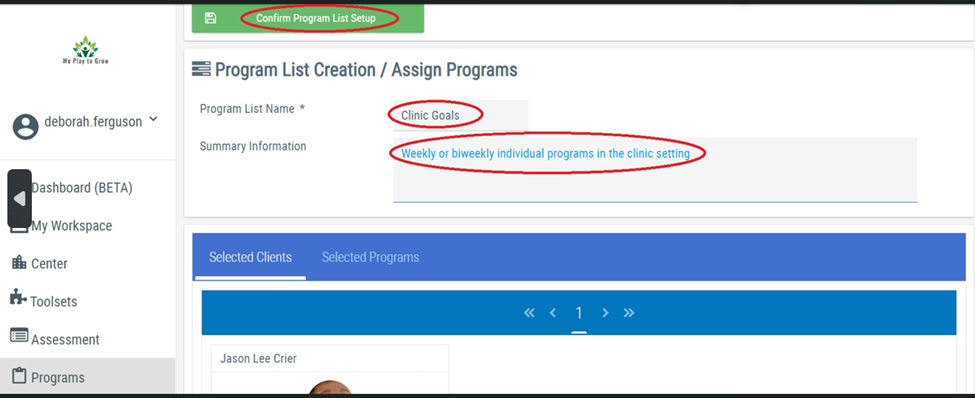
Since this is the first program/ goal you are adding to a client’s program list, you will need to complete the list set up before adding additional programs. First, click the Finish Program List Creation button:
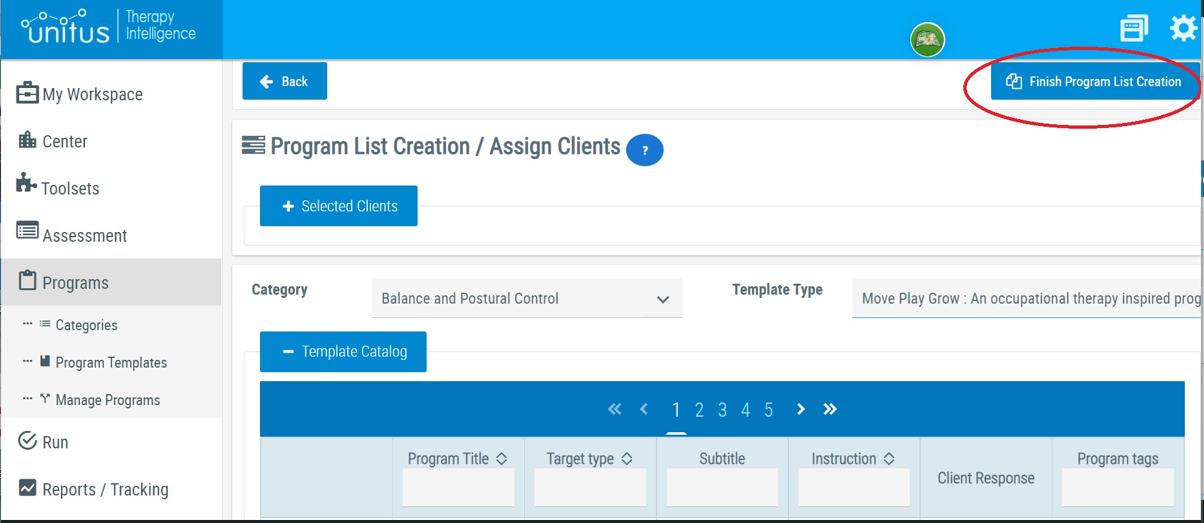
Decide on a consistent name protocol for your program lists, across all clients. For example by location (clinic, home, school, etc.); by skill type (fine motor, gross motor,etc); by intervention (speech, OT, PT etc.); by time frames (summer program, IEP quarters, etc.) click on Confirm Program List Setup .
STEP 14: Add Additional Programs and/or Program Lists
Now you are ready to add another program to the client’s list. Click Add Program to List and repeat the process . Typically therapists add anywhere from 3 to 5 goals per client.
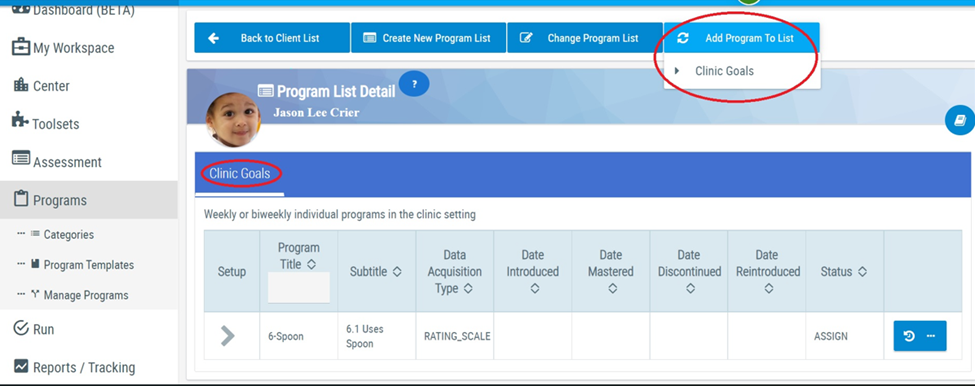
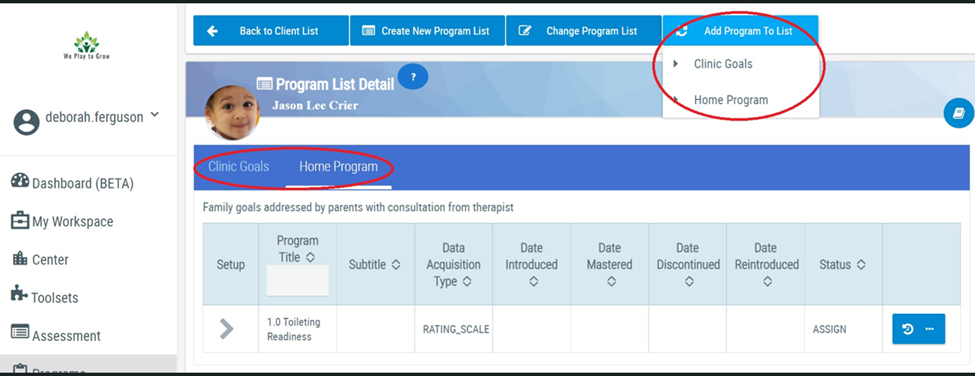
If you wish to create more than one program list for programs conducted in different locations, or with different skill sets, therapists, or time frames for example, return to the Create New Programs List and go through the same steps to add additional programs. When you have more than one list, you will see your lists displayed across the blue tab, and listed in the pull down menu beneath Add Programs to List .
2. Assigning Programs to Groups of Clients
You can assign the same program to more than one client by selecting Bulk Assign and completing the steps outlined above . This is helpful for example if you are running a group in which your clients are working on the same goal, or if you happen to be setting up the same programs for more than one client.
STEP 1: Bulk Assign
Click on Bulk Assign and select the clients to which you wish to assign a program.
STEP 2: Select Clients
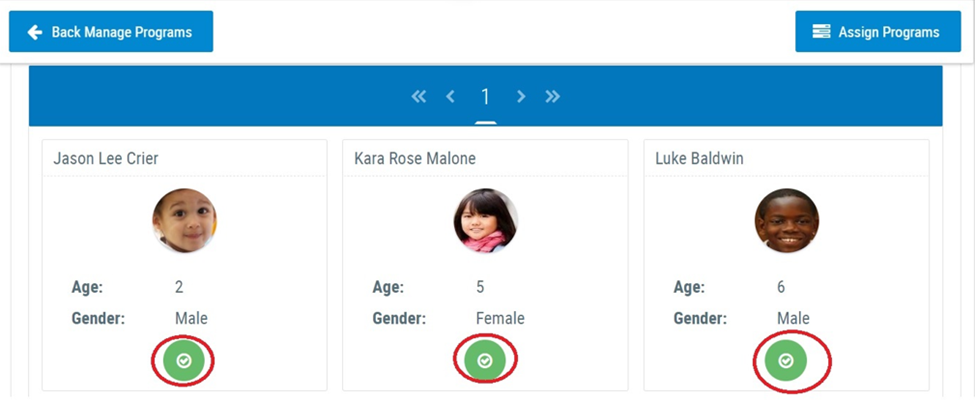
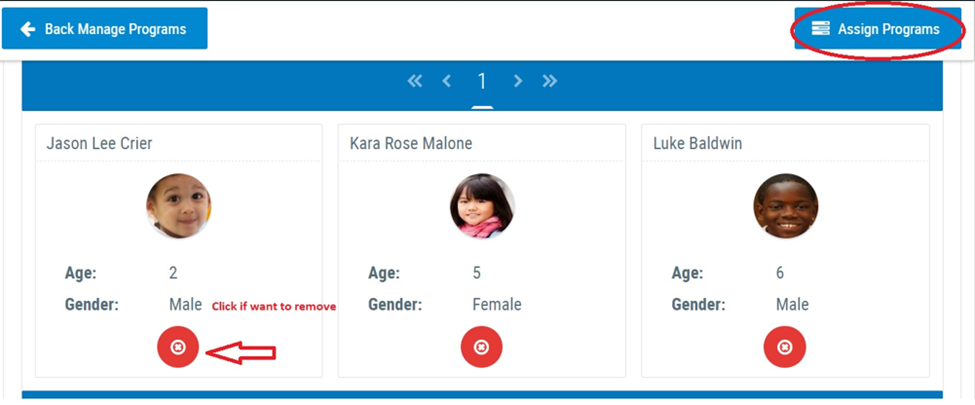
Click on the green buttons for the clients you wish to assign programs. Scroll down the window and you will see the clients you selected now have red buttons. If you wish to remove any one from the list click on the red button below their picture. When you are done click on Assign Programs.
STEP 3: Assign Programs
Select and set up the programs in the same manner as you do for individual clients. Once you have completed assigning the first program click on Finish List Creation.
STEP 4: Confirm Program List Set Up
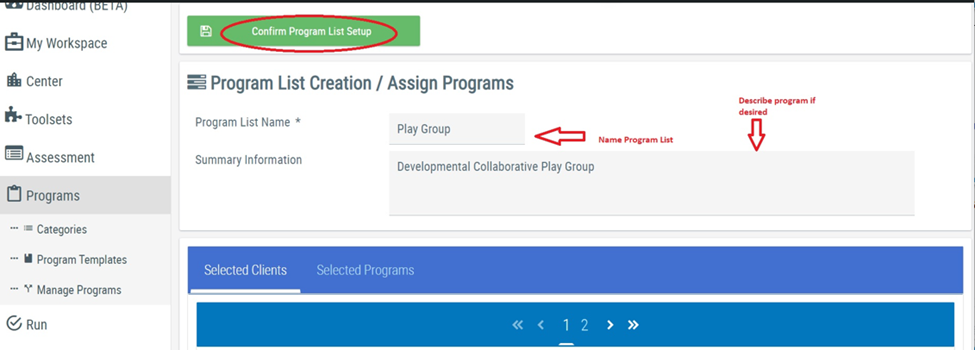
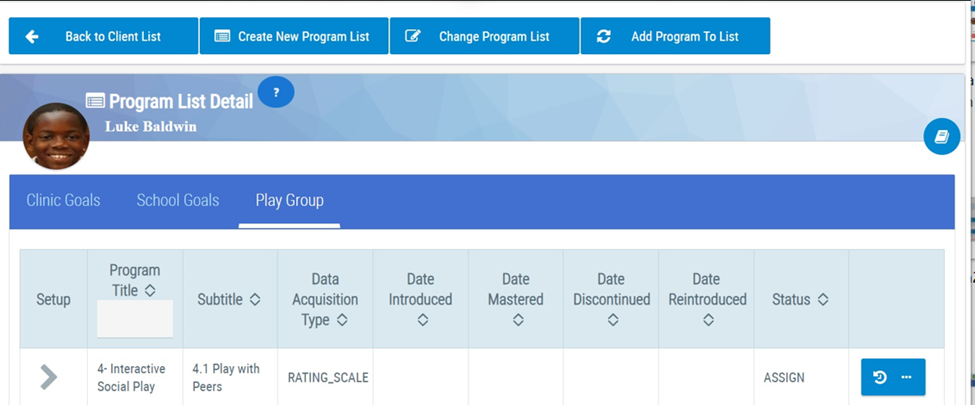
The programs you have assigned will now appear in your client’s lists when you are ready to run the program and record data.
E. Using MPG © to Document Client Sessions
-
Recording Data
STEP 1: Select Program List
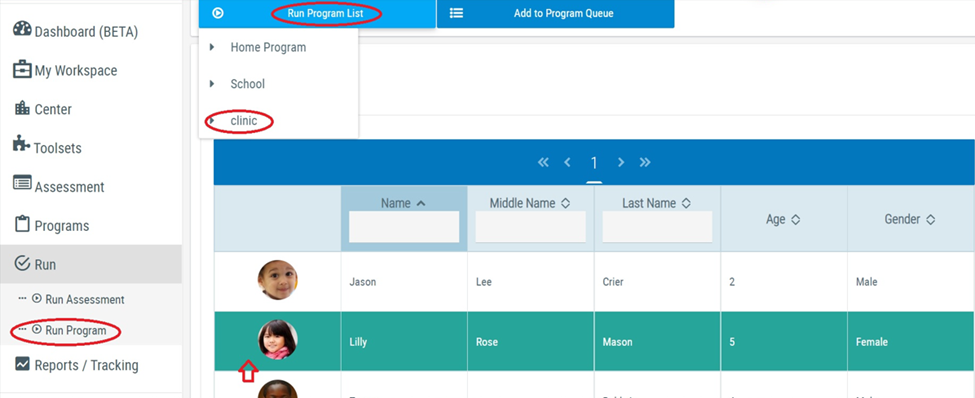
You can document sessions after you complete them, or during a session as needed, for example if you are running discrete trial or timed programs. To document your session:
- Click Run on the far left menu
- Click Run Program
- Click on the client. The row will turn green to indicate the client selected
- Click Run Program List and select the Program list you are working with. You can select more than one program to work with at a time by clicking on Add to the Program Queue.
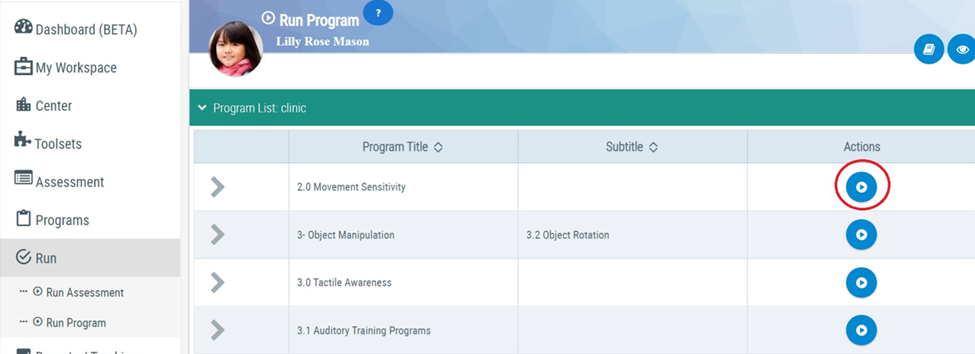
STEP 2: Select Program to Run
Click the arrow button in the Actions column of the goal. This will take you to Run this Program window:
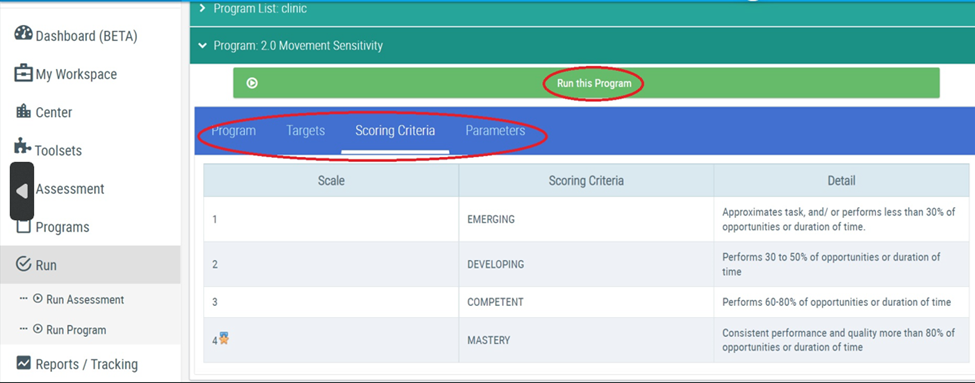
STEP 3: Review Program Details
Before running this program you can review the Detail , Parameters , Targets , Scoring Criteria if needed by clicking on each tab.
STEP 4: Confirm or Set Date
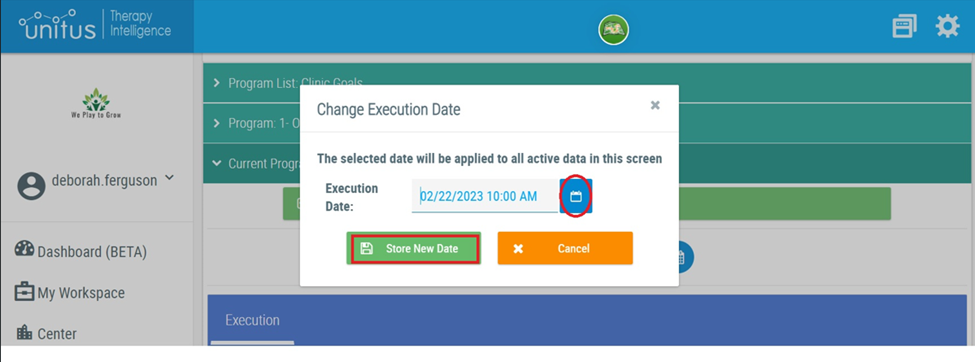
Confirm the Date. Unitus will display the current date on the calendar. You have the option to reset the date to record a previous day’s session if you are not recording at the time of service. However, you will not be able to set a date prior to the last session that data was recorded. To change the date, click on the calendar.
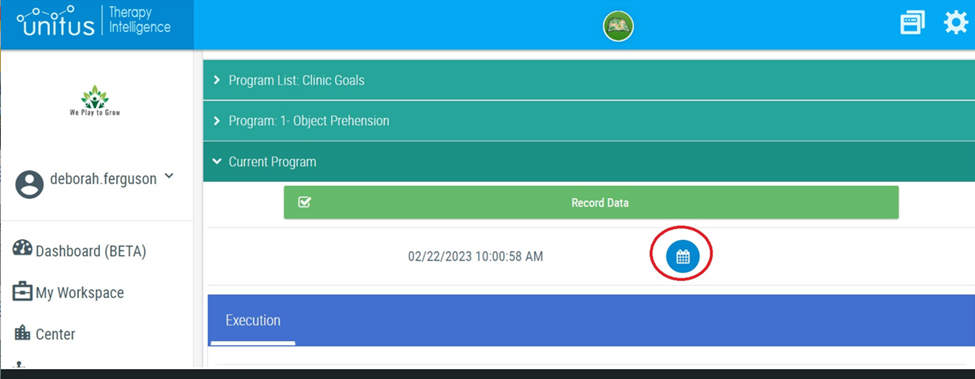
Enter the date in the calendar then store the new date. When you record your data it will be stored to the new date you entered.
STEP 5: Enter Data
To record data for a rating scale, click the number of stars that correlate to the Rating Scale Scoring Criteria.
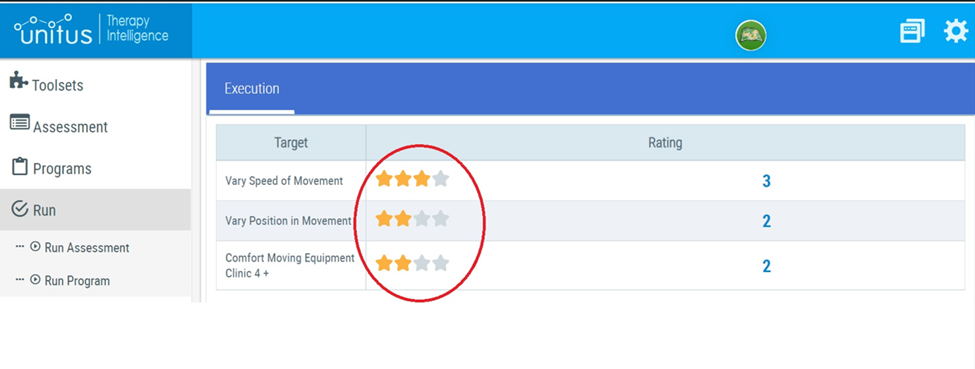
In this example the client was comfortable playing on only two of the three types of movement equipment offered and declined to try new equipment( Developing). On familiar equipment with which she was comfortable she was willing to vary the speed of movement 60% or more of the times she was invited to do so (Competency). However she was willing to vary her position on the equipment only 3 of the 5 opportunities presented (Developing).
STEP 6: Enter Comments
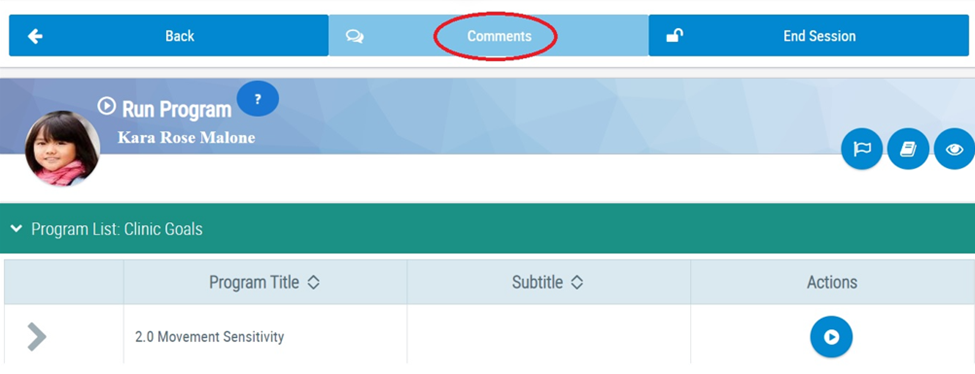
If you’d like to round out your quantitative data with qualitative statements, you can add a comment specific to the target. When generating a report, you can choose to include or exclude comments. Click Comments at the top:
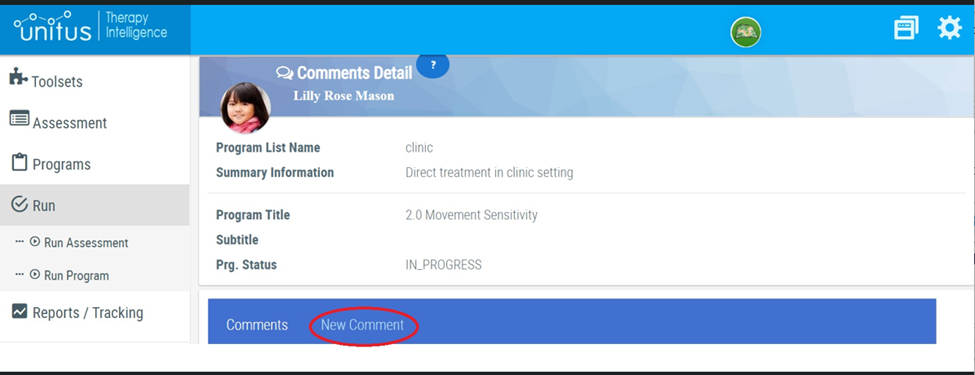
Then click New Comment:
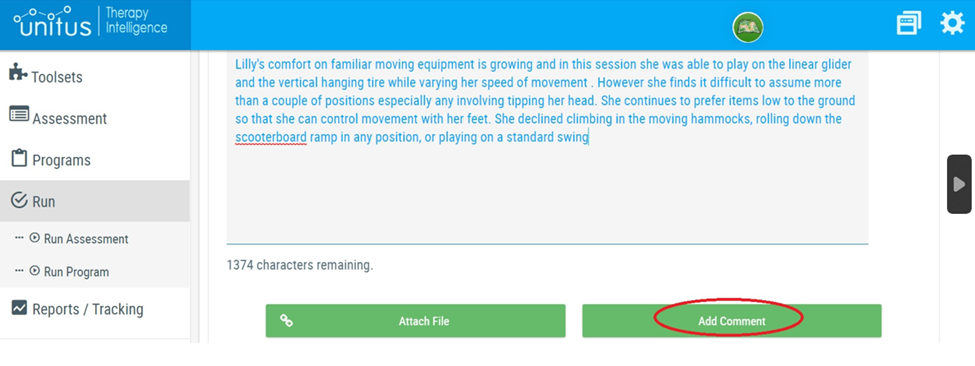
Write your narrative comments in the box, then click Add Comment:
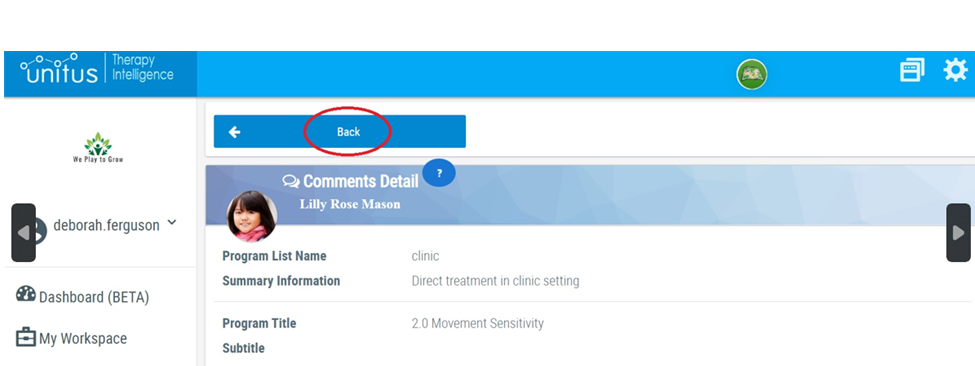
Click the Back button at the top left to proceed to next step
STEP 7: Record Data
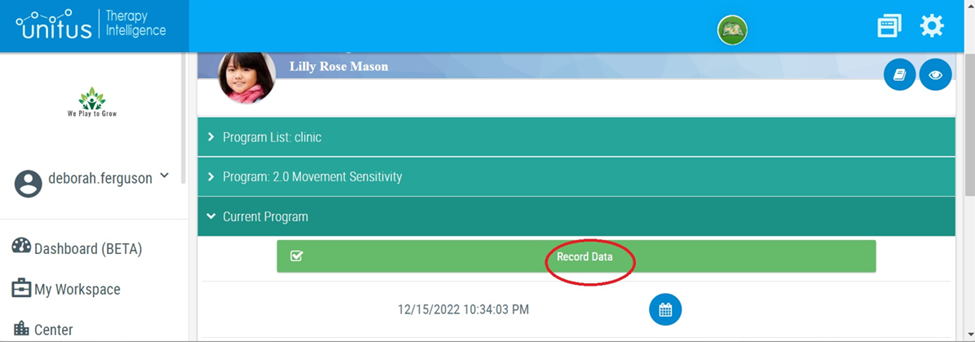
Click Record Data . Your rating scale information and your comments will be stored in the system. Repeat this process for every program (goal) that you addressed during the session.
2. Working with Multiple Programs Lists/Clients
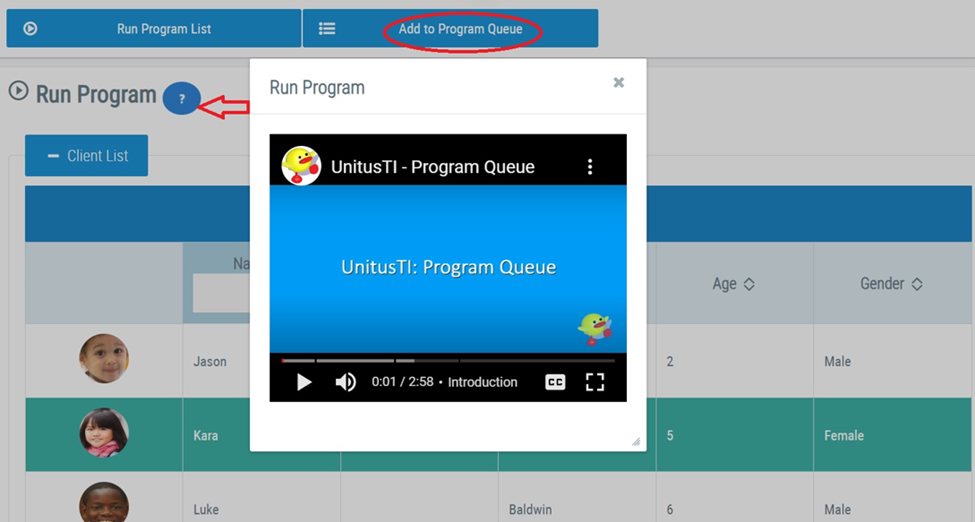
When taking data it is possible to load more than one program list and/or more than once client using the Add to Program Queue function. For details on how to do this, refer to the video by clicking on the question mark next to Run Program or viewing the video within the UnitusTI Training Video section.
3. Creating Session Notes
Within MPG © you can store your daily sessions as data with or without comments as noted above. All of the data from your sessions can be recorded and exported or printed in your report. You can also choose to create session notes for any session for which you would like to provide additional data. These can be downloaded and printed individually if needed. These choices will depend on your preferences for recording and providing information to providers and third party billers. Once you are familiar with the many options within MPG © you will be equipped to customize your documentation to meet your program needs.
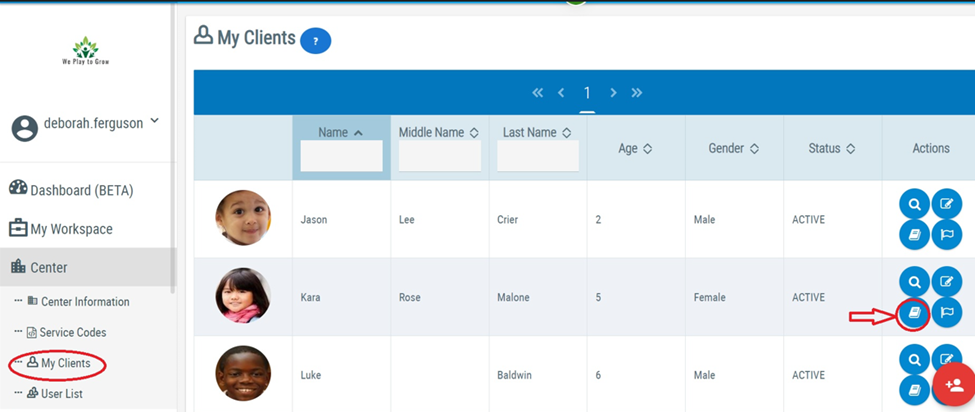
You can view and create session notes from two different locations: (a) You can create them within My Clients under the Center drop down menu or (b) You can create them from within your Run Programs screen.
(a) Creating a Session Note in My Clients
To create session notes within My Clients click on the session icon that looks like a notebook.
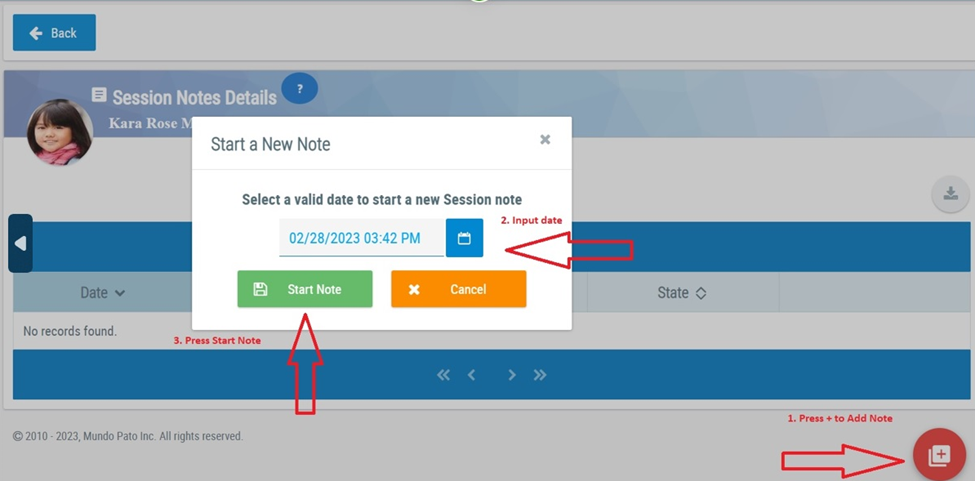
This will take you to a screen with a dated list of all session notes and allow you to add new notes. Press the red plus button at the bottom right of your screen to add a session note. Enter a date for your session and press start note.
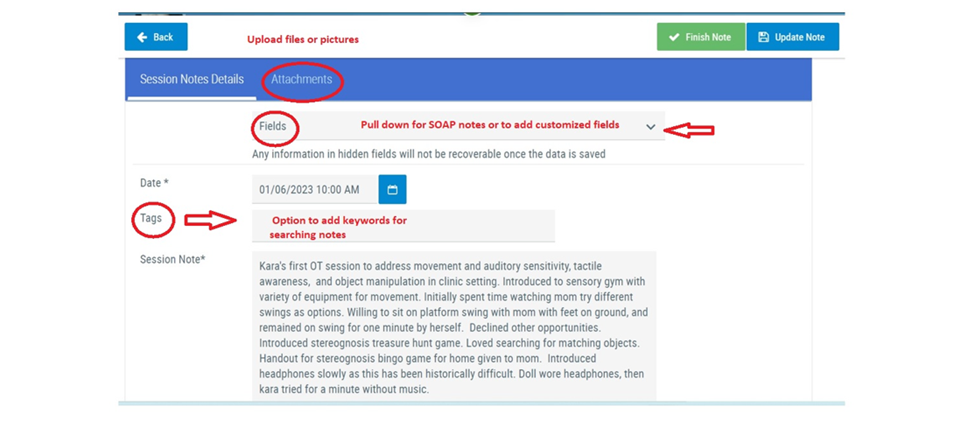
You have a number of options for Session Notes. You can write a simple note in the Session Note field provided. You can create a soap note or add other Fields such as location, service code, etc. from the drop down menu. You can add a tag, if something occurs during the session that you may want to search for at a later date. You can also upload files or pictures you may wish to associate with the session - for example a picture of a sample of a child’s work.
Once your note is complete, sign it and press Finish Note. At this stage you will not be able to make changes to your note.
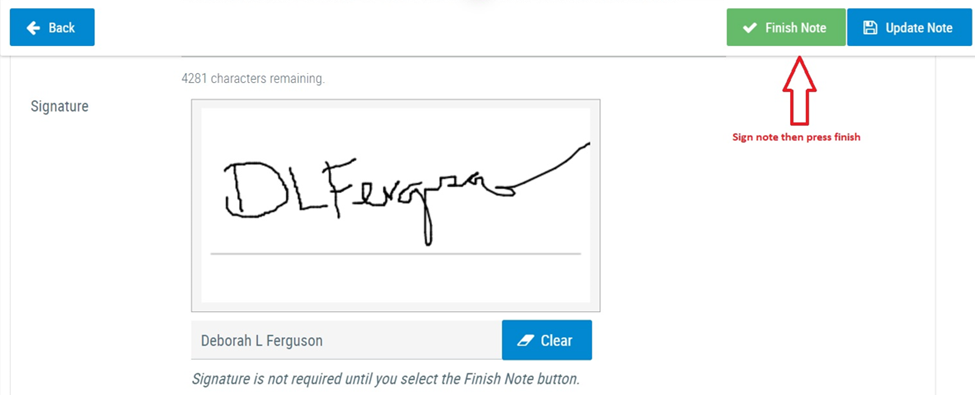
If your note is not complete and/or you would like the option of editing at a later time you can save it without signing it by pressing Update Note.

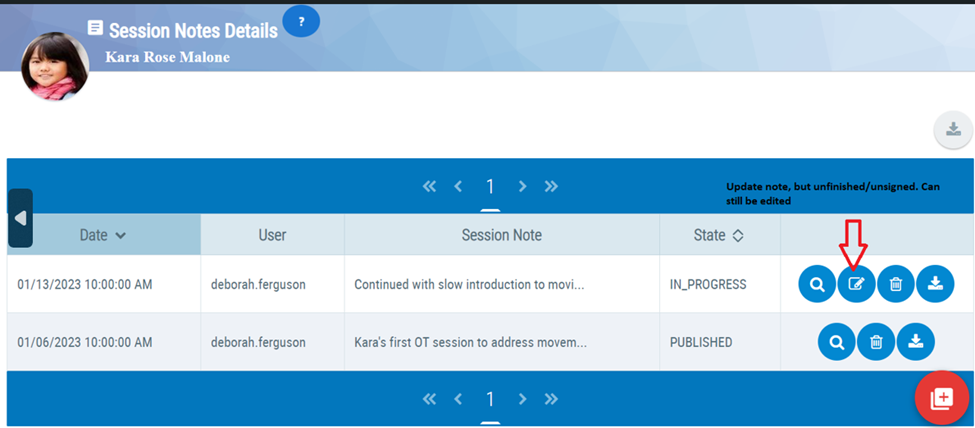
Your note will be stored as In Progress rather than Published . Under the list of session notes an edit icon will be available until you have signed and finished your note.
(b) Creating a Session Note in Run Programs
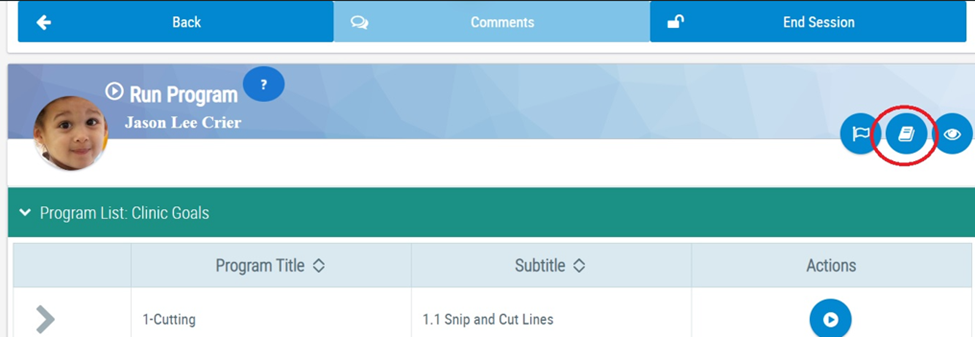
To create session notes from within Run Programs click on the icon that looks like a notebook and go through the same process as you did above.
4. Downloading Session Notes
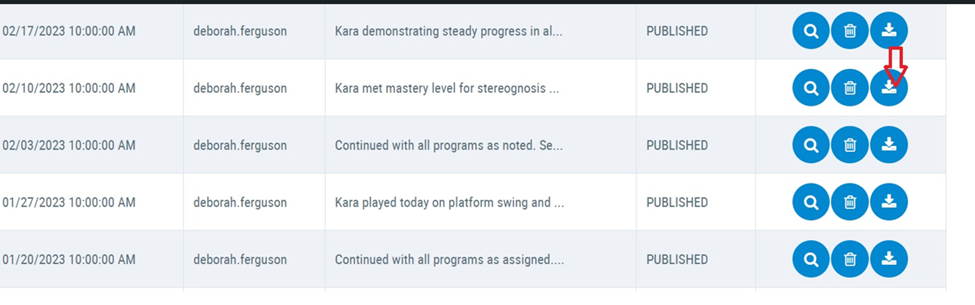
Select and print notes from your list by clicking on the download icon.
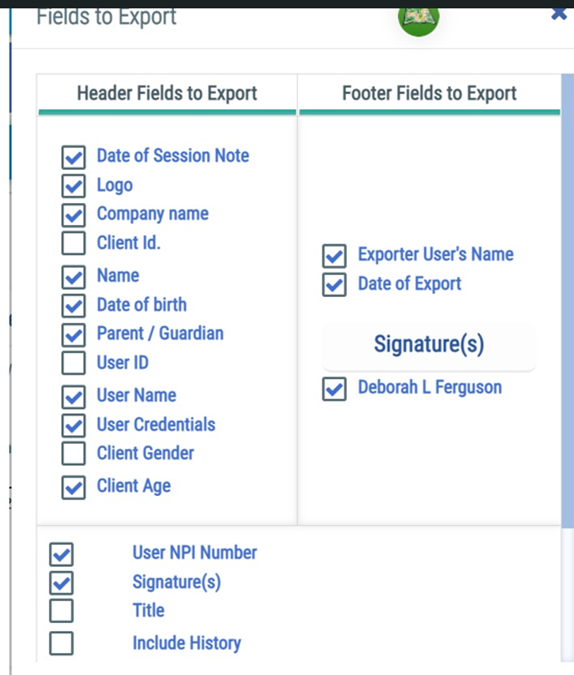
Select the fields you would like to export into your session and print your note with customized information.
F. Creating Reports with MPG ©
What makes MPG © most exceptional is your ability to quickly create detailed, customized reports that summarize your client’s progress on individual goals over the course of any time period you choose. Because the report is detailed, flexible and complete you may not find it necessary to keep lengthy session notes on your clients. It is helpful to thoroughly understand the reporting requirements of any third party payors for which you seek reimbursement when setting up your reporting system. To create and print a report follow these steps:
STEP 1: Select Client
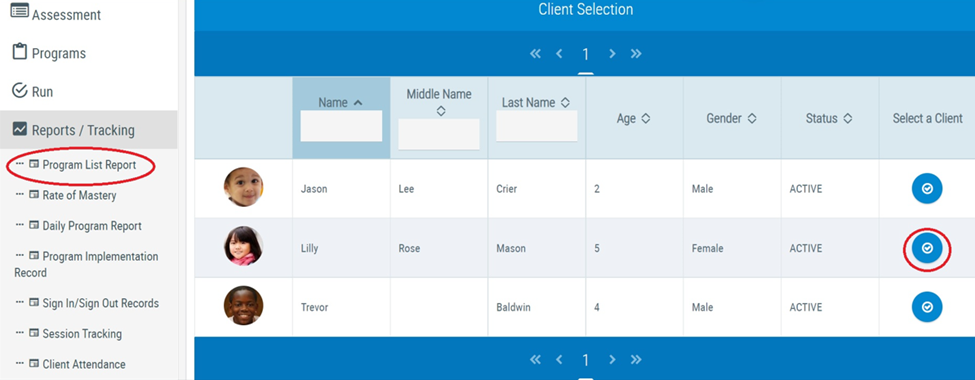
Click Reports/Tracking on the far left menu, click Program List Report , then click the Select a Client button of the client:
STEP 2: Generate Graphs
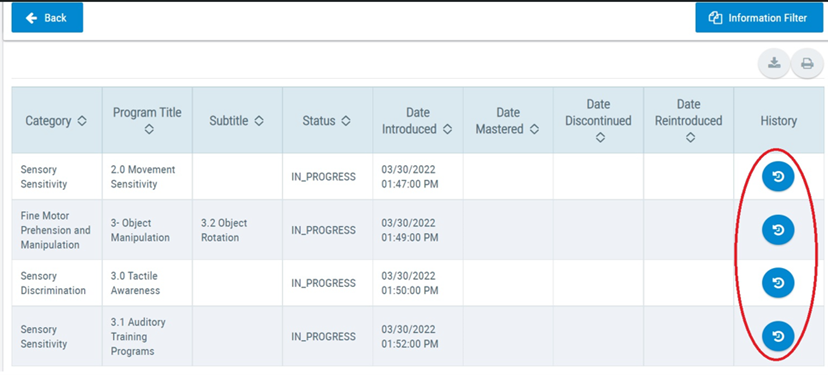
Your first step is to generate your graphs for each of the goals you have been working on with your client so that they can be included in your report . For each goal, click the History button:
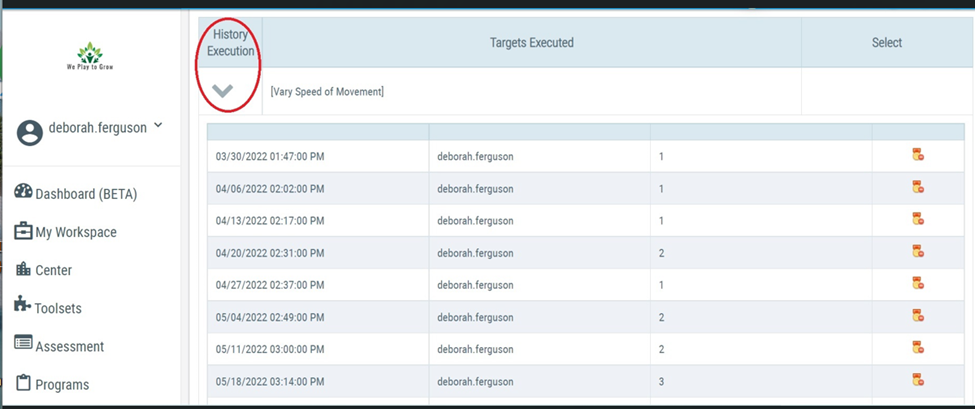
Click the arrow underneath the History Execution button to expand and see all the raw data points you have entered for each session:
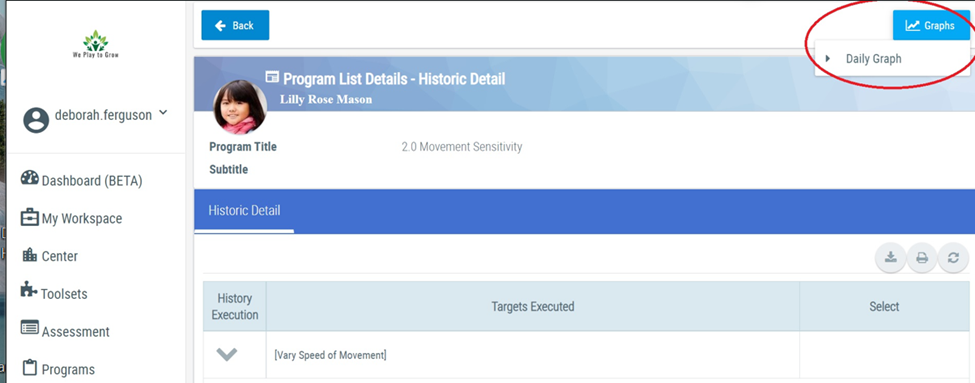
To generate the graph, click the Graph button at the top right, and then Daily Graph :
Below is a graph of the three targets recorded under the Movement Sensitivity Program for our demo client Lilly. These targets are noted in color. The data shows the client progressing towards the goals. Since these goals are interrelated, it can be seen that when new equipment is tried, the client temporarily loses ground in the ability to tolerate changes in position and comfort on equipment.
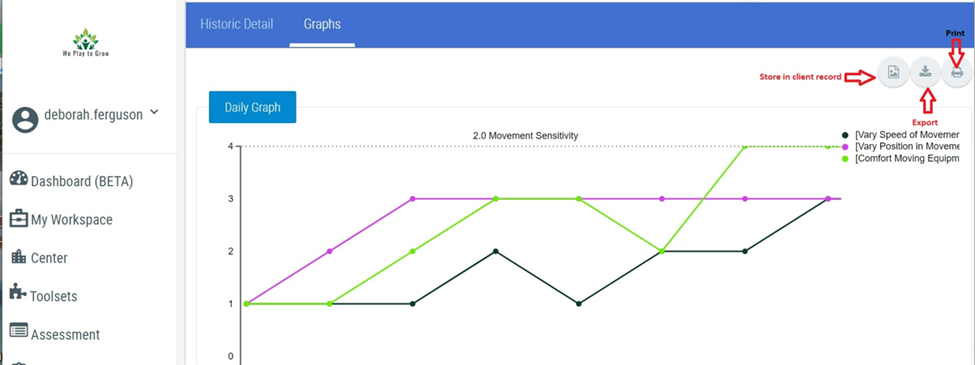
With the 3 gray buttons, you have 3 functions you can execute with this graph:
A) Store to client records
B) Export (to add to your own clinical report template)
C) Print
STEP 3: Preparing Graphs for Reports
To include a graph in the UnitusTI generated Program List Report , click the first gray button “ Store to Client Records ”. This is where you will add an interpretation of the graph/ summary of the client’s progress on this particular goal. Leave the File Name as is, type in the goal name into the Graph Title field, and add your summary in the Graph Description field. Click the green Save button:
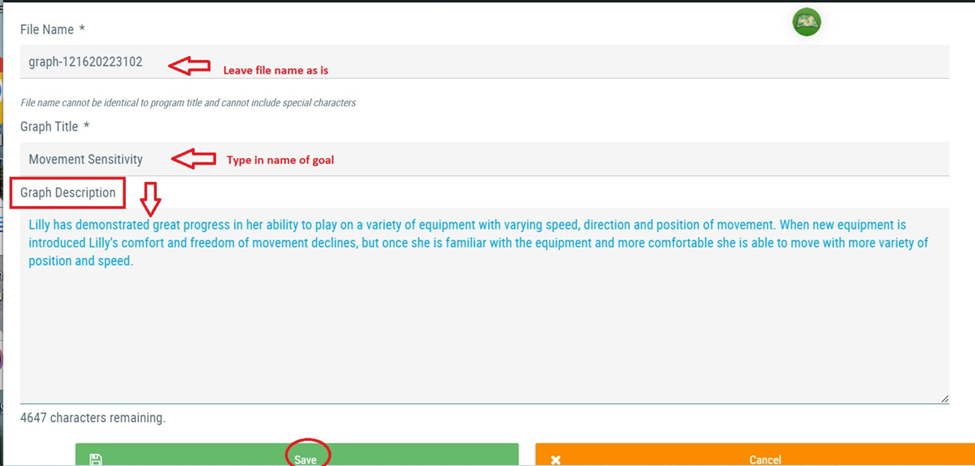
Repeat this process for each goal!
STEP 4: Filtering Information to Include in Reports
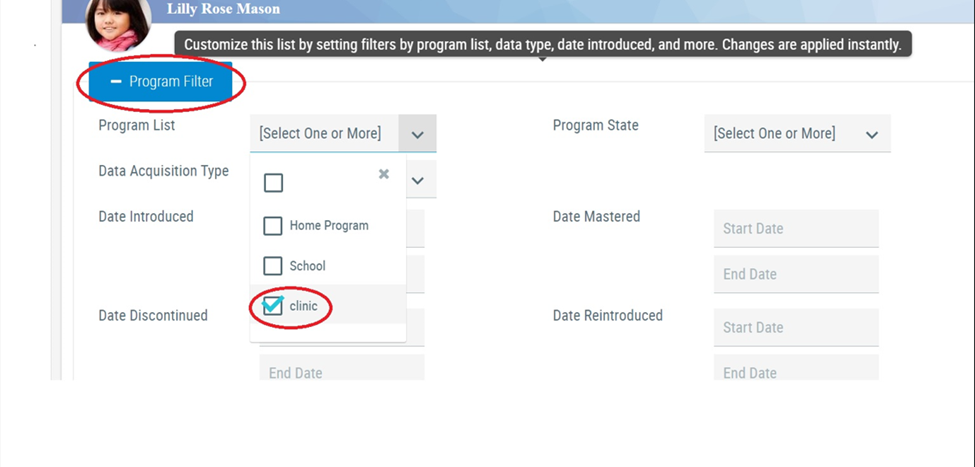
Program Filter: If this is a client you have been servicing for a while you can create a customized report by clicking on Program Filter and choosing from a variety of options, for example, you can filter by program list, programs in progress, date range, programs mastered, etc. In the examples below I have selected the clinic program list.
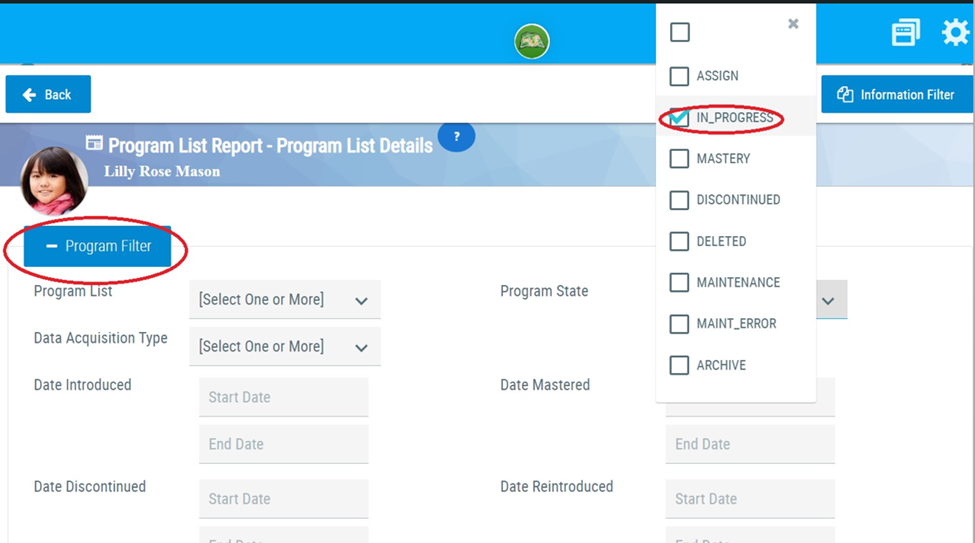
In this example, under the drop down menu for program state I have selected to report only programs that are currently in progress.
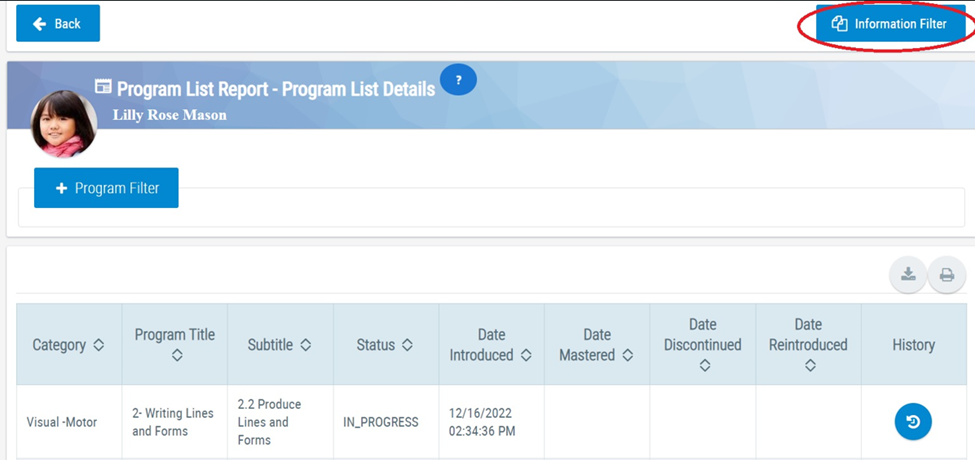
Information Filter : After you have selected the programs you wish to include in your report via the Program Filter, your next step is to visit the Information Filter and select the elements you would like to include in report.
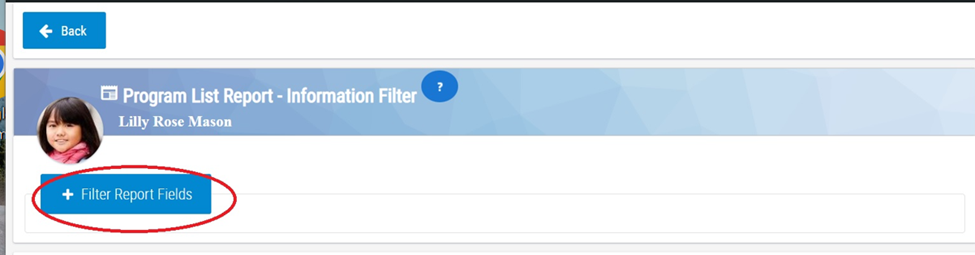
Select Filter Report Fields
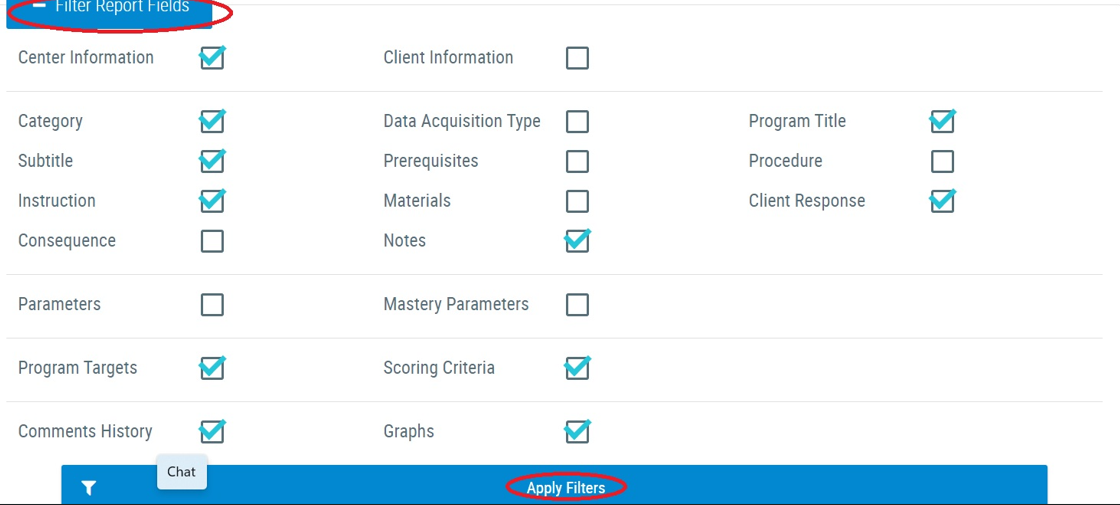
Choose what you want the viewer to see in your report . UnitusTI allows you to create reports that filter the information you are providing according to what is necessary and/or helpful to those for whom you are creating the report. You have the option to include or exclude items such as prerequisites, procedures, materials, instructions etc. while including center information, client information, scoring criteria, notes, graphs, and other items that help you to convey client progress. Select the information you wish to include. Click Apply Filters.
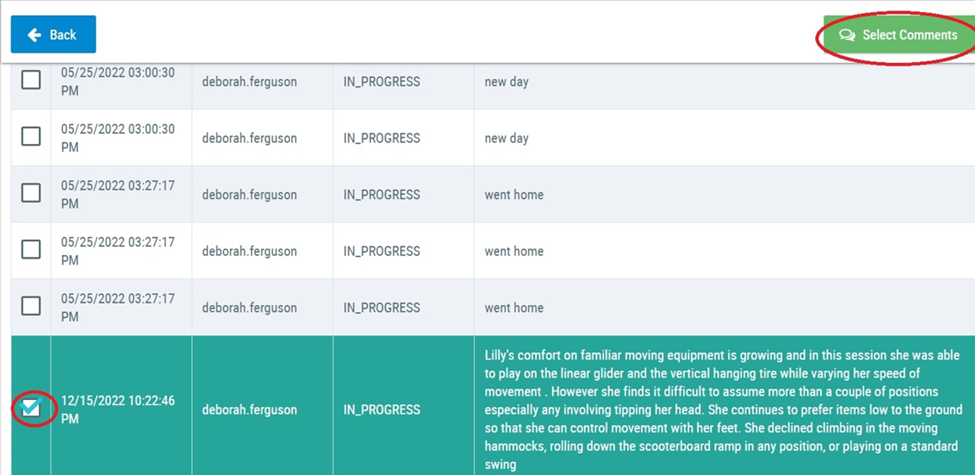
Scroll through the report on your screen to select graphs and comments.
If you generated graphs in STEP 3, you can choose these graphs to include in your report.. Click Select Graph beneath each program. This will generate the list of graphs you created in Step 3, from which you can select what you want to display in the report. Note: This is an excellent way to provide information on your child’s performance in each session over time and may decrease the need for individual session notes in some cases.
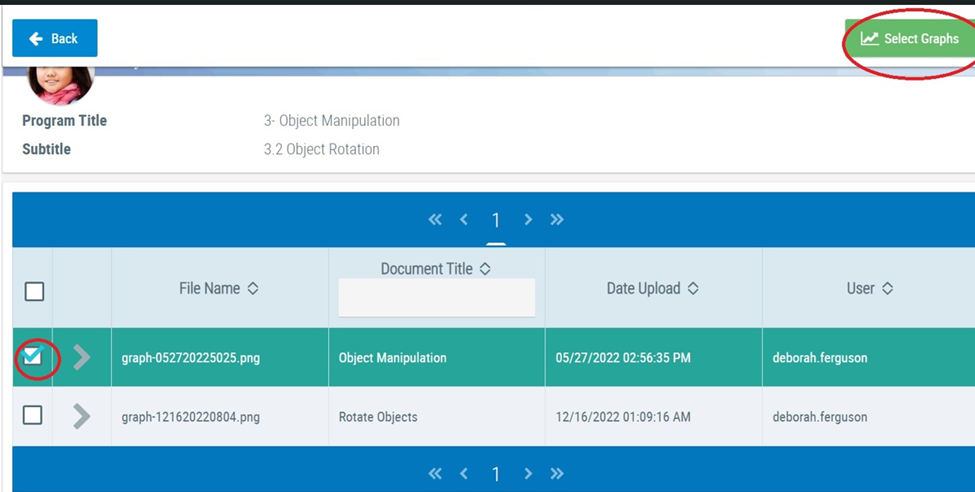
The graphs you select will show up in your printed report along with any of the comments you included to summarize progress when creating your graph in STEP 3.
If you elected to include comments in your report when in the Information Filter , you can view the list of comments from the dates you created them and select ones that you wish to include from within the draft of your report.
STEP 5: Review and Download Report
When you are reviewing your report you have the flexibility of going back to the information filter and including or excluding fields as you wish. These changes are applied instantly. Once you have included all the fields you wish to include press the download button.
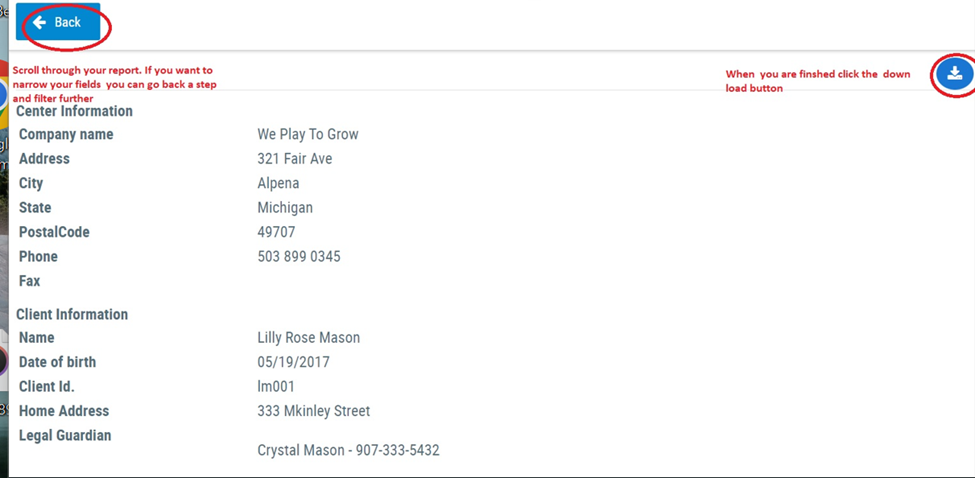
You can download to PDF, Word or in some cases Excel documents depending on your data.
G. Working with Other Data Collection Types
When you work within UnitisTI you can collect different types of data in real time or after the session depending upon the type of data you wish to collect, and your preferences for documentation.
Most of the programs in MPG ©, come with a preset Rating Scale which is flexible enough to accommodate percentage of correct trials, percentage of time, or percentage of the session in general terms if you are documenting during or after a session. Setting up documentation with a rating scale has been described in pages 13-22.
The variety of data collection options in the UnitusTI platform include Discrete Trial, Task Analysis, Probe, Rating Scale, and Natural Environments. Below I will highlight working with discrete trials and duration data. To learn more about working with other options refer to the training videos on the UnitusTI Help Platform.
1. Recording Discrete Trial Data
Any program set up with a rating scale can also be set up for collection of Discrete Trial information. This option is useful any time that you are setting up a goal for an activity you plan to repeat multiple times . For example if you are working on holding a crayon with a tripod grasp and plan to give your client 5 or 10 opportunities to pick up and use crayons during your sessions, then you can run this as a discrete trial. Recording discrete trial data works best when you collect the data in session as each trial is noted + or -. However if you can accurately recall these details you can record them later. Note: The number of trials cannot change session to session when recording discrete trial data. So it is important to be certain you can provide the number of opportunities you identified if you choose discrete trial data . If you are uncertain about this, then working with a rating scale will provide you with more flexibility as you can record the percentage of successful trials from session to session even if the number of opportunities provided changes.
STEP 1: Assign Program to Client . Review then Click Next.
STEP 2: Select Target(s) .
Move one or more of your targets to Targets Selected . Note: Remember you can move multiple targets in a developmental sequence and set your concurrent targets at one, so that once mastered your program automatically progresses to the next target. When ready click Next.
STEP 3: Select Discrete Trial Data Type
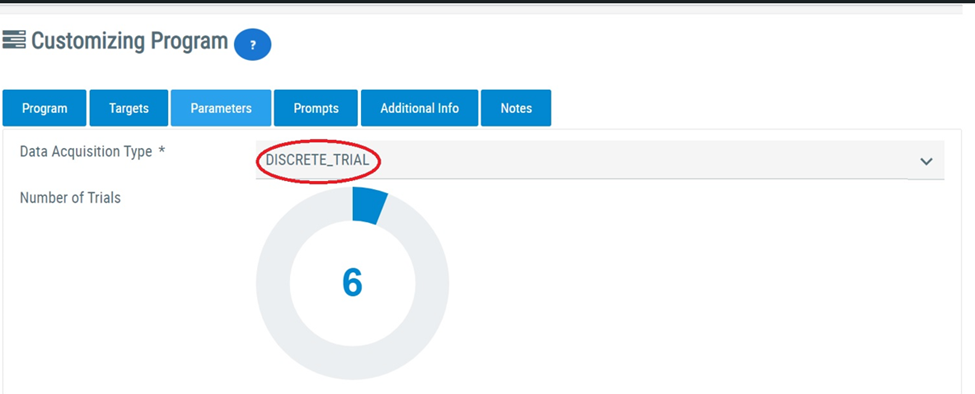
Select Discrete Trial from the Data Acquisition Type drop down list. Click and drag on the circle to select the number of trials you plan to provide every time you run this program.
STEP 4: Enter Mastery Criteria
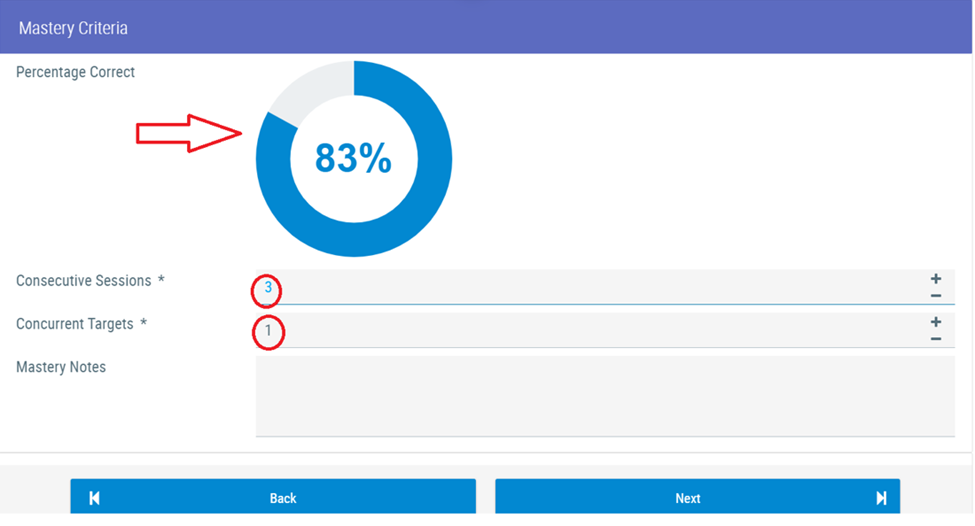
Click and drag to enter the percentage of correct trials you decide will indicate mastery of this goal. Enter the number of consecutive sessions this goal must be mastered before moving on to the next goal. In this case, for example, the client would need to correctly cut 5 out of 6 squares correctly for three sessions in a row before this skill would be recorded as mastered. Since you are tracking only one goal at a time, the concurrent target is 1. Press Next when you have completed entering your information.
STEP 5: Record Prompts
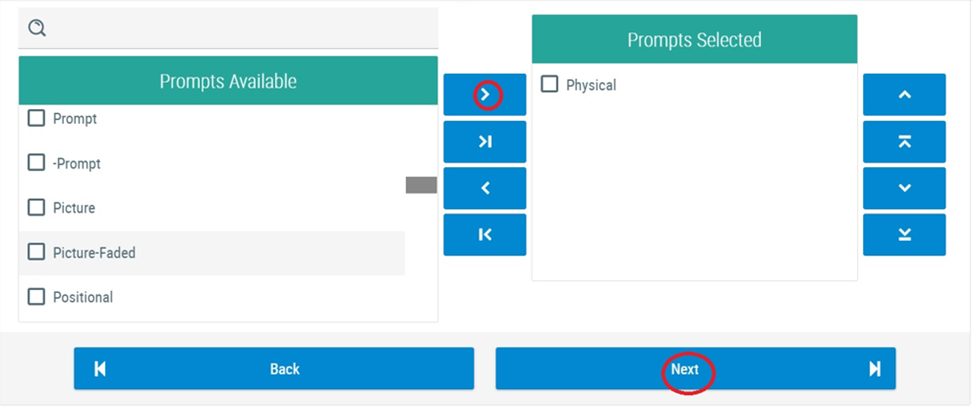
Unitus TI gives you the opportunity to record one or more prompts when collecting data. Any time you record prompts when working with Discrete Trial Data, the trial is automatically recorded as not met. This is useful if you want your client to master a goal with no prompts, and you want to track one or more types of prompts you are providing. If you do not want to record prompts do not select any before pressing Next .
Step 6: Complete Customization Options and Update Program List
Add any optional customization/ information you wish in the next couple of windows then press Save at your last screen. This will take you to the screen where you can Update Program List .
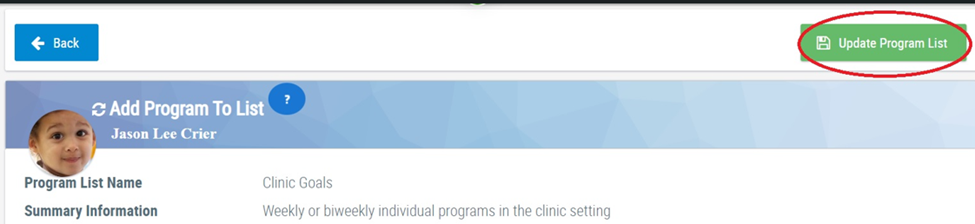
The program will be added to your list. When you run the program you will record each trial directly into your system as successful (+) or unsuccessful (-). As noted, if you record a prompt for that trial the client will not be considered as independent and the trial will not be considered successful.
2. Recording Duration/Time Data
When you are interested in documenting the duration of time a client spends in a task or activity with the goal of increasing time ( e.g. sitting at circle time) or decreasing time ( e.g. transitioning between activities) you have the option of setting up timed data collection. This type of data collection works best during the session. Your subscription includes a number of goals that are preset for duration and you have the flexibility of adding your own programs as needed. Any program included in your subscription that can be timed includes the word Time in the subtitle. When setting up your clients program in Manage Programs you can type “Time” under target type, and all timed goals will show up in your template catalog. Any program template that is timed has only one target.
STEP 1: Assign Timed Target Goal to Client.
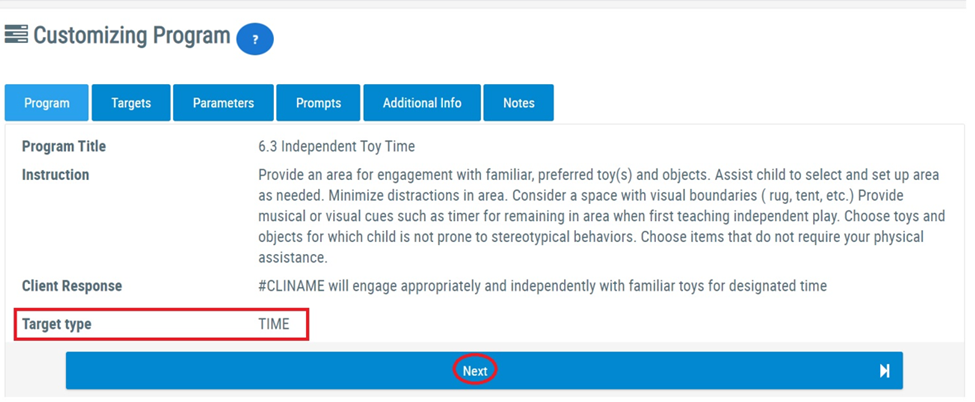
Click Next
Step 2: Select Target Time(s)
You can select one or more target times from available targets. For example in the case below, the goal is for JC to play independently for five minutes. One option is to choose the 5 minute target and each time you run the program it will document the number of minutes. However, in the example below the plan is to start with an expectation of two minutes at a time and progress towards five, using a visual timer to cue him how long to stay in the play area. This will allow him to end on a successful note with shorter time frames initially. As he progresses, the program times will progress.
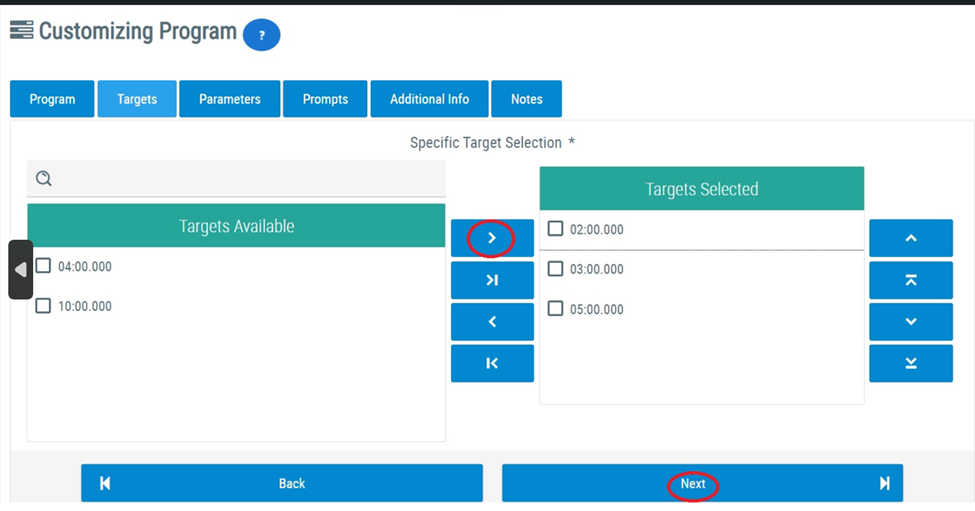
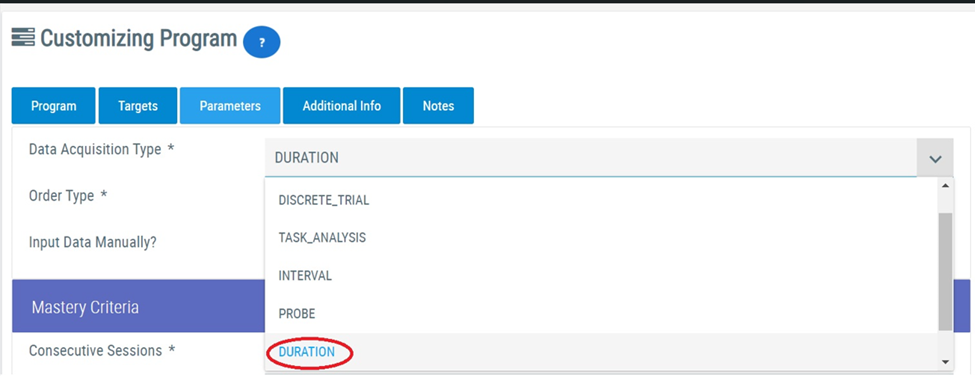
Step 3: Select Duration from the Data Acquisition Drop Down Menu
Step 4 : Choose Ascending or Descending Order for Time
If your time in a task/activity will be increasing as your client progresses, choose ascending time increments. If your time will be decreasing as your client progresses, choose descending. If you have only one time listed, either will work for you.
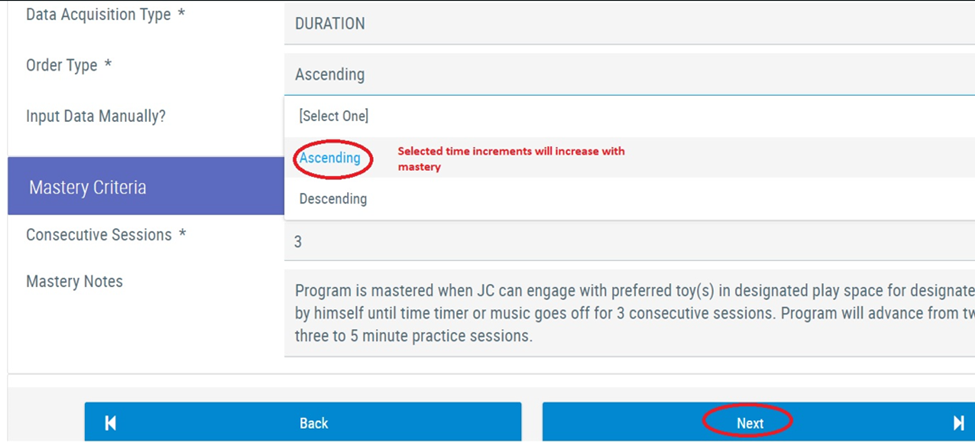
Before exiting this window decide how many consecutive sessions your client needs to meet the goal before proceeding to the next time increment. In this case, JC will need to be successful playing independently in the play area for two minutes for three consecutive trials before progressing. You can also add any mastery notes for those running the program if you choose.
Step 5: Complete Customization and Update Program List
Add any optional customization/ information you wish in the next couple of windows then press Save at your last screen. This will take you to the screen where you can Update Program List .
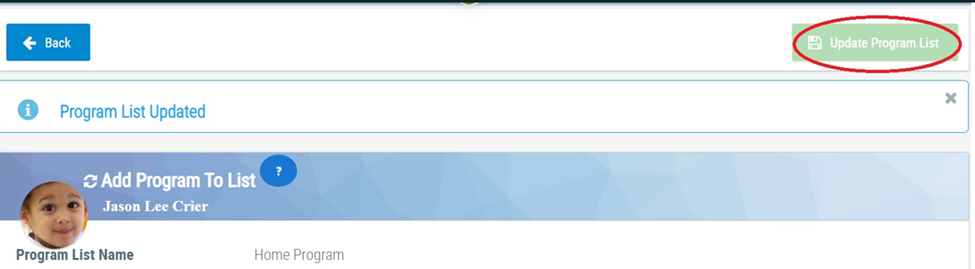
When you run this program a timer will appear on your screen. Note: If you are recording data after the session you will have to remember the time and run the timer when doing your note. This can be done but it is much more practical to run this program during the actual activity when using duration data.
H. Updating MPG © Subscription Programs
As a program author I am regularly adding to the resources available to you within your MPG © subscription so that you will have more options for supporting your clients. These changes can include simple edits, the addition of categories and programs, and the addition of resources within existing programs.
In order to benefit from these changes you must check for program updates under the Program Library on the Program Templates page . Program updates will not impact programs you are running for existing clients, but will be available when adding new clients, or new programs to an existing client.
To update your program, click on Program Library .
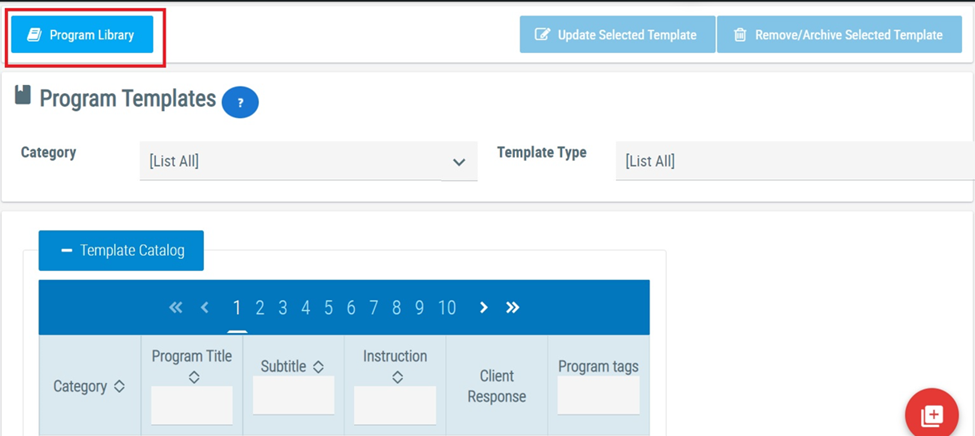
This will take you to the catalog of all subscription programs available within UnitusTI. To update your MPG © subscription click on the Check for Program Updates button below the description of Move Play Grow.
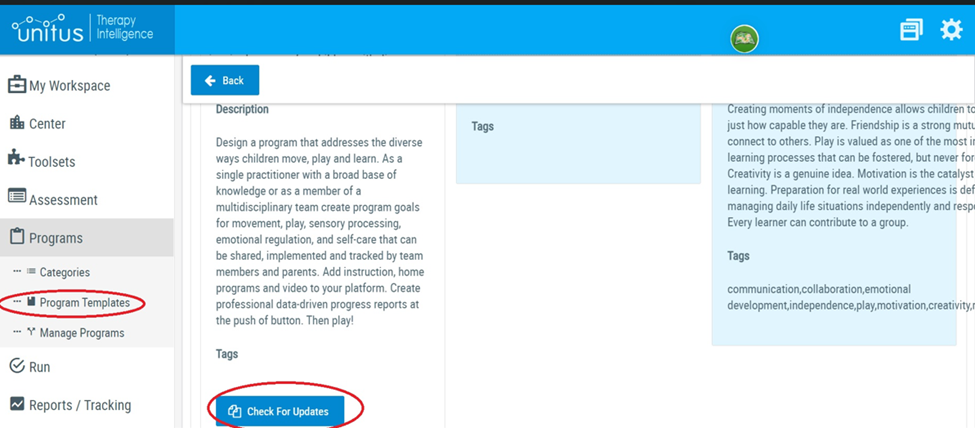
When you check for program updates the next screen will read No Records Found if there are no updates or it will list the available updates.
You can choose to update all of the program templates by clicking the Merge All Updates button, or update one program template at a time:
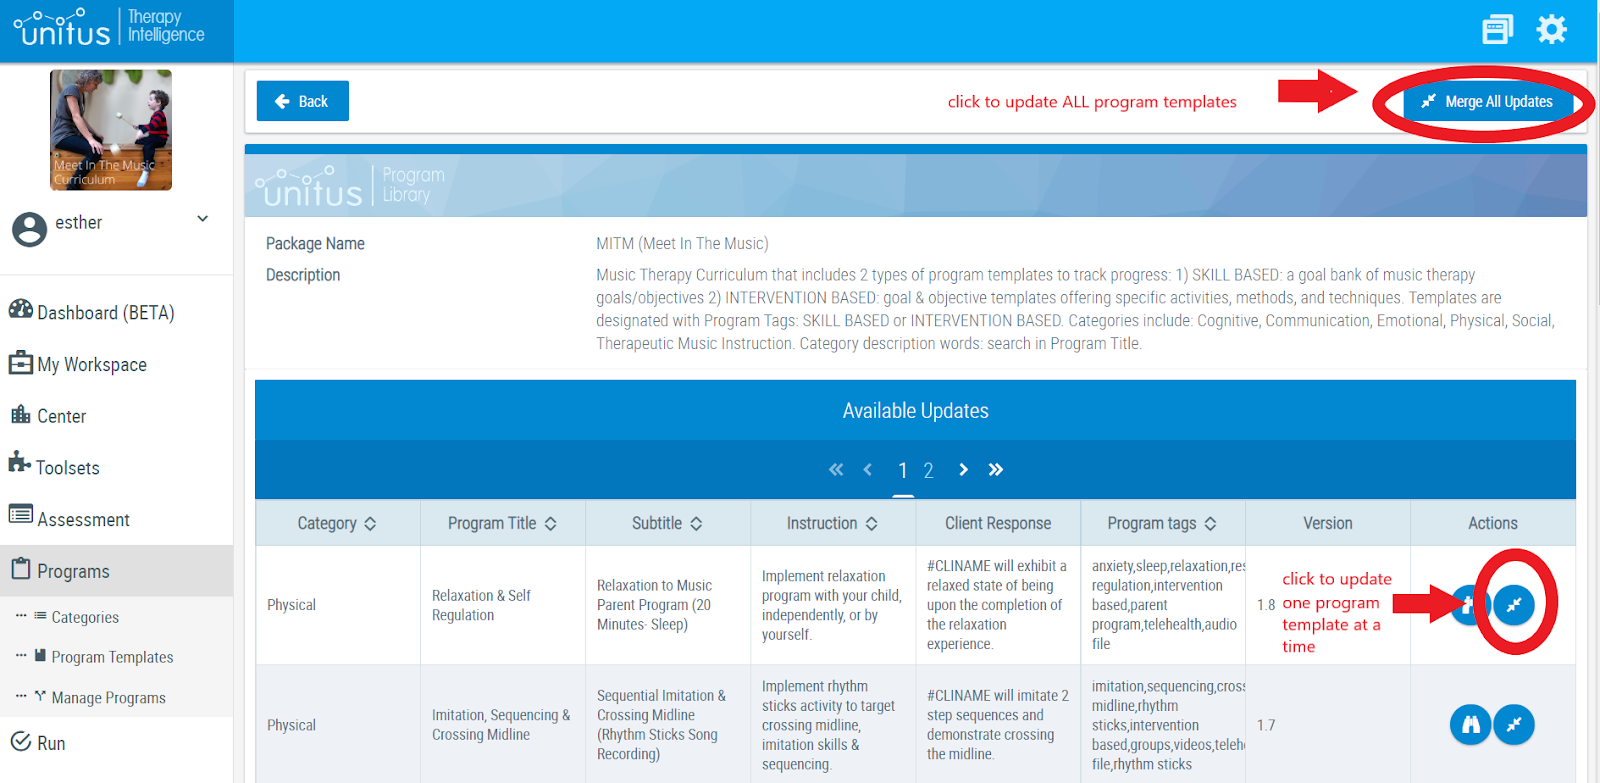
In most instances downloading all of the program updates is to your benefit. Remember that these downloads do not change programs that you are running for clients. In addition you always have opportunities to clone and customize any program that you add to your subscription.
Getting into the habit of checking regularly for updates is a great plan. Any therapist using your system can do this and changes in program templates are automatically loaded to all users.
I. Customizing and Creating Programs
In MPG © you have the option of cloning and customizing MPG © templates to meet the unique needs of your clinic. These changes create a custom version for your site which your therapists can access and assign to clients while leaving the subscription templates intact. You are also able to create whole new categories and templates for areas of treatment you would like to add to your program.
1. Cloning and Customizing Programs
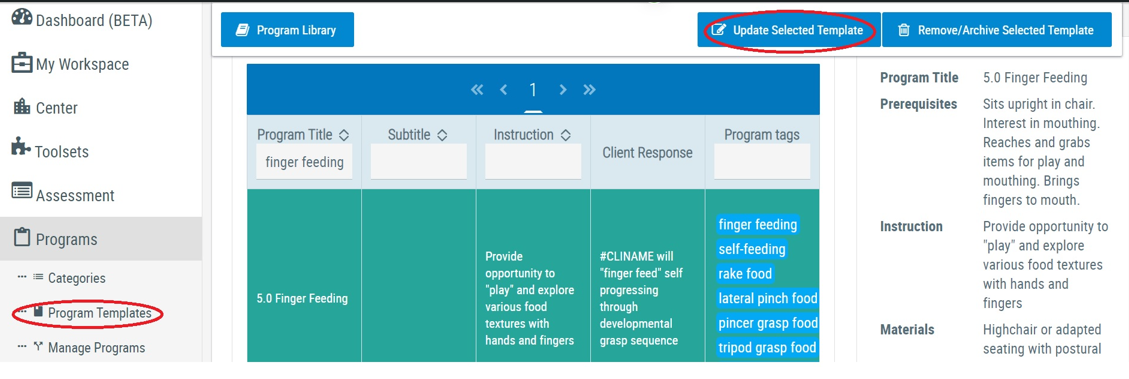
STEP 1: In the Program Template catalog select a template you would like to customize and click Update Program Template.
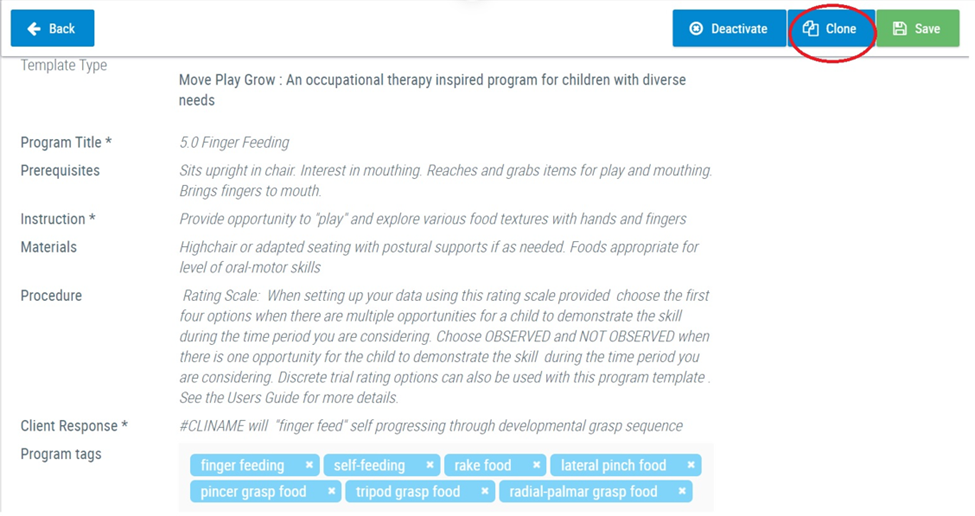
STEP 2 : In the next window click Clone .
STEP 3:
Customize Copy
.
You now have a working copy designated
COPY
in the Program Title Field. Rename the program. It's a good practice to include your facility name in the new Program Title to differentiate your program from the MPG
©
templates. This also allows you to search under your facility name. In any case this will be saved as a custom template
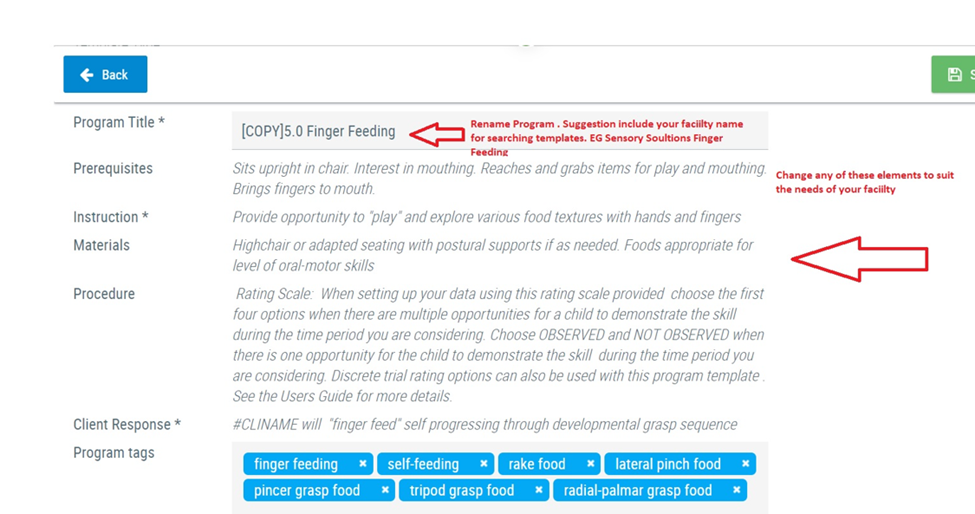
You will now be able to change any of the fields or add additional fields from the drop down menu in order to customize your program. You will also be able to add or remove targets. This is especially useful if you have specialized treatment programs or targets you regularly use that are not in the MPG © templates. You can add a whole new target or you can clone existing ones and change the wording.
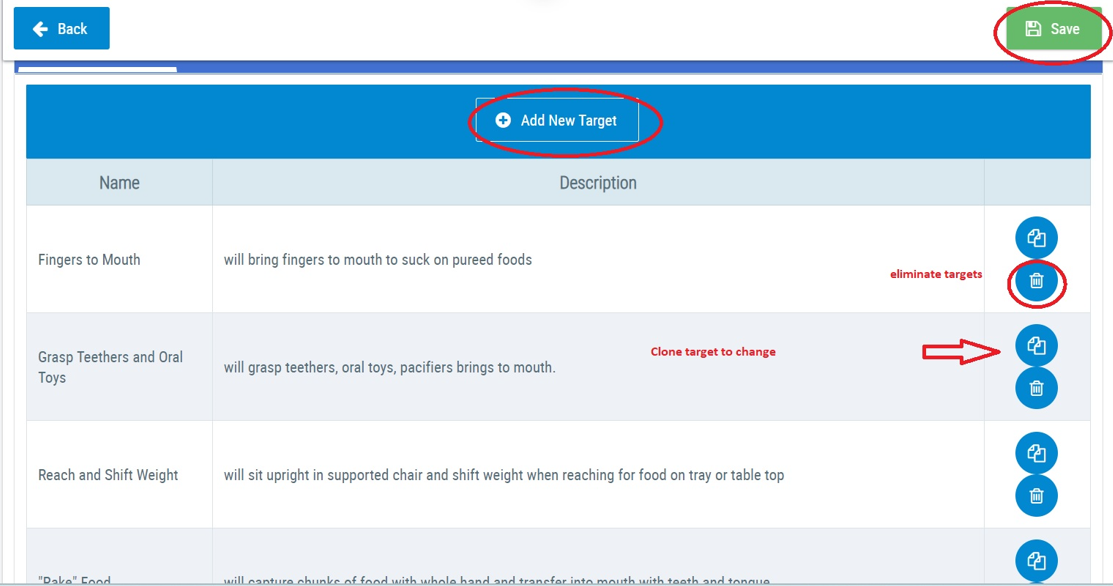
Note : When you clone a program template it will automatically assign the scoring criteria associated with the original program unless you change the scoring criteria in the cloned copy.
2. Creating New Program Categories
Working within MPG © you can create whole new categories of treatment with customized program templates. In this way MPG © can accommodate the types of treatment interventions you provide in your setting. Because of the overlap amongst disciplines such as OT, PT , Speech and Educators, MPG © includes goals that may be appropriate for multiple disciplines. However, creating new categories and program templates that reflect the unique contributions of each discipline allows you to provide programs that reflect different types of expertise.
You can add Program Templates to existing categories or create a whole new program category. To create a new category go to Categories under the Program menu and press the Red + button.
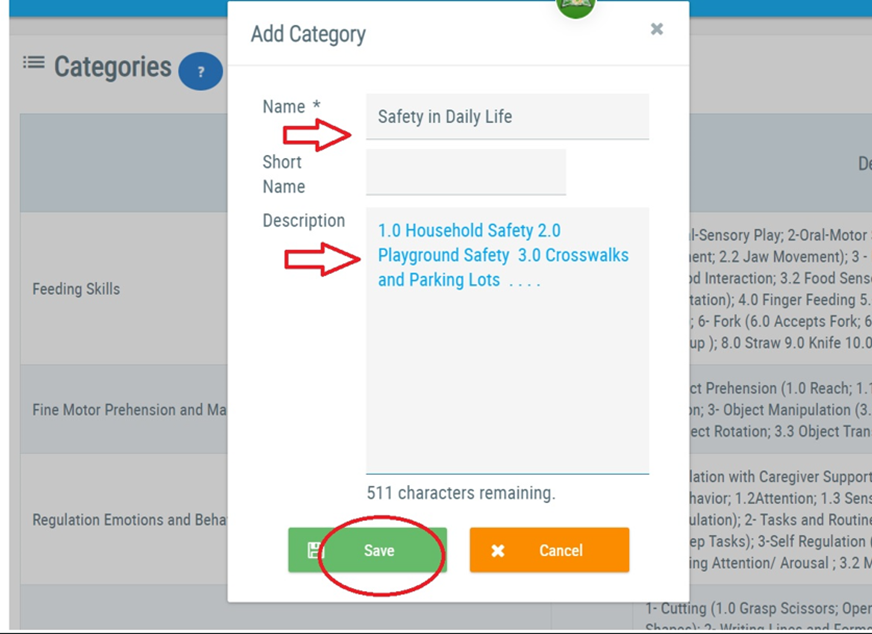
Name your category and provide a description of the template(s) that will be included. You do not have to number them as in the example if you prefer to organize them in a different way.Click on Save.
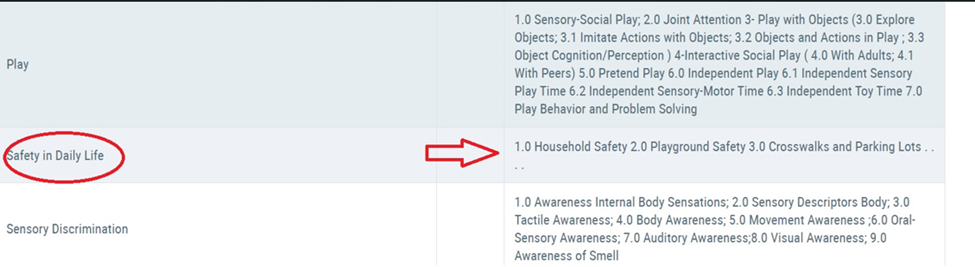
Your new category will now show up in the category list with the description of the template(s) you will be adding. You can update the category at any time and add or remove program templates
3. Creating New Program Templates
STEP 1: Select Category. From within the program templates catalog select a category from the drop down menu and press the RED + button. You can add a program to an existing category or to a new program category you have created. Select your category in order to create program templates for it.
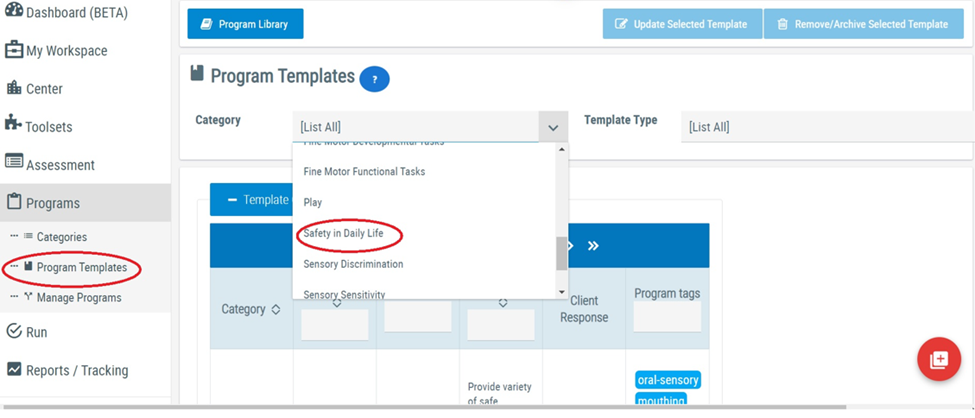
STEP 2: Add and Update Program Templates.
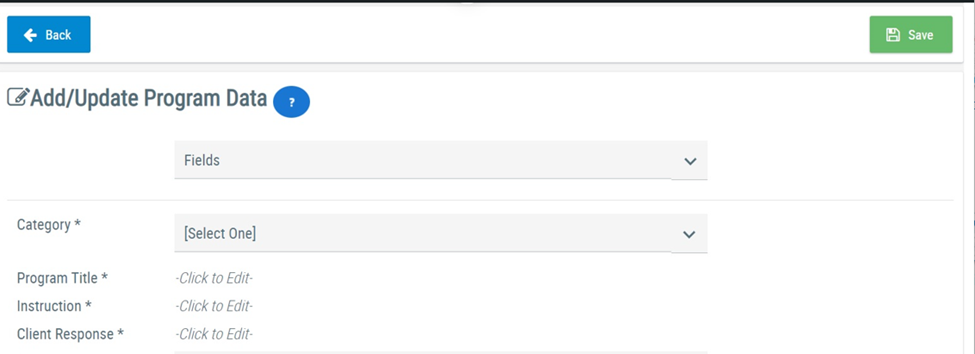
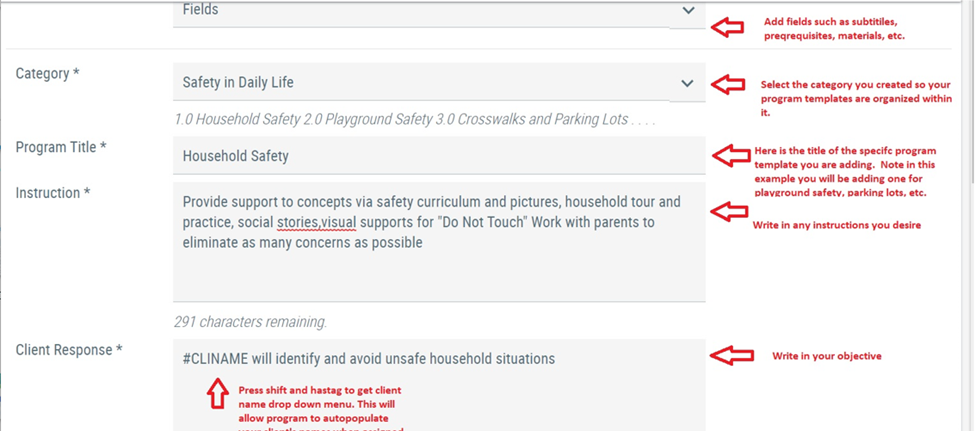
Here you will add a Program Title , add Instructions , and add Client Response . You can also add subtitles, prerequisites, materials, or other fields from the drop-down menu.
Here is an example of adding a template for household safety.
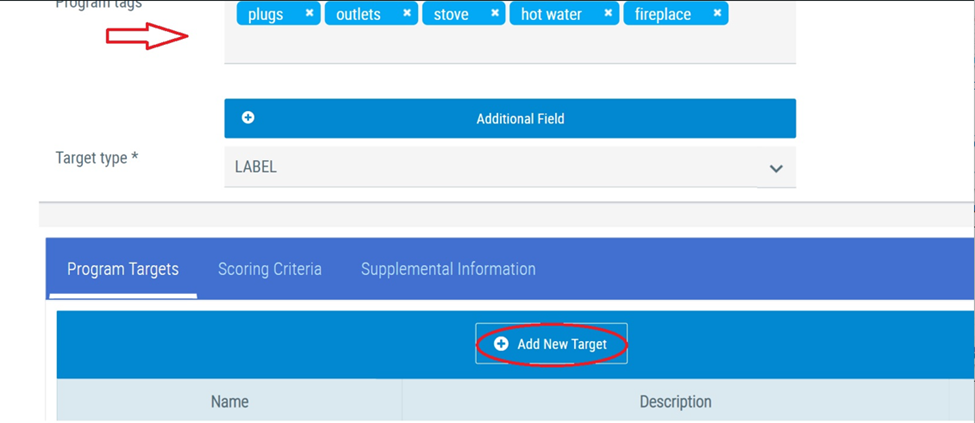
STEP 3: Add Program Tags and Targets . Scroll down the page and add any program tags that will allow you to search your new templates. Next select Add New Target to start writing your options for targets.
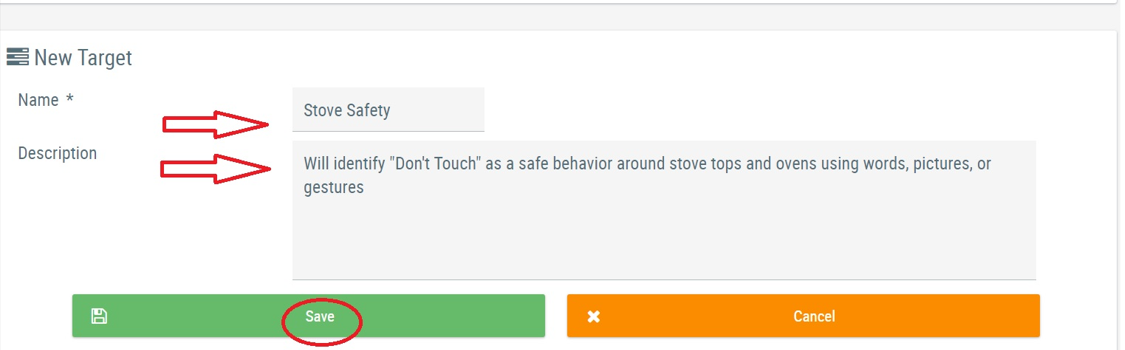
STEP 4: Adding Targets . Name your target and describe your outcome. Click Save .
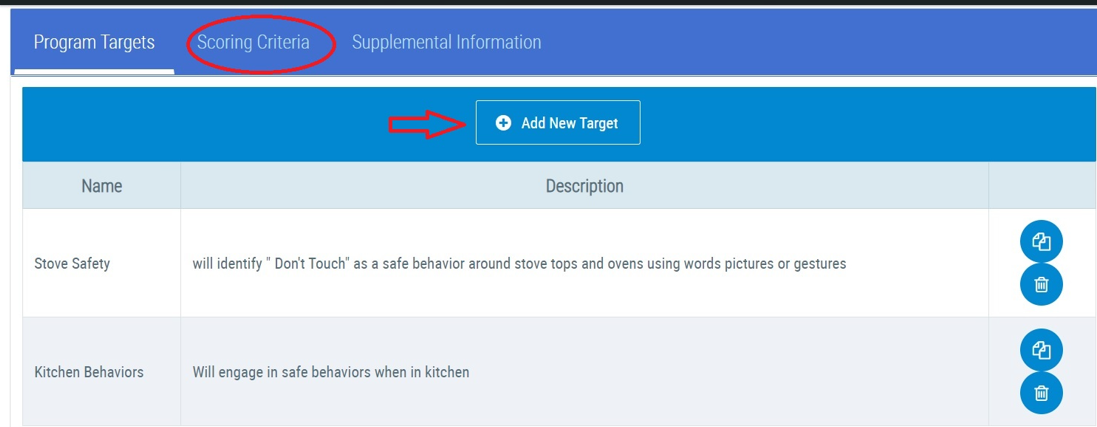
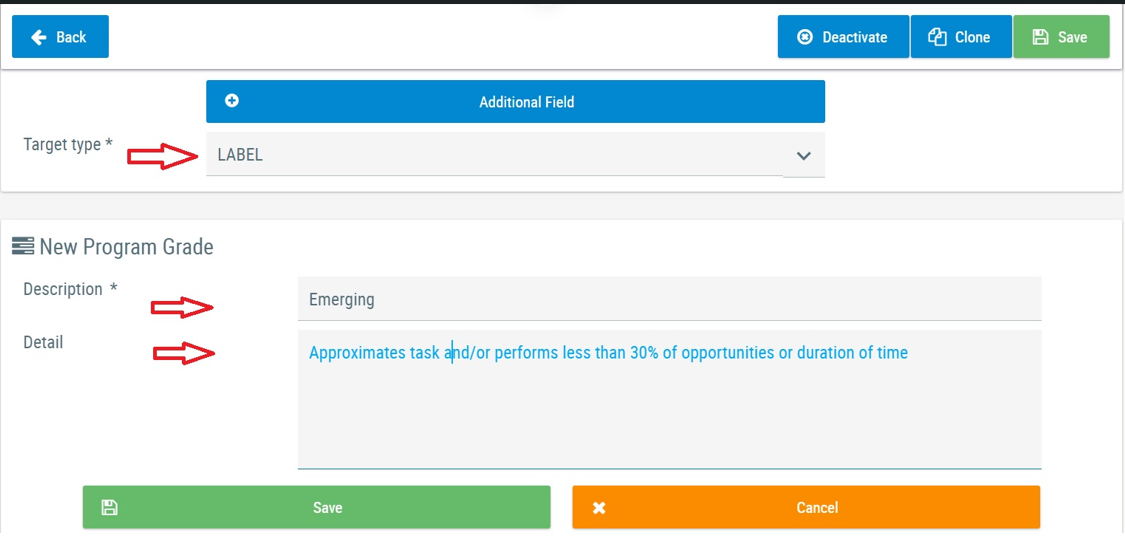
STEP 5 : Adding a Rating Scale. When you are creating your own templates, determine the scoring criteria you will be using. If you are going to use a rating scale you can enter in the one used by MPG © for consistency, or you can develop your own. For rating scales, make sure your target type is LABEL. Any targets under the category LABEL can be assigned to rating scale or discrete trial.
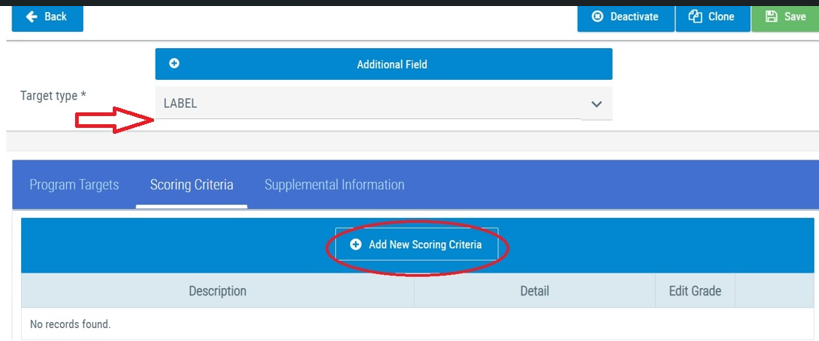
Add in your rating scale criteria in order one at a time and Save .
STEP 6: Setting up Duration and Frequency Data
If you are creating a program that will use duration or frequency data you can only have one target associated with the template. Review the Training Videos in UnitusTI for more information on setting up other types of data.
J. Accessing Training Videos
The UnitusTI platform includes a number of videos that can walk you through the process of using the software when you are first learning how to navigate and use Move Play Grow. There are two options for doing this from within your UnitisTI account:
Option 1 : Access videos from the page you are working on by clicking on the question mark next to the Page Title
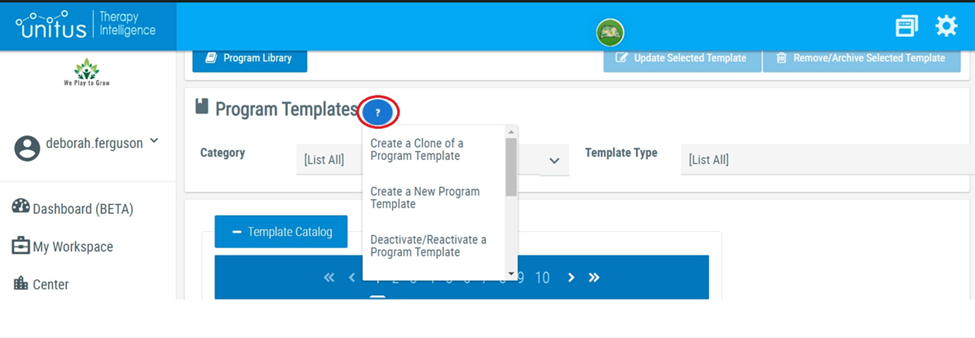
Clicking on the Blue ? provides you a list of links to video tutorials associated with this page. Scroll to see all options.
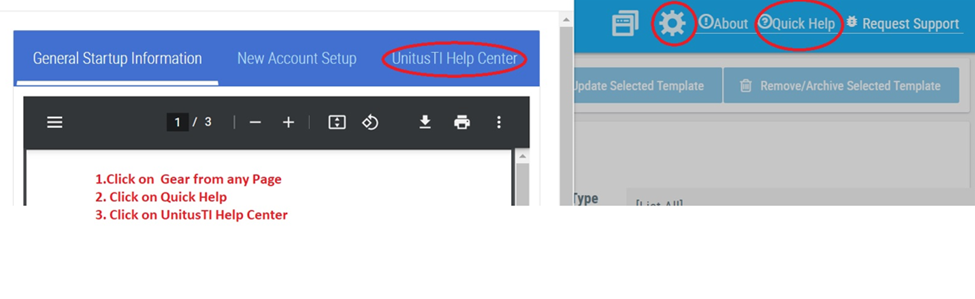
Option 2: Access the Quick Help Center from any page in your system by pressing on the gear to see these options.
STEP 1: Click on UnitusTI Help Center in the pop up window .
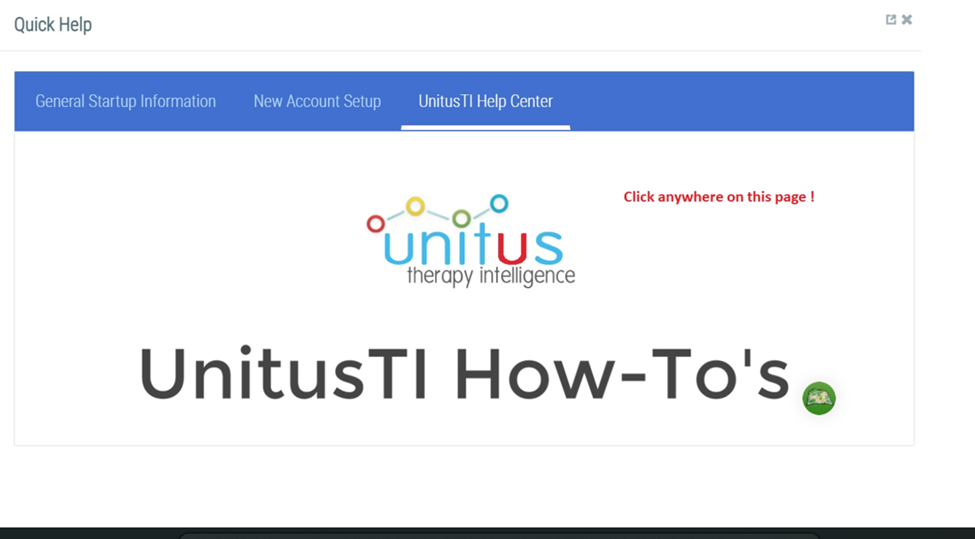
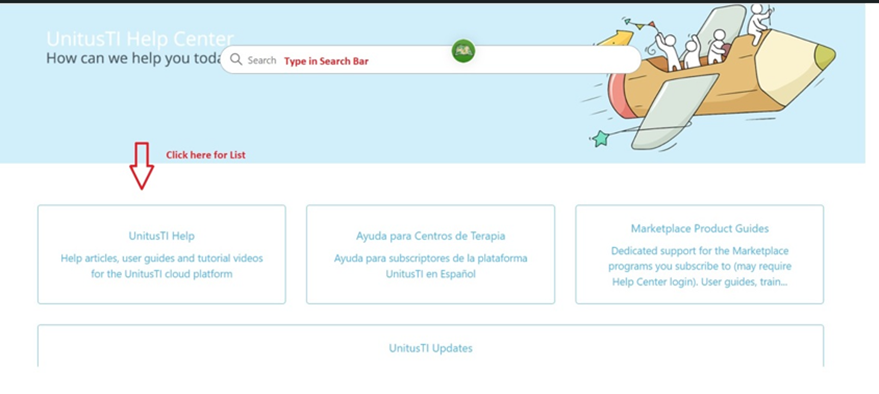
STEP 3 : Use the Search field or Click on Link for all contents
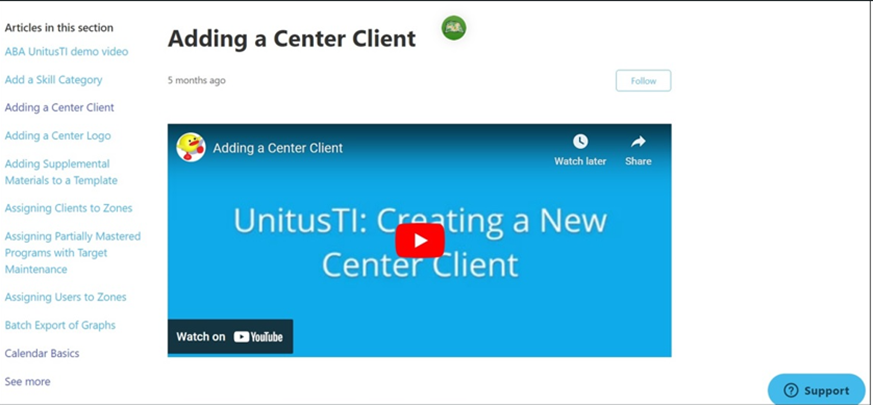
STEP 4: Select the subject/article of interest and watch the video.
K. Requesting Support
If you need assistance for technical concerns request support by clicking on the gear from within any page on your account and then select the Request Support Link
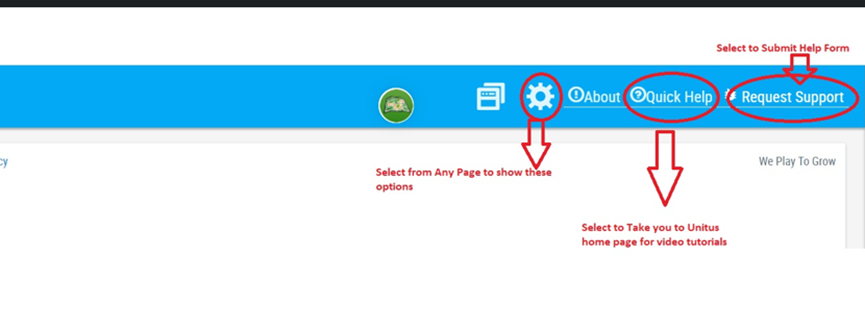
The Request Support Link will take you to a Submit Help form. Scroll to complete all sections of the form and then send!
L. Notes on Copyright
All content in Move Play Grow © is copyrighted. Limitations on usage and reproducibility include the lack of ability to edit original program templates. You can, however, clone Move Play Grow © program templates. This results in the original version being maintained in your UnitusTI account, as well as account. Program templates from Move Play Grow © , including any cloned program templates, are unable to be used outside of the UnitusTI system and are only made available while your subscription to UnitusTI is active .
_______________________________________________________________________________________________________________________________
MPG © User Guide Page of
UnitusTI Copyright 2023 Mundo Pato Inc. , all rights reserved.