Unitus Therapy Intelligence contains a calendar feature to help you plan and track activities in your center. To access the calendar, go to the main menu, select My Workspace, and select Calendar.
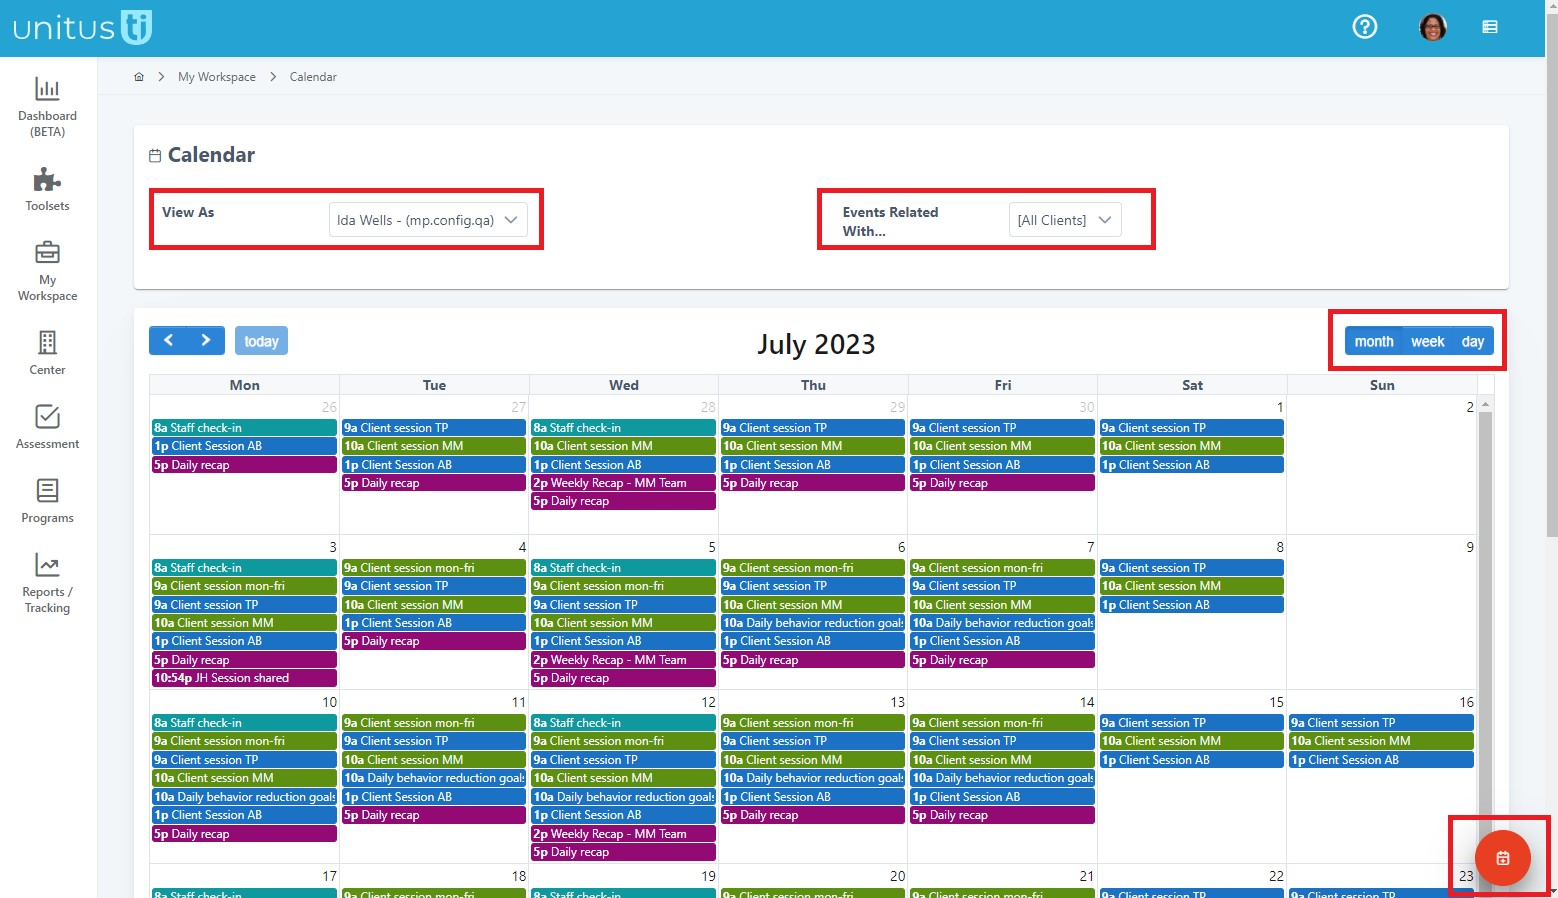
- View your calendar by month, week or day
- “View As” selector : Administrators are able to filter and view other user calendars. Selecting another user shows just their events on the screen. Selecting Center displays just events created with the Center Wide visibility.
- “Events Related With” selector : Filter for just events related to specific clients
View the tutorial video above or read below to learn how to: create an event, edit an event, confirm services rendered with the Service Completed option, and confirm receipt of a shared event.
Creating an Event
To create an event, click the red button at the bottom of the screen.
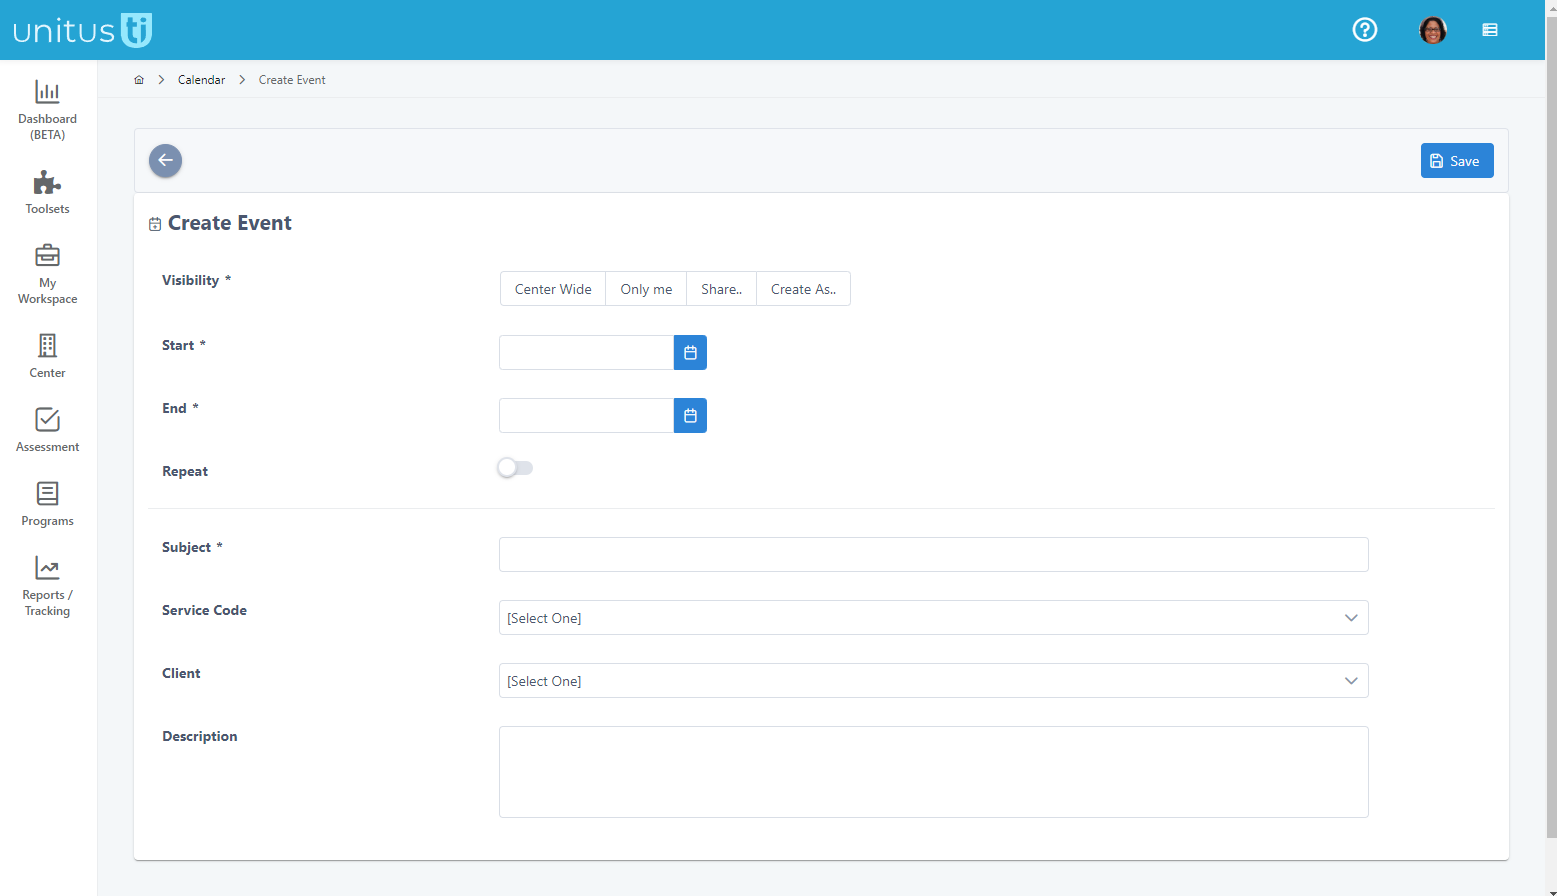
Determine the visibility of the event: “Center Wide” (to add an event on all user calendars), “Only me” (to add an event just on your calendar, “Share” to add an event on multiple calendars that you select, or “Create As” to create an event on behalf of a different user, or multiple users, and add it to their calendar instead of your own. The visibility cannot be edited after saving the event.
“Center Wide” events are great for things that all users in your organization should know about, such as holidays or other events appropriate for all users to see. It’s important to note that Center Wide events are not included in the Session Tracking report.
“Share” or “create as” events let you include other users by clicking the

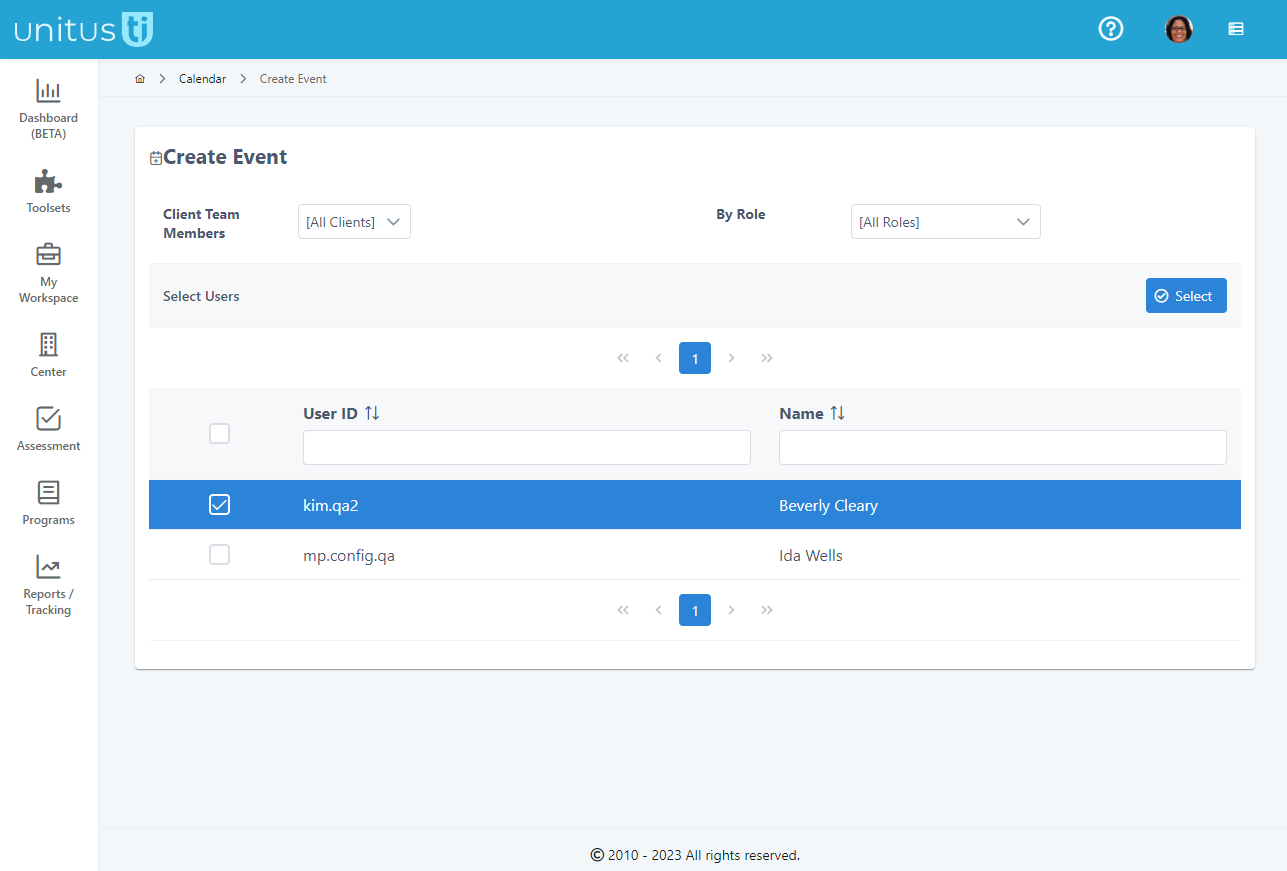
A list of users appears; check the box next to each name to include a user, or click the checkbox at the top of the column to add everyone on the page (and do the same for users on other pages using the page arrows). Search for specific users by typing their username or name in the search boxes at the top of the columns. Use the filters at the top to find users that share a client with you or by their security role. When you are done, click the “Select” button at the top.
Next, enter a start and end date for your event using the blue calendar icons.
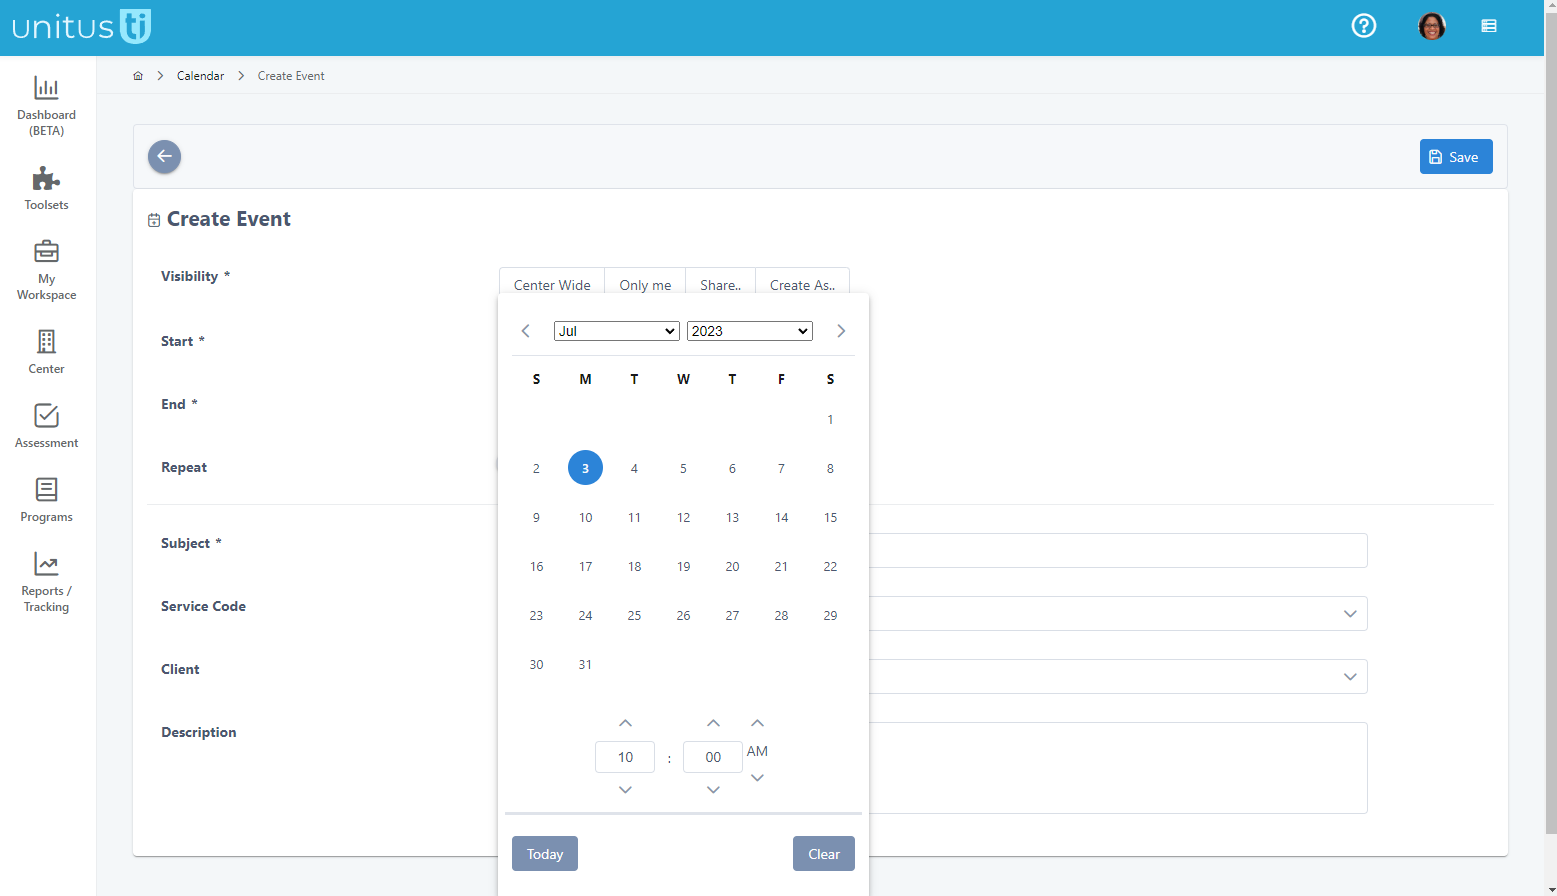
Click the Today button for today’s date or choose a date from the calendar. Enter the time of the event using the arrows or by typing directly into the hour and minute fields. When you’re done, click outside the popup window to close it and repeat for the end date.
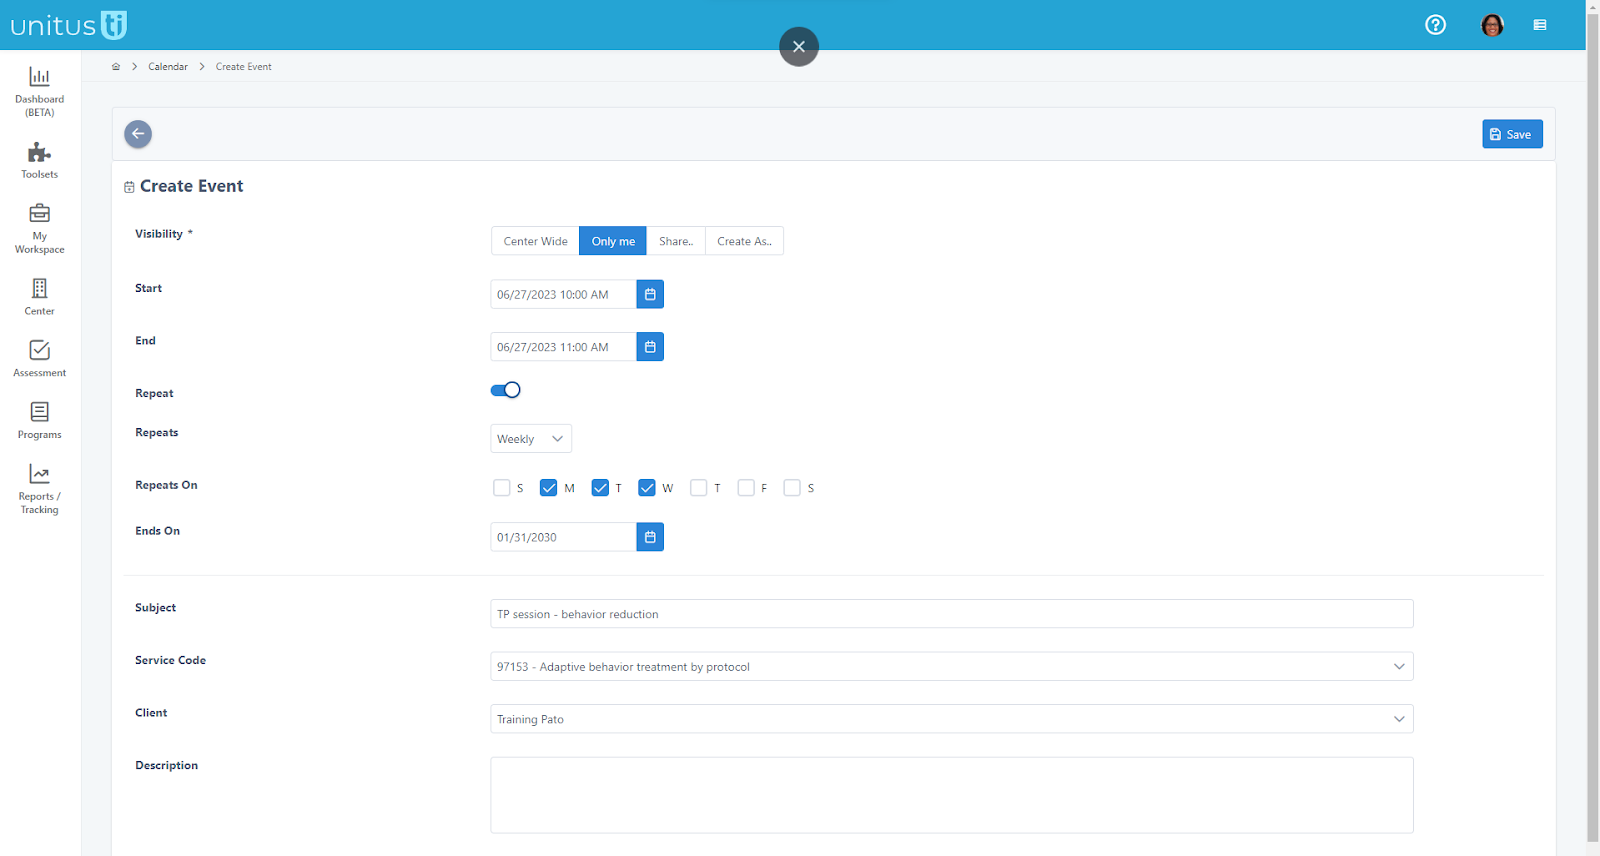
If you want to create a recurring event, toggle the Repeat switch and choose daily, weekly or monthly. “Daily” repeats the event every day, Monday through Sunday through the end date you set below. Weekly lets you choose which days of the week the event should recur on . Setting an end date is required, but if you don’t know when the event should stop repeating, choose a date in the future and edit this information later on. (Tip: this field lets you type in a date or use the blue calendar icon to select one.)
Create a name for your event in the Subject line. This is displayed on the calendar, so it’s recommended to keep this short. It has a character limit of 100 characters.
Adding a service code and client to your event will allow you to see the event in the Session Tracking report, as long as the event visibility is not set to Center Wide. Service codes are created in Center/Service Codes and can also be used in Session Notes. It’s very important to note that codes added to calendar events are only tracked in the Session Tracking report, not the Session Notes Dashboard or in other custom reports. Nor are service code unit limits tracked through the calendar. Please see the tutorial videos for using services codes in the Calendar vs. Session Notes to learn more. One code can be added to a calendar event.
Once you’ve entered all of the required information, select the “Save” button at the top of the screen. Your event is now viewable in the calendar to you and any users with whom you’ve shared the event. The color identification is set by the service code and can be changed by editing the service code in the Service Codes area.
Editing an Event
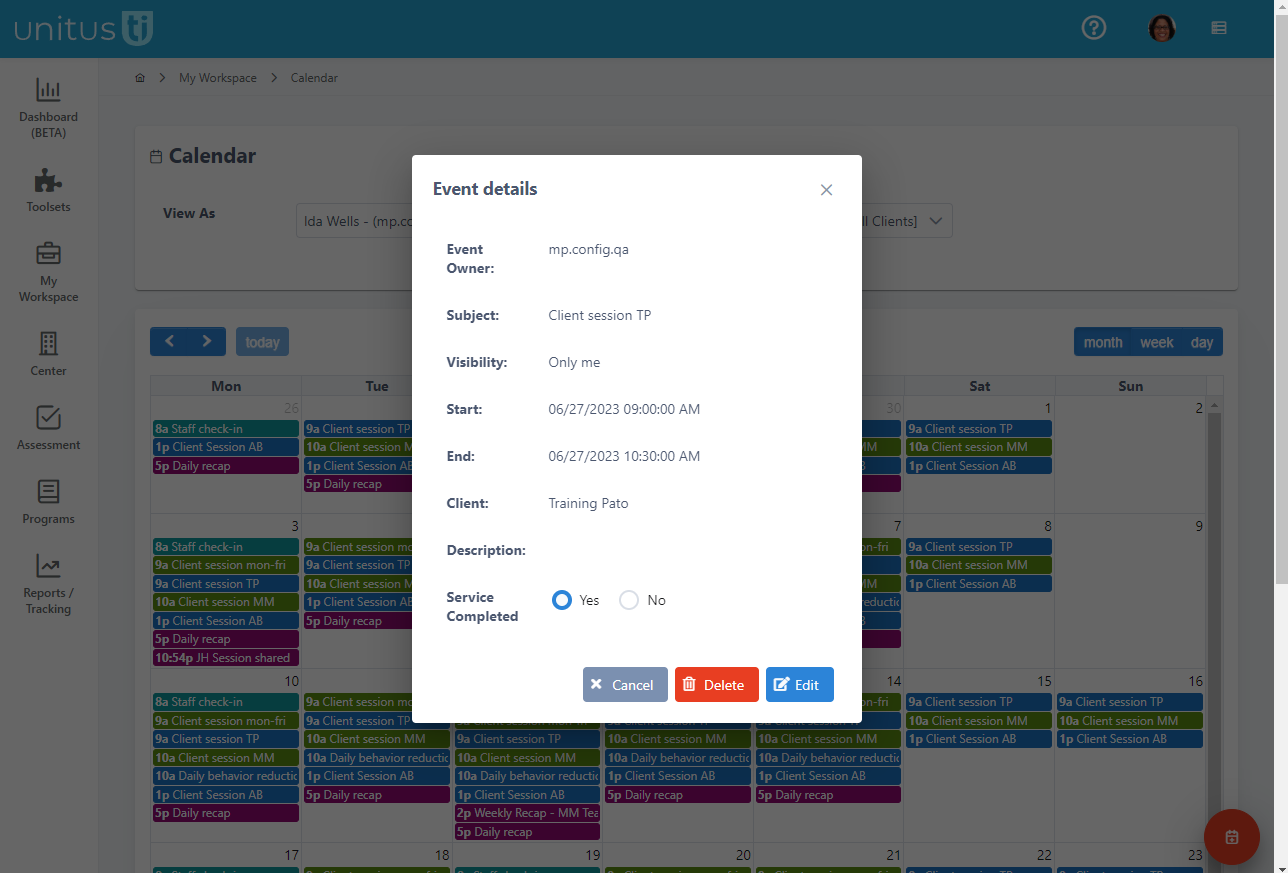
Click on an event to see details and perform other actions. To change event details, click the Edit button.

In the Edit screen, you can change the following fields: Start and End dates, Subject, Service Code, Client and Description. For shared events, you can add or remove the users associated with the event. You cannot change the visibility of an event after it’s saved. For events that repeat, the Repeat options are disabled after saving, however after changing other information, you will see options for which of the recurring events should be affected.
Select the Delete button if you wish to remove the event from the calendar. If this is a recurring event, you can choose whether this should affect only this event, this event and all following events, or all the events in the series. This is a permanent action and cannot be undone.
Confirming Services Rendered
UnitusTI offers a feature to help you and your staff keep track of completed therapy sessions, as well as sessions that were not completed for some reason; perhaps a staff member called in sick, or the client had a last minute doctor’s appointment.
Only events created with a visibility other than Center Wide, and that have a client and service code are viewable in the Session Tracking Report.
Click on an event in the calendar and a pop-up window will appear where you can review the event’s information.
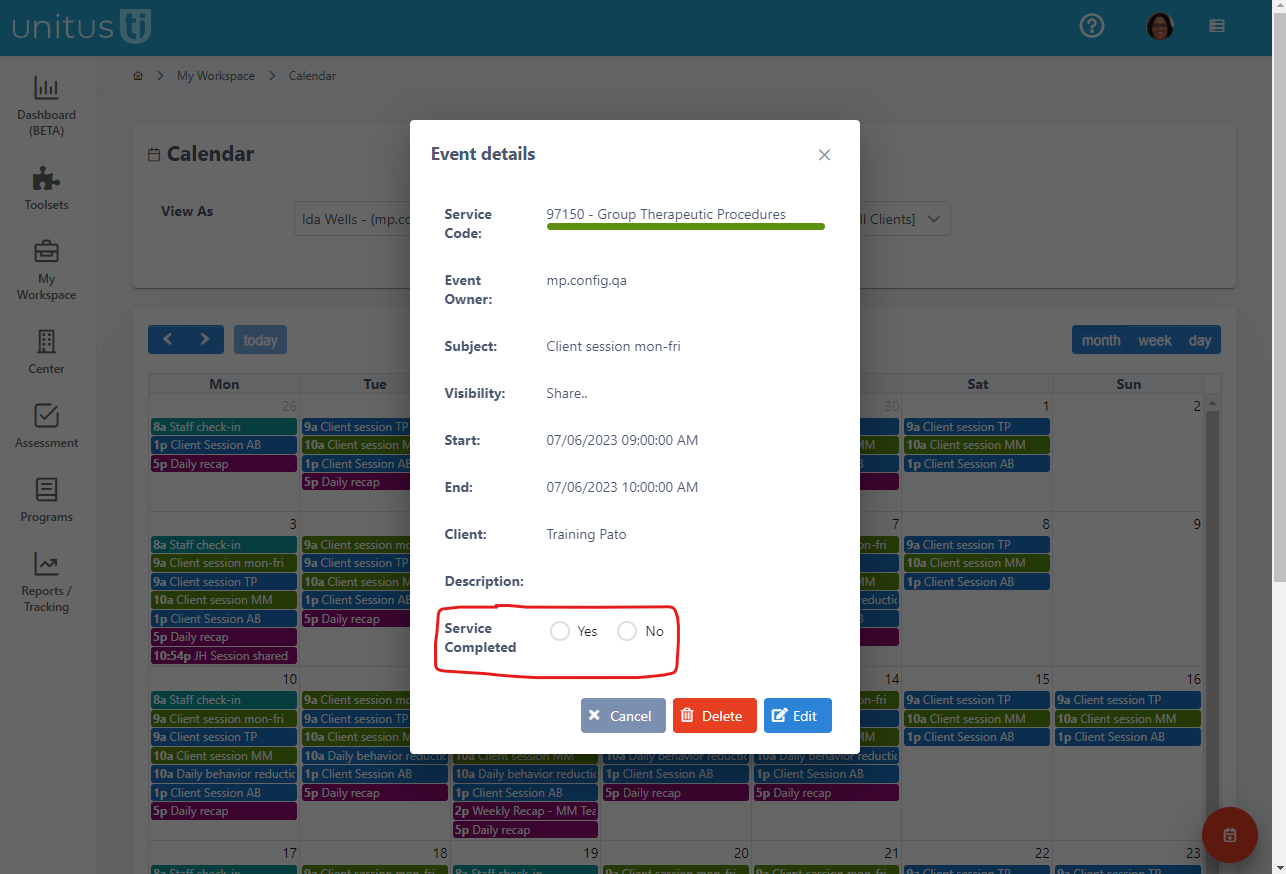
At the bottom of the window, the Service Completed area lets you designate whether or not an event was completed. If the session was completed as normal, you may select “yes”, the event is automatically updated, and you can close the pop-up window by clicking the ‘x’ at the top right of the window or by clicking cancel.
Let’s say that for this session, your client was sick and the therapy session was canceled. In this case, you may select “No” and an additional field appears where you may select the reason the session was canceled.
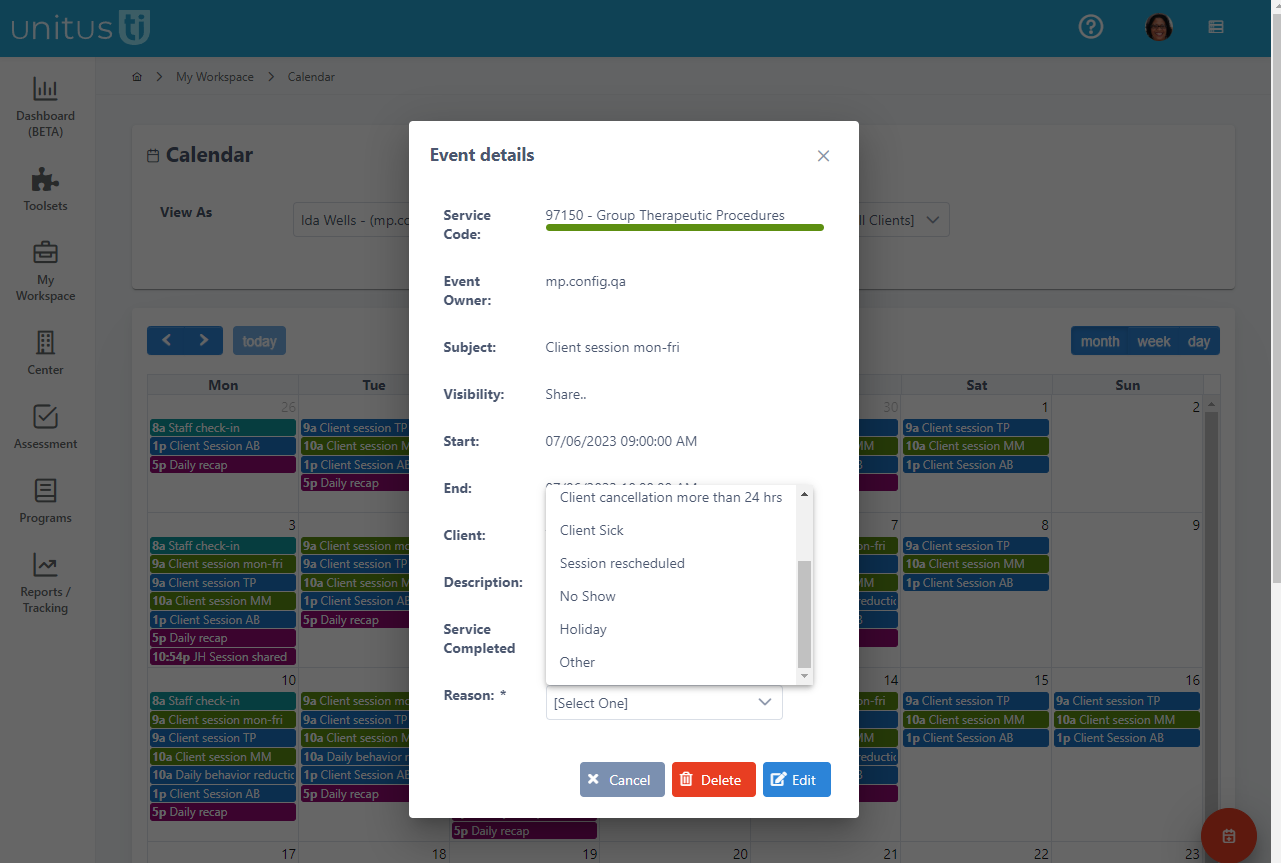
Choosing “other” lets you add a custom reason not found in the list. After entering your information, the event information is updated automatically and you can close the pop-up window. View a list of compiled data about these events in the Session Tracking Report.
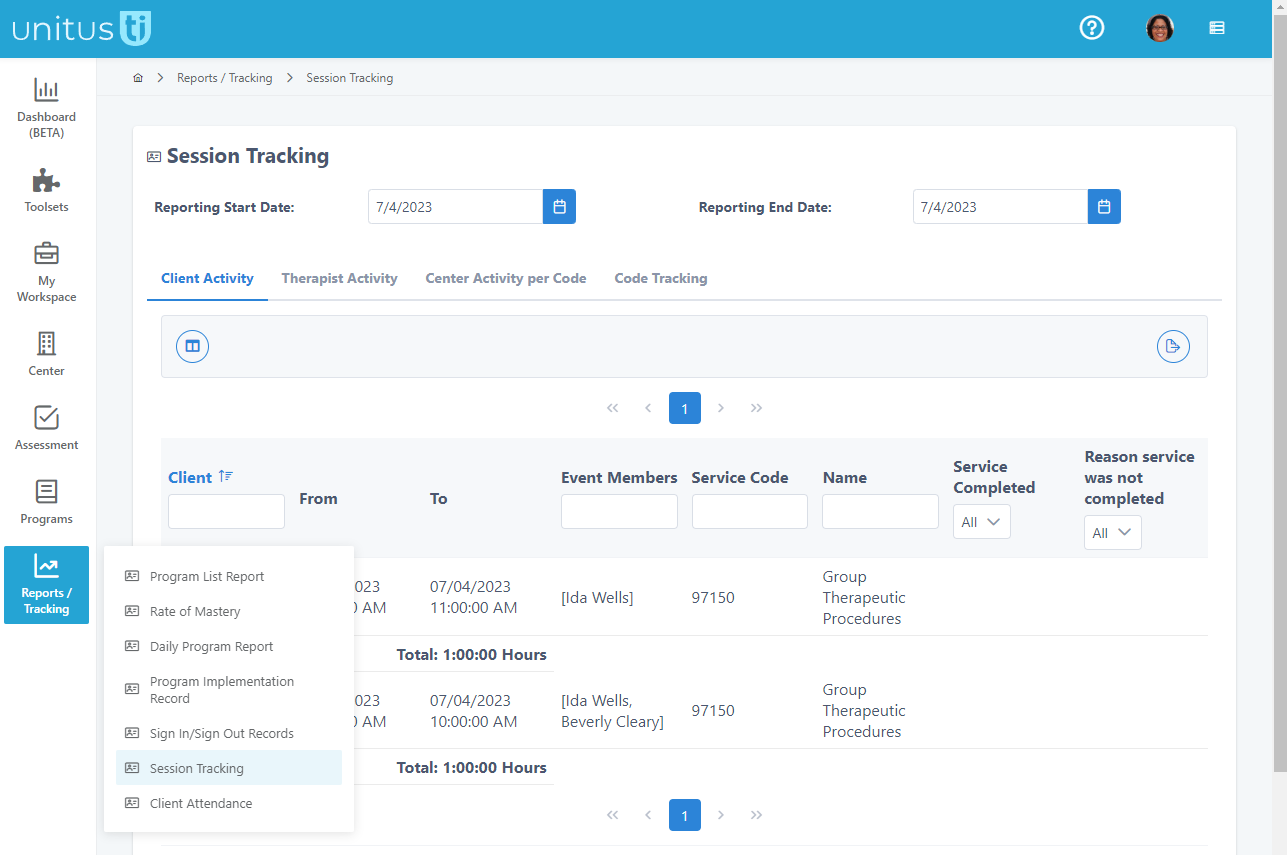
Go to Reports/Tracking in the main menu, and select Session Tracking Report to view information about client sessions.
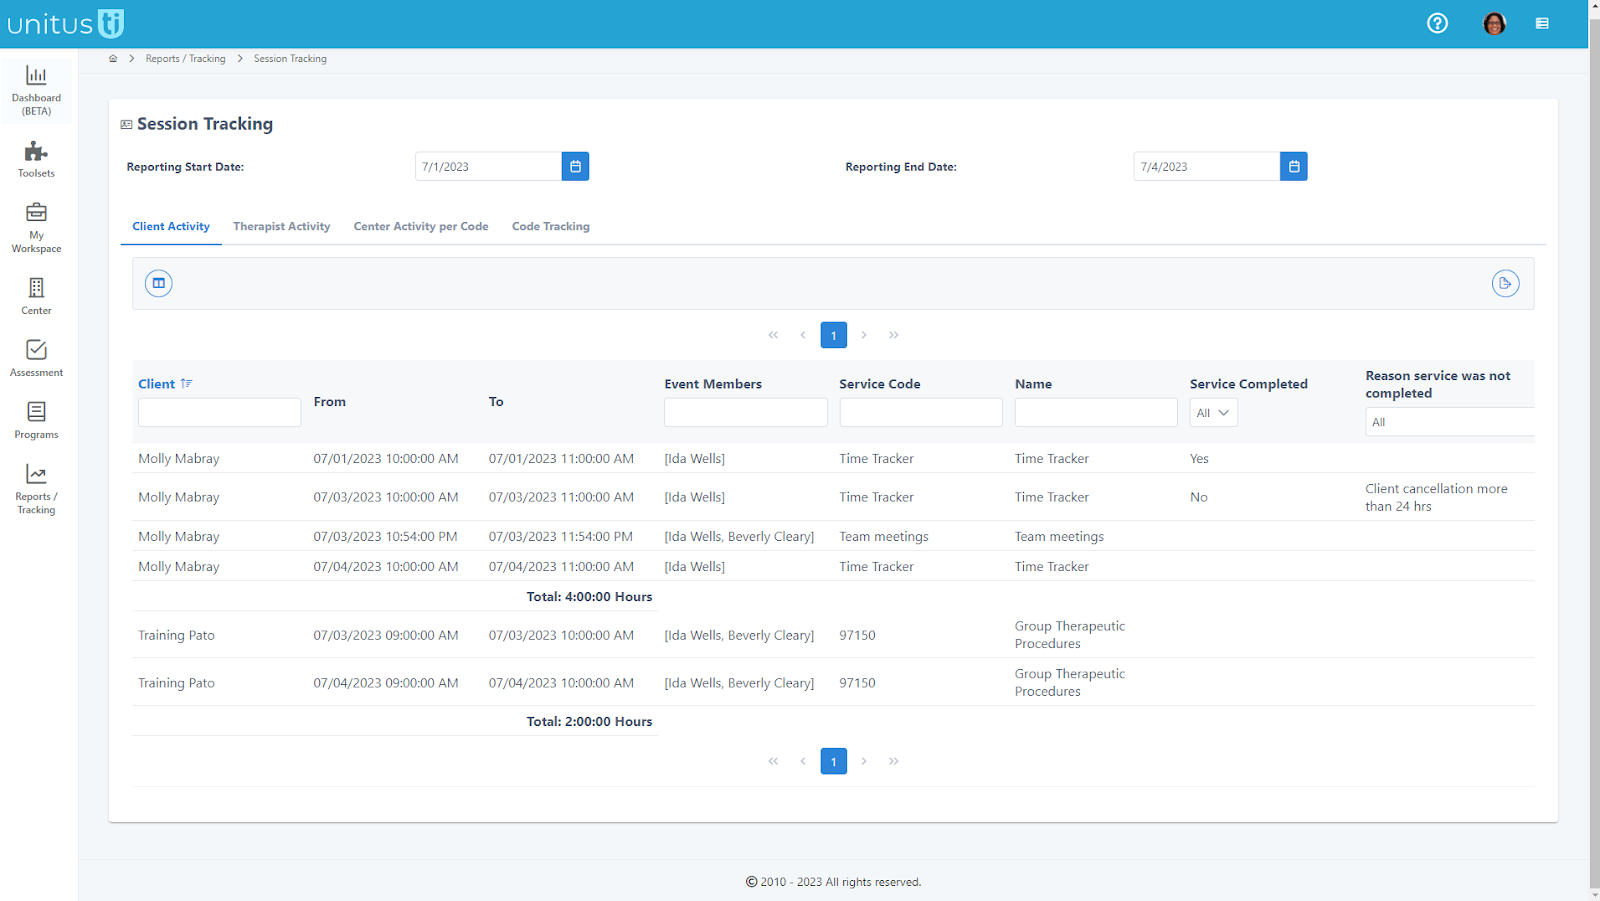
Typing into the search fields filters the list. You can also view the report by user or by service code in the additional tabs. Filter the list to see only events that were completed or not completed, or to view each event that was not completed for each of the possible reasons. This report can then be exported to a PDF file or to an Excel file.
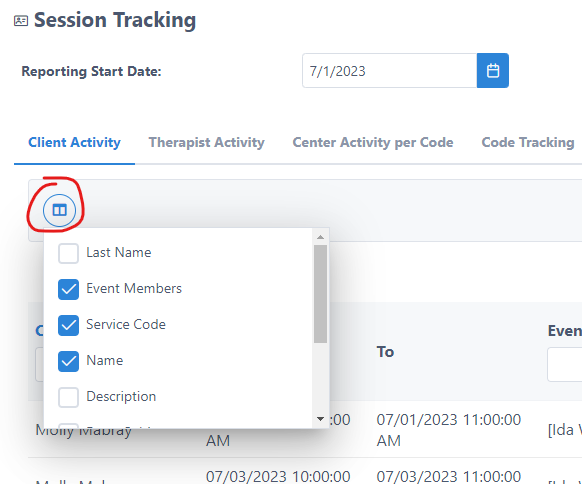
Use this icon to add or remove columns from the page:
An important item to note is that events added to the calendar with “center” visibility are not included in the session tracking report as these events may skew the client-related information in the report. For this reason, it is advised to create client-related events with shared visibility for all appropriate supervisors, therapists and even parents.
Confirming Shared Events
When sharing a calendar event with one or more users, UnitusTI now offers an option to track whether or not those users have seen the event on their calendar; users can now confirm that they have received the shared event.
Begin by creating a new event and set the visibility to “Share”; select the users with whom you are sharing the event, enter the event information, and click save. The event can now be viewed in the calendar, and clicking on the event will open this pop-up window. Beneath the event description is a slider labeled “Confirm”; to confirm that the event was received, toggle the slider on and close out the window by clicking the x.
To view a list of users who have confirmed receiving the shared event, click the event and select “Edit”. Here, you can see the users who have confirmed and the users who have not yet indicated that they have viewed the event in their calendar.
Users with lower access levels have the ability to confirm the event, but do not have access to edit the event information. View the security roles guide to see all user security role permissions.