Need to upload a large list of students and staff to set up your UnitusTI account? While UnitusTI makes it easy to add user accounts and client/student profiles (and create associations between them) from within your account, if you have a large number of these entries to create, a one-time bulk upload may help.
Contents
Workbook 1: Client Information
Workbook 3: Client and User Assignments (Assigning team members)
Step 2. Return The Completed Files To Us
Step 3. After a Successful Upload
How the process works
- Submit a support request to initiate the service. They will provide you with a payment link to order the service. This request should come from the account holder.
- Review the steps below that outline how the upload process works. Upon ordering, you’ll be provided with pre-formatted spreadsheets to add information for
- Users
- Clients
- Assignments between Users and Clients.
- Return the files when prompted by the support team in the support ticket you created in step 1.
- Allow 3-10 days for processing the files. You’ll be notified upon completion and provided with a reconciliation report to identify and correct any errors. Note that the ability to manually manage users and clients in the User List and My Clients area will be disabled during this time. It’s not uncommon to encounter errors; you should allow time to correct and resubmit your spreadsheets as much as needed.
- After the information has been successfully loaded, you will need to provide login credentials to Users (these will not be sent to them by us). They will need the UnitusTI login URL, the UnitusTI ID number (your five digit account number), their Username (“User ID”) and the password you created for them.
Step 1. Preparing the Files
To add Users (staff with logins), Students (called “Clients” in UnitusTI) to your account and designate security access and assign users to students, you will complete spreadsheets provided by our team that are formatted for upload to UnitusTI. Other files or documents will not be accepted. These pre-formatted Excel workbooks each contain a worksheet with the proper formatting that you may enter your information into, along with a special Instructions worksheet with examples and more information.
The three Excel workbooks are as follows:
Workbook 1: Client Information
(Users assigned to these clients will be able to view them in My Clients after they are successfully uploaded to UnitusTI.)
File name: client_upload.xlsx ( will be provided upon order)
To upload additions or changes to client or student information, complete the predefined table contained in the Excel worksheet “ client_upload.xlsx ”. The fillable sheet is labeled “ Client Information ”.
How to use the worksheet:
- Refer to the “Information” sheet (second tab in workbook) for information and examples
- Use the “Client Information” sheet (first tab in workbook) to enter the information for your account upload (this sheet is what will be uploaded to your UnitusTI account)Yellow highlighted cells are required.
- Each row represents a client
- Category corresponds to the area in UnitusTI where the information will be updated/added
- The ACTION cell defines which action you want to perform for that client; choose one of these actions:
- C: create
- U: update
- R: remove (archive)
- D: deactivate
- A: activate
Important : Cells highlighted yellow are required. Please do not reorder or delete the rows, columns or other formatting in the document. The “Client ID” is required to ensure that the upload process isn’t flagged with errors due to duplicate names. You may use any characters or letters for this field.
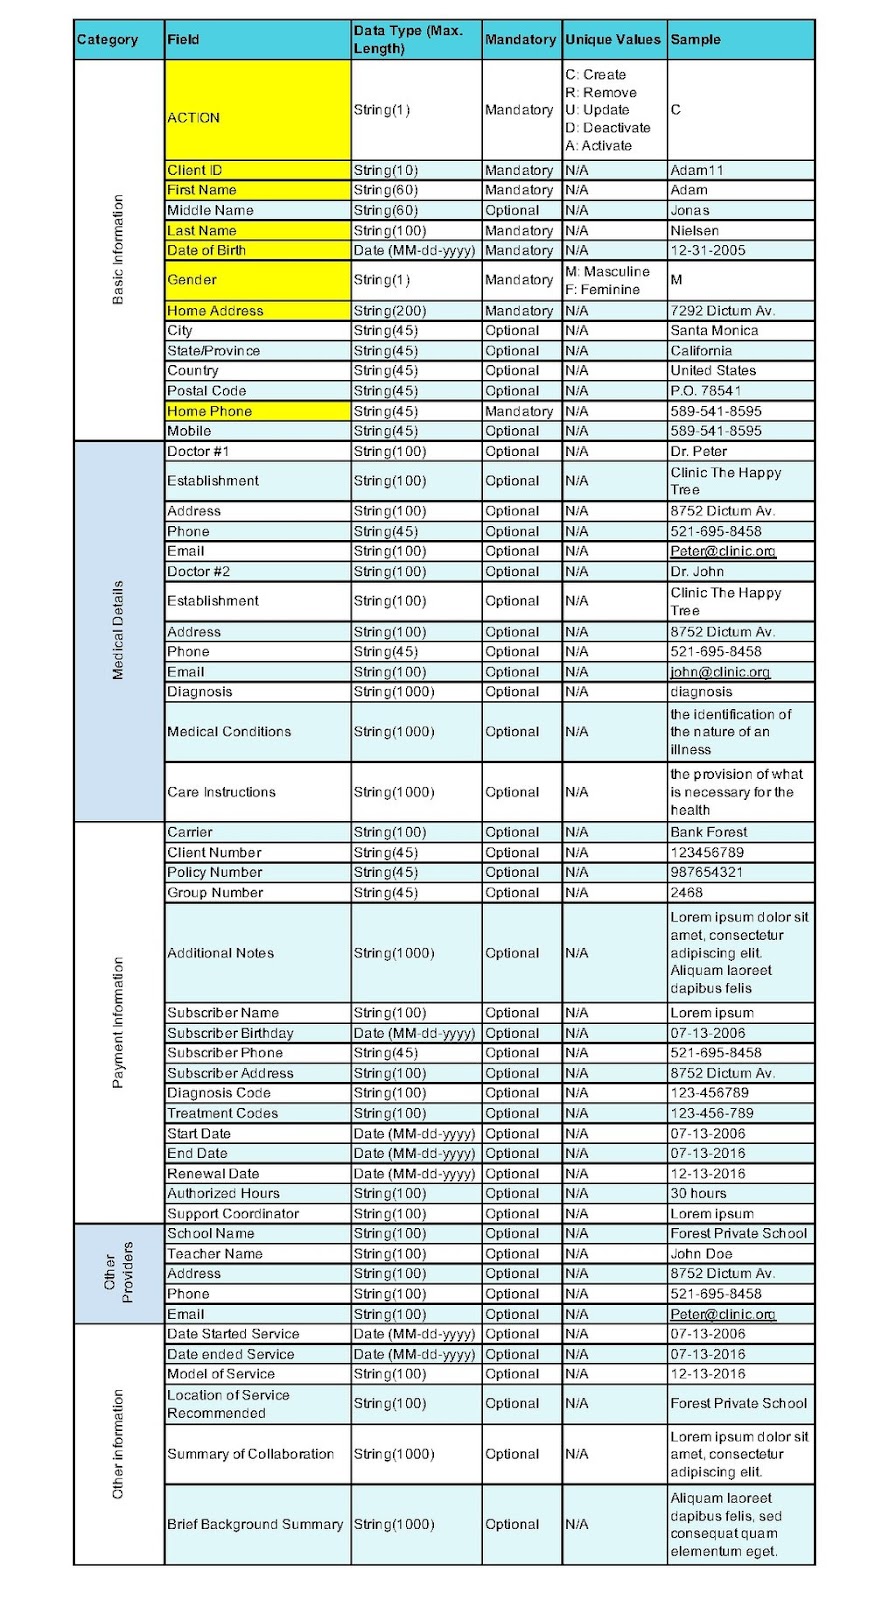
(Note: this example is found in the “Instructions” worksheet of client_upload.xlsx)
Workbook 2: User Information
Updates the User List area in UnitusTI
File name: user_upload.xlsx (will be provided upon order)
To upload additions or changes to client information, complete the predefined table contained in the Excel worksheet “user_upload.xlsx”. The fillable sheet is labeled “ User Information ”.
How to use the worksheet:
- Refer to the “Information” sheet (second tab in workbook) for information and examples
- Use the “User Information” sheet (first tab in workbook) to enter the information for your account upload (this sheet is what will be uploaded to your UnitusTI account)
- Yellow highlighted cells are required
- Each row represents a user
- Category corresponds to the area in UnitusTI where the information will be updated/added
- The ACTION cell defines which action you want to perform for that user; choose one of these actions:
- C : create
- U : update
- R : remove
Important : The “Password” cell is only mandatory when the ACTION value is C (create). Cells highlighted yellow are required. Please do not reorder or delete the rows, columns or other formatting in the document.
Tips for User creation: A username (also called User ID) may be flagged as a duplicate by the system if any UnitusTI subscriber has already used it (even outside your account). Additionally, usernames can’t be re-used after being removed in the past, nor can they be changed. Any of these cases can cause the system to show an error and not update or create the user account. You may wish to use a naming convention with a special identifier for your organization (for example a number string or prefix/suffix) that ensures your usernames will not be rejected as duplicates. If you do receive an error, you may identify which username needs to be changed in the reconciliation report. Usernames can include letters, numbers, and a period (.) or underscore (see the example in the information tab of the workbook).
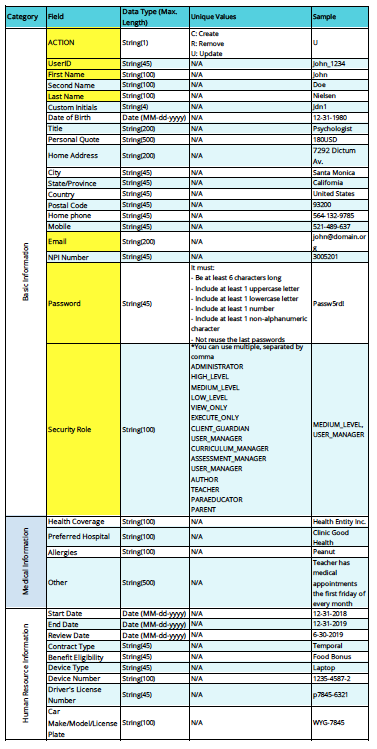
(Note: this example is found in the “Instructions” sheet of user_upload.xlsx)
Workbook 3: Client and User Assignments (Assigning team members)
Updates the User List menu area in UnitusTI
File name: user_client_assignment_upload.xlsx (will be provided upon order)
To designate which users should be assigned to which clients, please complete the Excel workbook named user_client_upload.xlsx . The workbook contains two sheets:
- Clients Assigned : this is the fillable sheet
- Information: for reference only - contains helpful information to aid you in completing the “Clients Assigned” worksheet
How to use the worksheet:
- Refer to the “Information” sheet (second tab in workbook) for information and examples
- Use the “Client Assignment” sheet (first tab in workbook) to enter the information for your account upload (this sheet is what will be uploaded to your UnitusTI account)
- Yellow highlighted cells are required
- Each row represents one client assigned to one user
- Category corresponds to the area in UnitusTI where the information will be updated/added
- The ACTION cell defines which action you want to perform for that client; choose one of these actions:
- C: create (assigns the user to the client)
- R: remove (unassigns the user from the client)
Important : Cells highlighted yellow are required. Please do not reorder or delete the rows, columns or other formatting in the document.
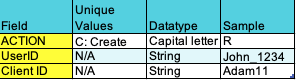
(Note: this example is found in the “Instructions” sheet in user_client_upload.xlsx.)
Step 2. Return The Completed Files To Us
When you have completed the three spreadsheet templates, please return them to Support in the email support ticket you created. You may wish to send these files back encrypted and send the password in a separate email.
Allow 3-10 days for processing the files. You’ll be notified upon completion and provided with a reconciliation report to identify and correct any errors. You may log into your UnitusTI account to review the information that has been created and review the reconciliation report to identify and correct any errors in the spreadsheets and resubmit them to us. Note that the ability to make changes within the User List and My Clients areas manually will be disabled during this time.
Our team will guide you through this process until the information has been successfully created.
Step 3. After a Successful Upload
After the information has been successfully uploaded, you can provide the login information for your users to access the account.
Provide users with the following information:
- the Login URL
- the UnitusTI ID number (the five digit account number is the same for all users)
- their Username (“User ID”)
- the password you created for them
The ability for Administrators to manage user and client records will be enabled in your account after the upload process is complete. Manage your user access and client profiles in the User List and My Clients area from this point on. Video tutorials for managing users and students (“clients”) can be found in these menu areas under the blue question mark icon (“?”) or in the Help Center.