UnitusTI Remote Upload Service: Your Guide to Bulk User & Client Management
The UnitusTI Remote Upload service is a paid feature designed for account owners who need to efficiently manage a large number of user and client profiles. Instead of manual entry, this service allows you to upload and update profile information in bulk using specially formatted spreadsheets. This is ideal for organizations with frequent changes to their staff or client base.
Understanding Users and Clients in UnitusTI
Before diving into the Remote Upload service, it's helpful to understand how users and clients function within UnitusTI.
- Users: These are the individuals who log into your UnitusTI account to provide services to your clients or students. Users can be staff members, administrators, parents/caregivers, or third-party care providers. User profiles are created in the User List , and they are assigned security roles that determine their access levels. For security and relevance, users are only able to see and work with clients who have been specifically assigned to them.
- Clients: These are your learners or students who receive services from a UnitusTI user. Client profiles are created for these individuals, and they do not log into UnitusTI directly. Similar to users, clients are only visible to the users they have been assigned to.
- Assignments: The process of assigning a user to a client links them together in the system, allowing the user to access and work with that client's information, programs, and assessments.
Example: Imagine you're a teacher (a User ) using UnitusTI to run an alphabet program with a student. Your student is a Client who has been assigned to your user profile. When you log in, you'll see your assigned students in your "My Clients" list, enabling you to manage their programs and assessments directly.
Managing Users and Clients: Manual vs. Automated
UnitusTI offers two primary ways to manage your user and client profiles:
Manual Management
You can manually create and edit users and clients, as well as manage their assignments, directly within your UnitusTI account. This is suitable for smaller organizations or infrequent updates.
- Where to find instructions: For detailed instructions on manual management, please refer to our support site or watch the video tutorials available under the " ? " icon within the "User List" and "My Clients" areas of your UnitusTI account.
Automated Upload with Remote Upload Service
If you have a large volume of users and clients to manage, or if you need to make recurring updates, the Remote Upload service is your solution. This service allows you to send us your data in specially formatted spreadsheets, and we'll handle the bulk import.
There are three key spreadsheets involved:
- User Information: To create, edit, or delete user profiles.
- Client Information: To create, edit, or delete client profiles.
- Client and User Assignments: To assign users to clients.
You have two options for using the Remote Upload service:
- One-Time Spreadsheet Upload: We upload your data once, and you manage future changes manually within UnitusTI. For more information, please read our help article: "UnitusTI One-Time Bulk Data Sync Service."
- Recurring Spreadsheet Upload: You submit spreadsheets on an ongoing basis for continuous automated updates. This option requires setting up a cross-platform Amazon S3 application (like WinSCP) to connect to your secure remote directory in UnitusTI. Instructions for this setup are provided below.
Single Source Data Management for Recurring Uploads
If you choose the recurring spreadsheet upload option, your ability to manually manage user and client profiles directly in the "User List" and "My Clients" areas of UnitusTI will be disabled . This is known as "single source data management."
Why is this necessary? To prevent data duplication errors or inconsistencies that can arise from having multiple data entry points. All changes to user and client data will exclusively occur through the Remote Upload service.
If you attempt to perform any of the following actions manually while recurring upload is enabled, you will see an error message stating "Access to this component is not available":
- Creating, activating, deactivating, archiving, or updating clients in "My Clients."
- Creating, removing, or updating users in the "User List."
- Assigning or unassigning clients to users.
Using the Remote Upload Service: Step-by-Step
Step 1. Set Up Your Files
To add, edit, or delete user and client information, you'll use specific Excel workbooks provided by our team. Each workbook contains two sheets: a template with the correct formatting and an instructions sheet.
We will provide you with the following pre-formatted Excel workbooks:
- Workbook 1: Client Information (client_upload.xlsx)
-
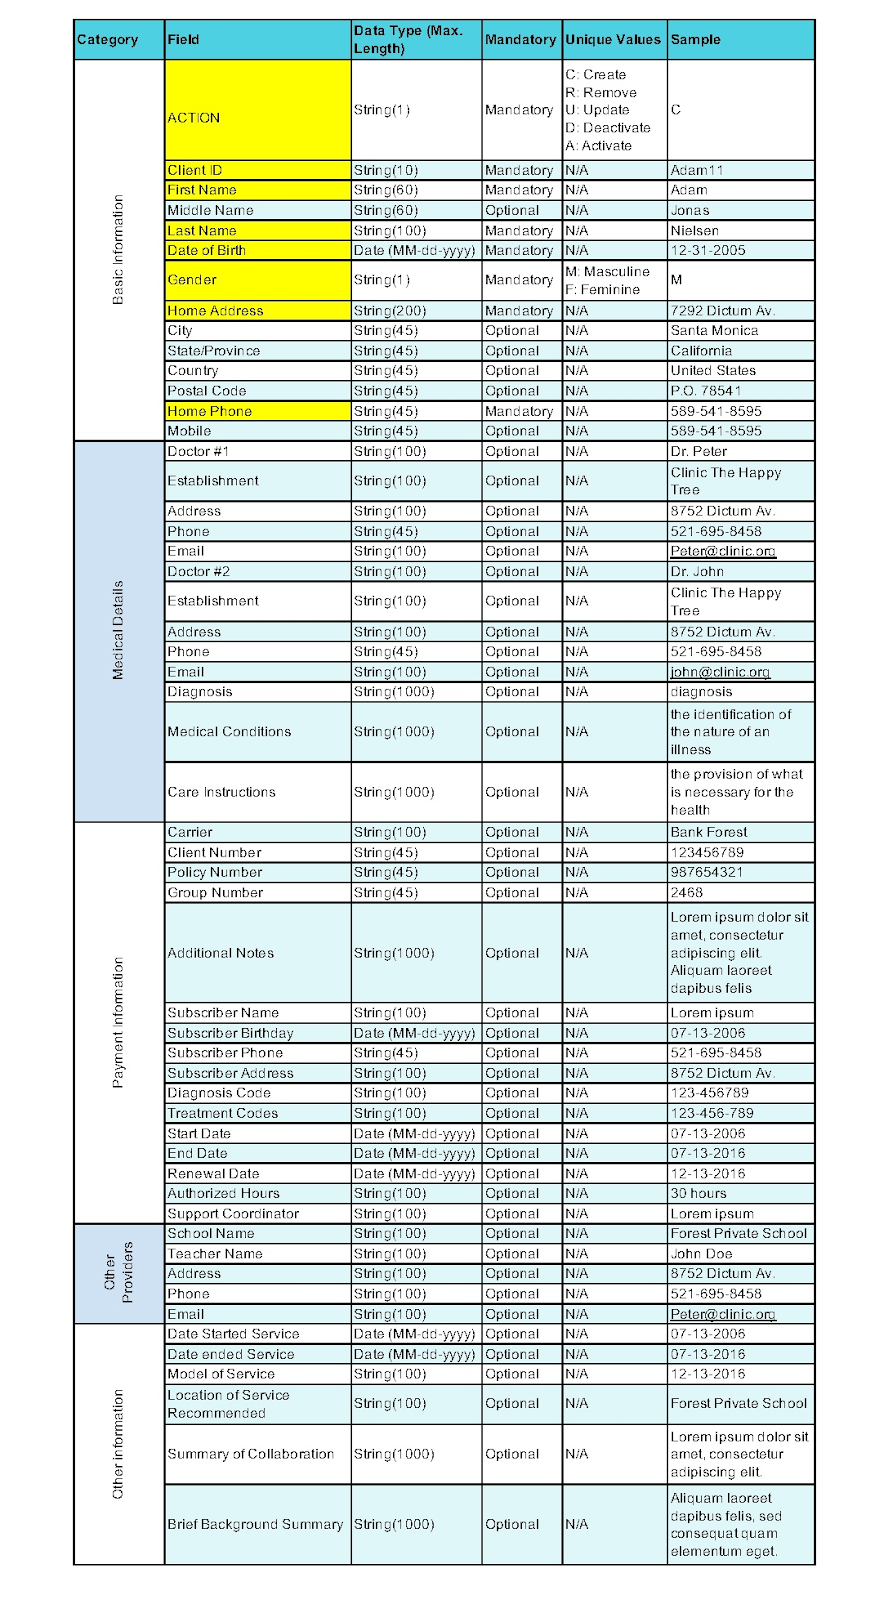
- Purpose: Updates the "Center > My Clients" menu area in UnitusTI.
- How to use:
- Use the "Client Information" sheet (first tab) to enter your data.
- Refer to the "Information" sheet (second tab) for guidance and examples.
- Yellow-highlighted cells are required.
- Each row represents one client.
- The ACTION cell defines the action to perform:
- C: Create
- U: Update
- R: Remove (archive)
- D: Deactivate
- A: Activate
- Important: Do not reorder or delete rows, columns, or other formatting. The "Client ID" is required to prevent duplicate name errors.
-
Workbook 2: User Information (user_upload.xlsx)
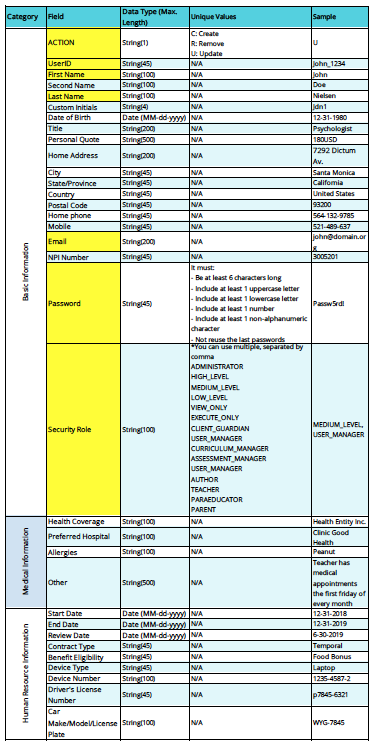
- Purpose: Updates the "Center > User List" menu area in UnitusTI.
- How to use:
- Use the "User Information" sheet (first tab) to enter your data.
- Refer to the "Information" sheet (second tab) for guidance and examples.
- Yellow-highlighted cells are required.
- Each row represents one user.
- The ACTION cell defines the action to perform:
- C: Create
- U: Update
- R: Remove
- Important: The "Password" cell is only mandatory when the ACTION is "C" (create). Do not reorder or delete rows, columns, or other formatting.
-
Workbook 3: Client and User Assignments (user_client_upload.xlsx)
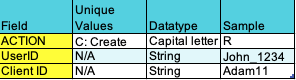
- Purpose: Designates which users are assigned to which clients.
- How to use:
- Use the "Client Assignment" sheet (first tab) to enter your data.
- Refer to the "Information" sheet (second tab) for guidance and examples.
- Yellow-highlighted cells are required.
- Each row represents one client assigned to one user.
- The ACTION cell defines the action to perform:
- C: Create (assigns the user to the client)
- R: Remove (unassigns the user from the client)
- Important: Do not reorder or delete rows, columns, or other formatting.
Our team will provide these pre-formatted workbook files for completion once you order the service.
Step 2. Set Up The Connection
This step differs based on your chosen upload method:
For One-Time Upload |
For Recurring Service |
|
Once you've completed the three spreadsheet templates, please return them to our Support Team.
|
To connect to your secure remote directory in UnitusTI, you will need to use a cross-platform application (e.g., WinSCP) that supports Amazon S3 connections.
|
Step 3. (For Recurring Service) Upload Files
After completing the Amazon S3 setup in Step 2, you'll be connected to your organization's remote directory. Create, edit, or delete the files in this directory as needed.
- Automation: All files in this directory will be automatically uploaded to your UnitusTI account every 24 hours at midnight UTC.
Step 4. (For Recurring Service) Check The Logs
Within your organization's remote directory folder, you will find a folder named " Logs ."
- Note: Logs will automatically expire in 7 days.
In the "Logs" folder, you'll find two types of files:
-
load.log_[date]_[time]:
This file contains a log for each row processed in your uploaded files, including:
- The upload date and time (UTC).
- Your UnitusTI ID#.
- Which spreadsheet file the row belongs to ([CLIENT], [USER], or [CLIENT-USER]).
- The ClientID, UserID, or [ClientID][UserID] for that row.
- The action performed (e.g., [C], [R], [U]).
- [Success] if the upload was successful, or [Error] if it failed.
-
Example of a successful row:
# - 08/19/2019 20:20:45– [10001] [CLIENT] [12345][C][SUCCESS]
Example of a failed row:
# - 08/19/2019 20:20:45– [10001] [CLIENT] [12345][C][ERROR]
-
loaderror.log_[date]_[time]:
This file specifically logs rows that failed to upload, providing additional details:
- The upload date and time (UTC).
- Your UnitusTI ID#.
- Which spreadsheet file the row belongs to ([CLIENT], [USER], or [CLIENT-USER]).
- The ClientID, UserID, or [ClientID][UserID] for that row.
- The action performed (e.g., [C], [R], [U]).
- The specific cause of the error.
-
Example:
# - 08/19/2019 20:20:45– [10001] [CLIENT] [12345][C][No data found]
Important: UnitusTI is not responsible for incorrect information or duplicate files contained within your submitted data. However, we will work with you to resolve any errors you encounter during the upload process.
How to Order the Service
To order the UnitusTI Remote Upload service, or for any further assistance, please reach out to our Support Team by:
- Submitting a support ticket from the " ? " icon in your account.
- Visiting the Help Center at https://support.mundopato.com/hc to submit a request.