Important note about using Service Codes in Calendar Events
Using Service Codes In UnitusTI
Assigning Service Codes to Clients and Users
Multiple assignments of the same code to a client in the same period of time
Using Session Notes in UnitusTI
Invite Other Users to Session Notes
Filters for the Session Notes Tab
Charts for the Session Notes Tab
Unit Balance Reporting for Service Codes
Filters for the Service Codes Tab
Charts for the Service Codes Tab
Additional filters for the Session Notes Tab
Service Codes & Session Notes
Updates Overview
Service Codes and Session Notes have gotten some new features and functionality in UnitusTI. Service Codes have moved from the Center Information area to a brand new module right in the main menu. Service codes have been enhanced to include the ability to create service codes, assign them, and report their use by creating session notes. Additional functionality includes the ability to assign unit caps and track and report on the usage by client and user.
Important note about using Service Codes in Calendar Events
Note that service codes may still be used in your Calendar events in order to create a Session Tracking report, which is exclusively intended to track calendar event hours. Using service codes in calendar events is not tracked in the Session Notes Dashboard, and codes used in events do not first need to be assigned to clients in order to be added to events. If you are using the Session Notes Dashboard to track service code usage, know that this report calculates service code usage exclusively from session notes.
Some other features and functionality that have changed:
- The new service code functionality is tracked using session notes instead of calendar events
- The ability to view other users’ session notes has moved to the Session Notes Dashboard, where you can see all notes for your assigned clients and create customized reports
- Client/guardian roles no longer can view session notes - review the updated security roles for Session Notes and Service Codes below
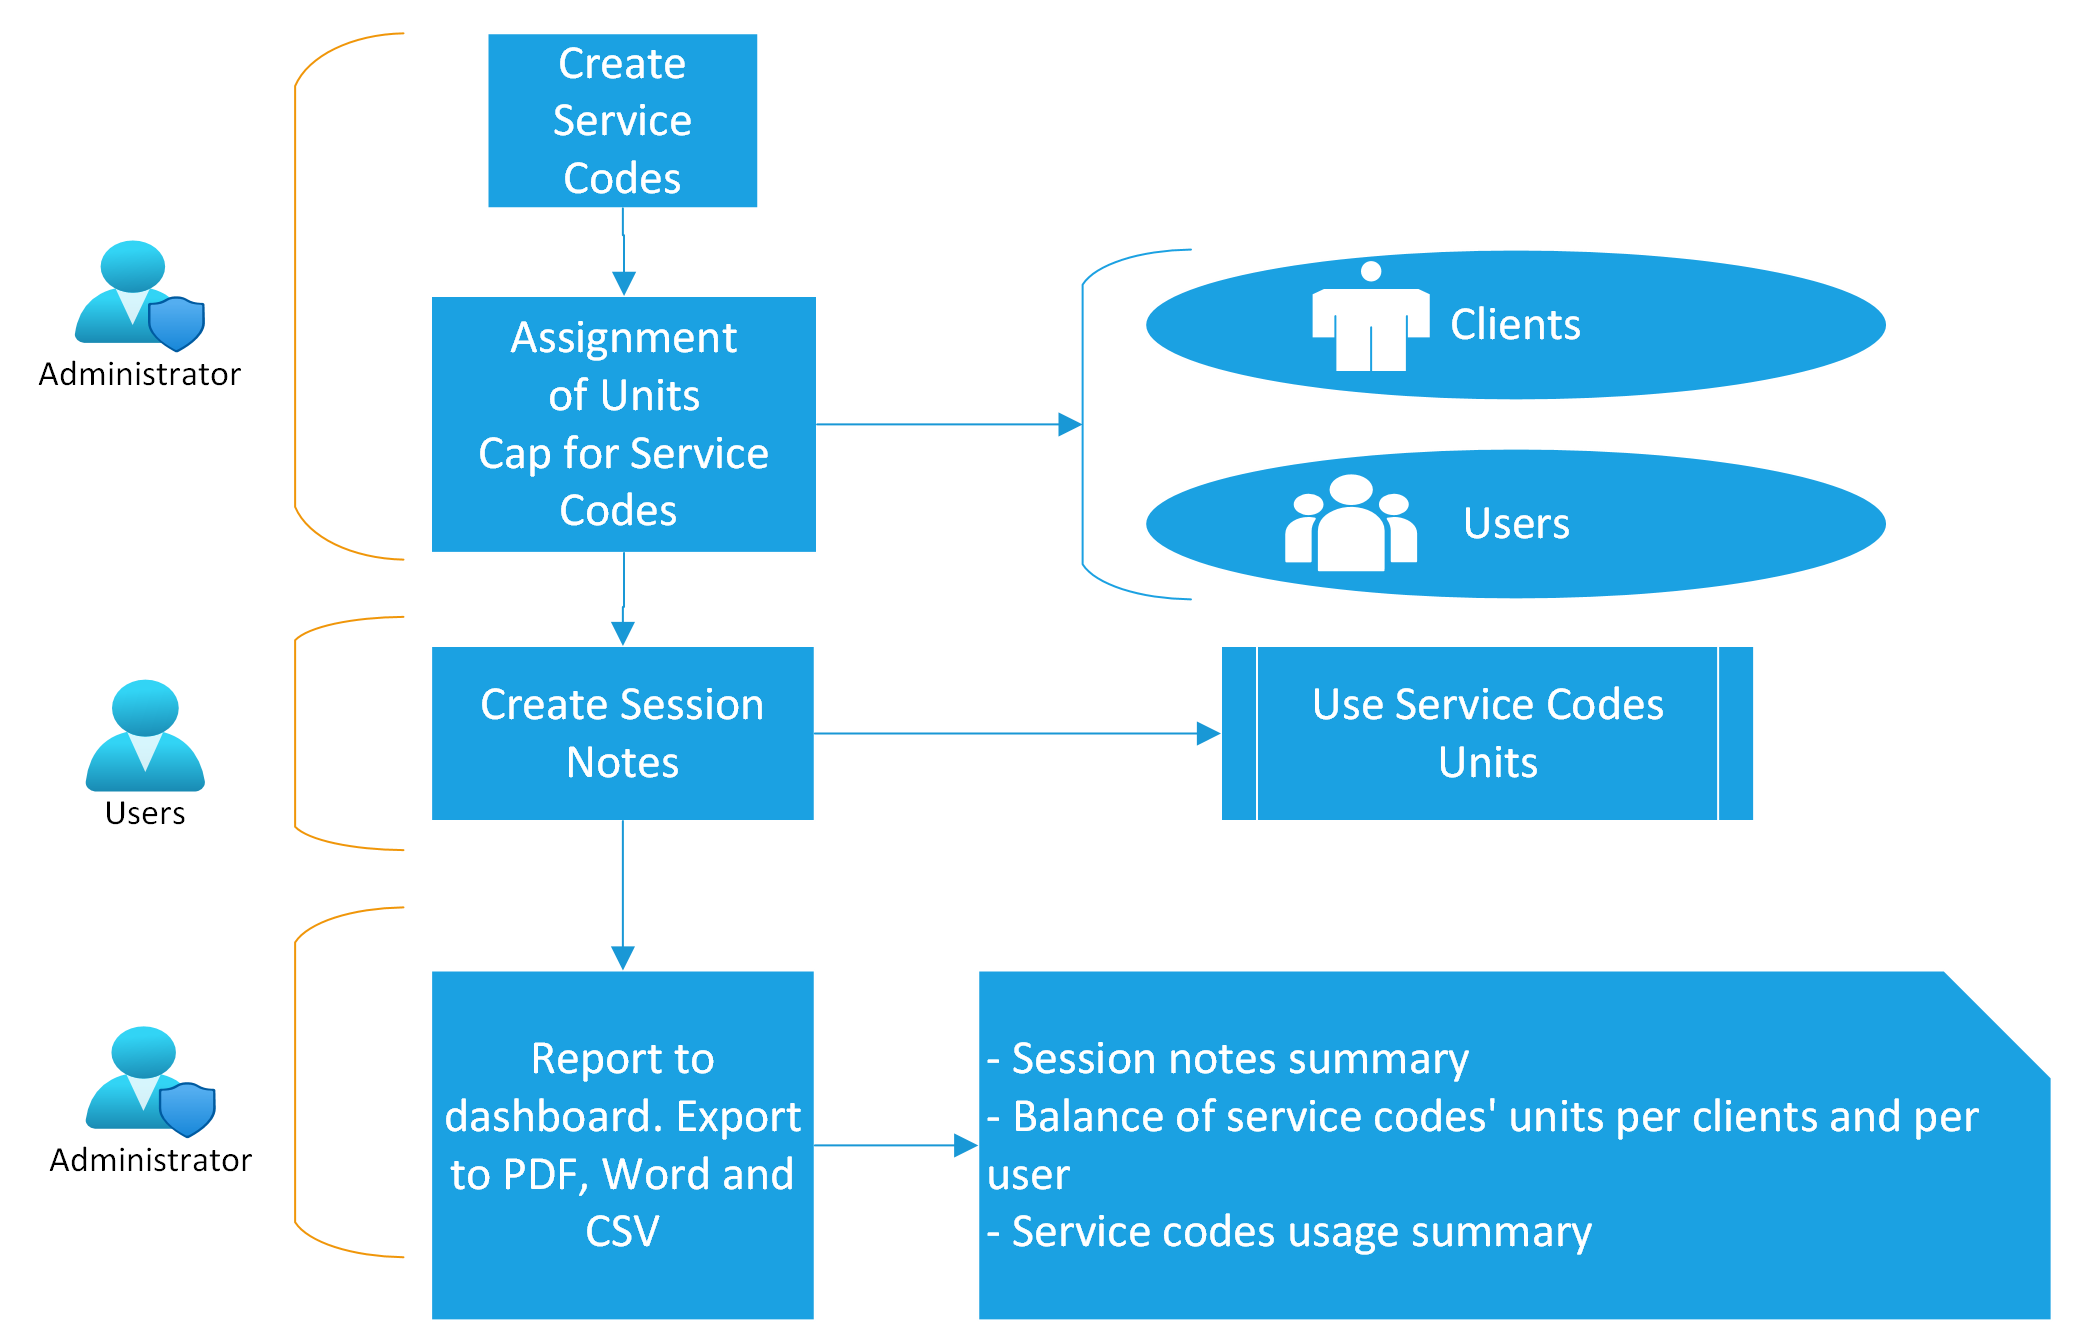
The diagram below demonstrates the lifecycle of service codes and session notes in UnitusTI:
Using Service Codes In UnitusTI
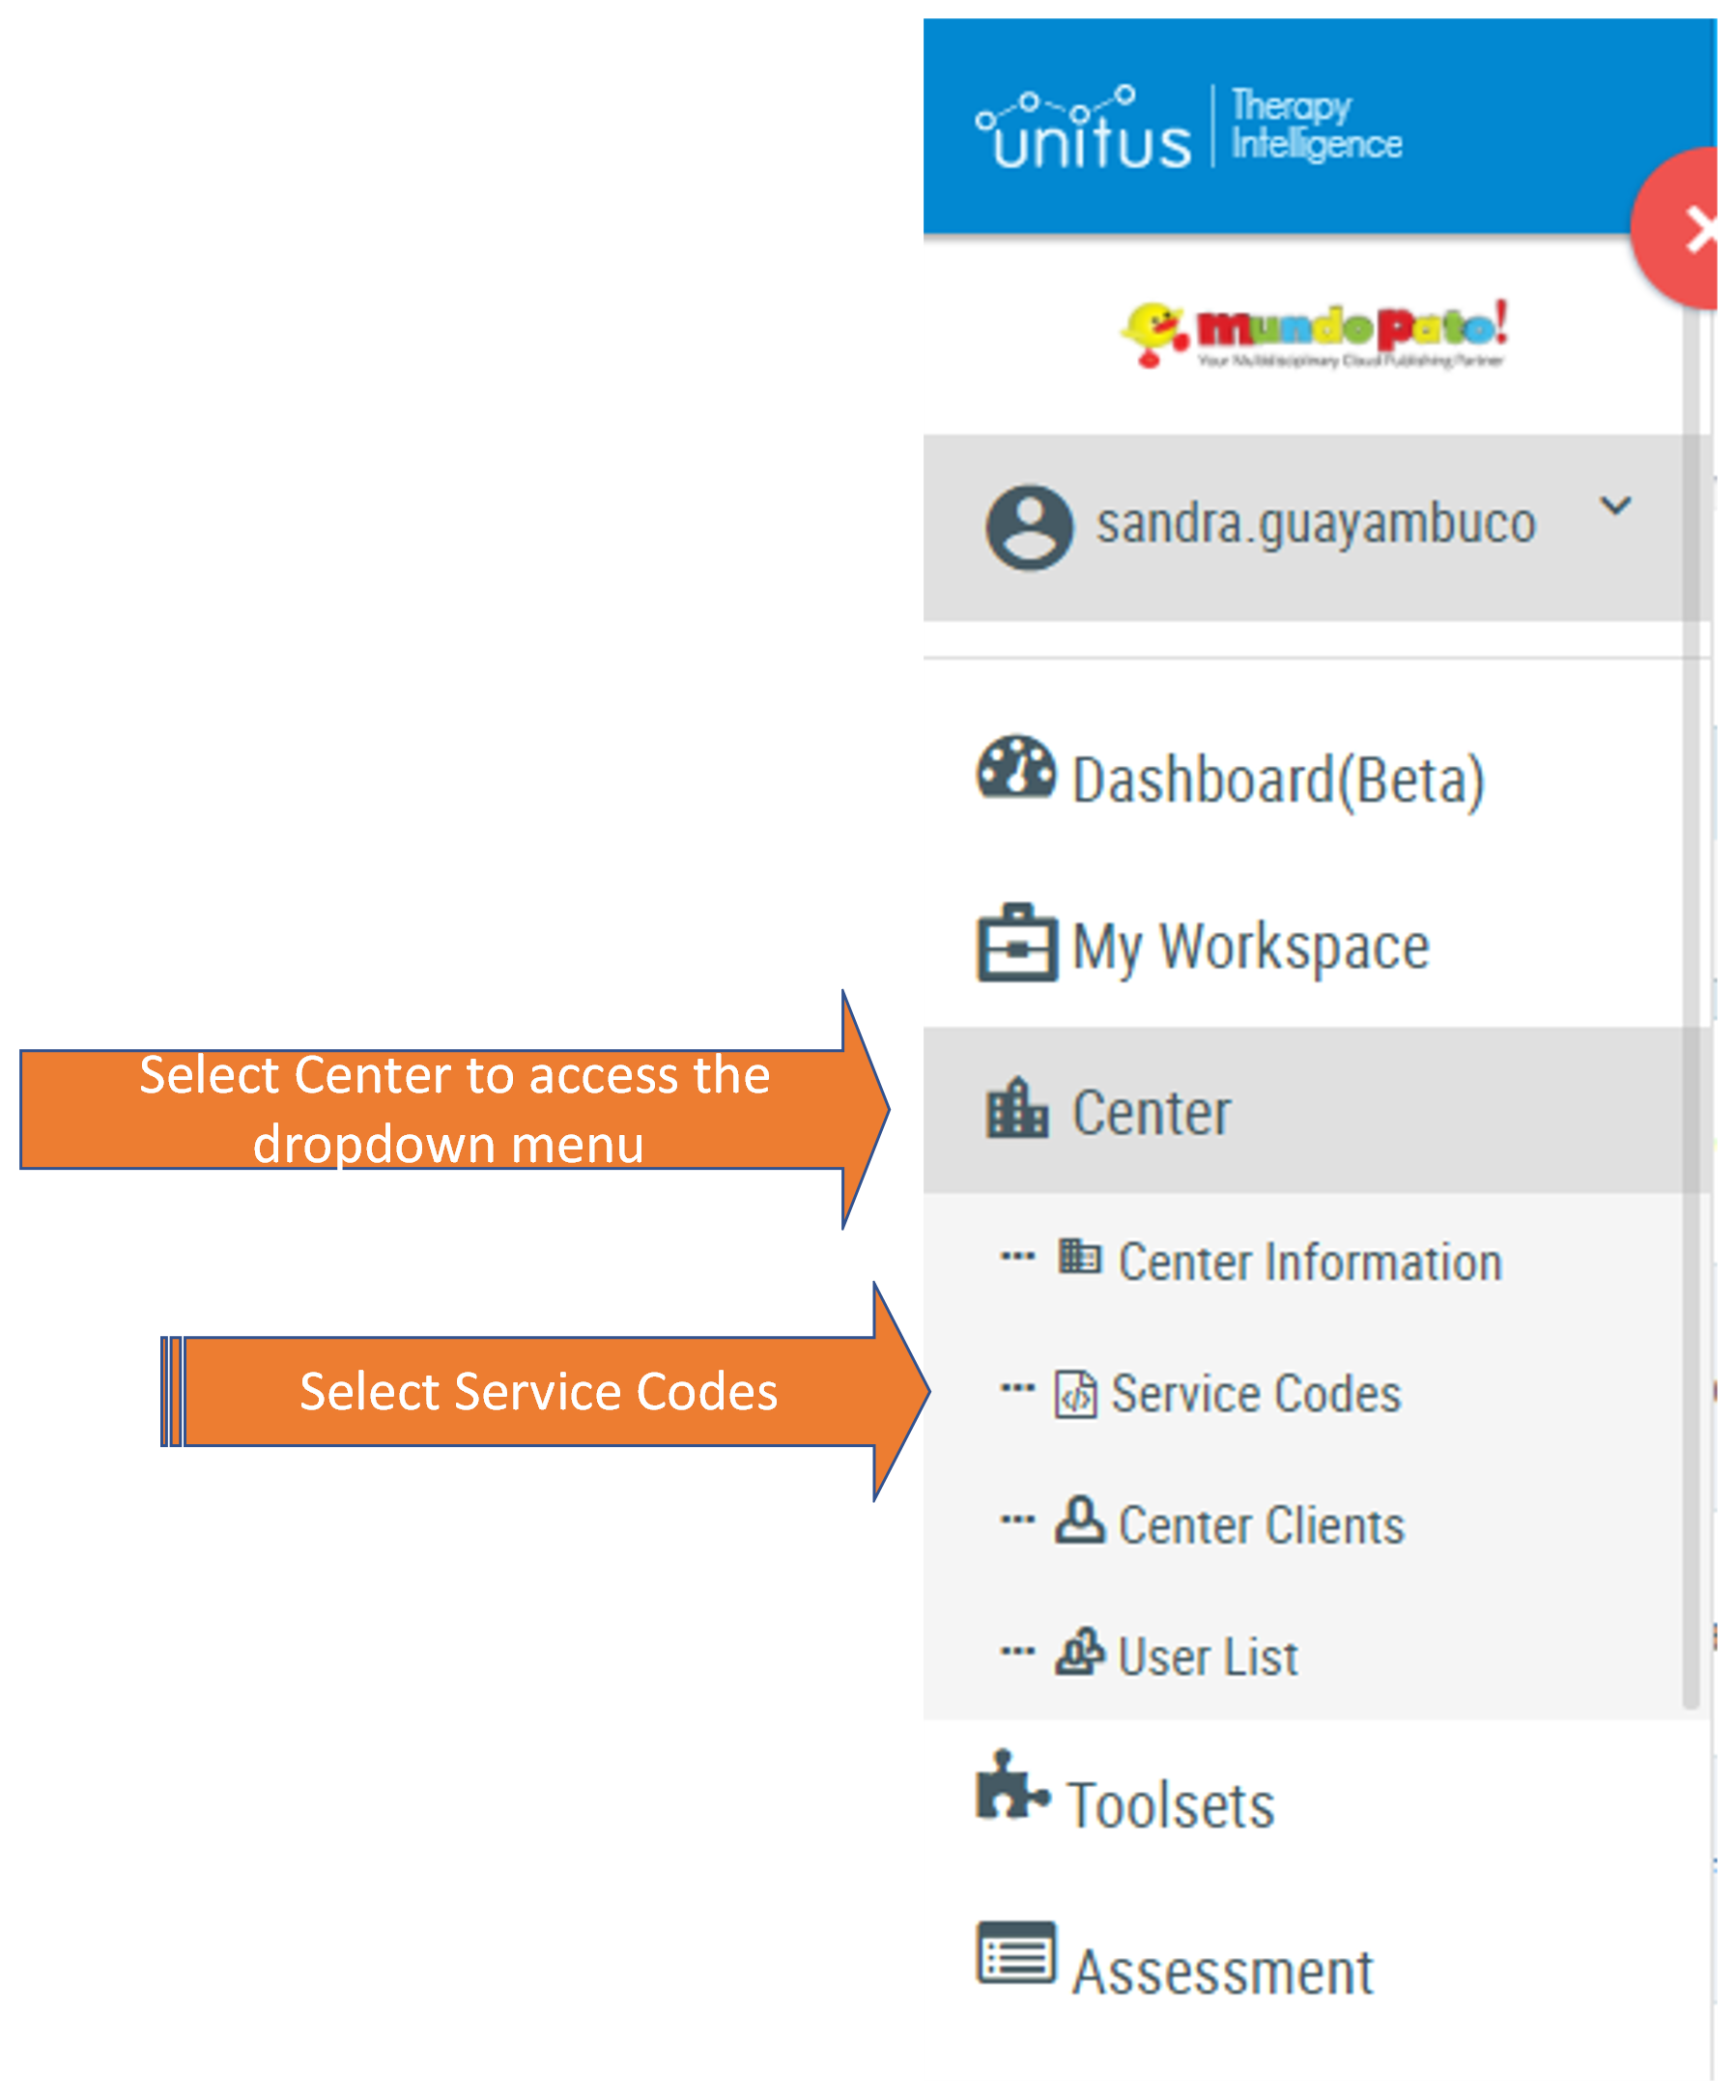
(Note that access and functionality in this area is governed by a user’s security role).
In the main menu under “Center”, you will see a new module called “Service Codes”, where you can view, create, update and remove service codes for your organization (see screenshot above).
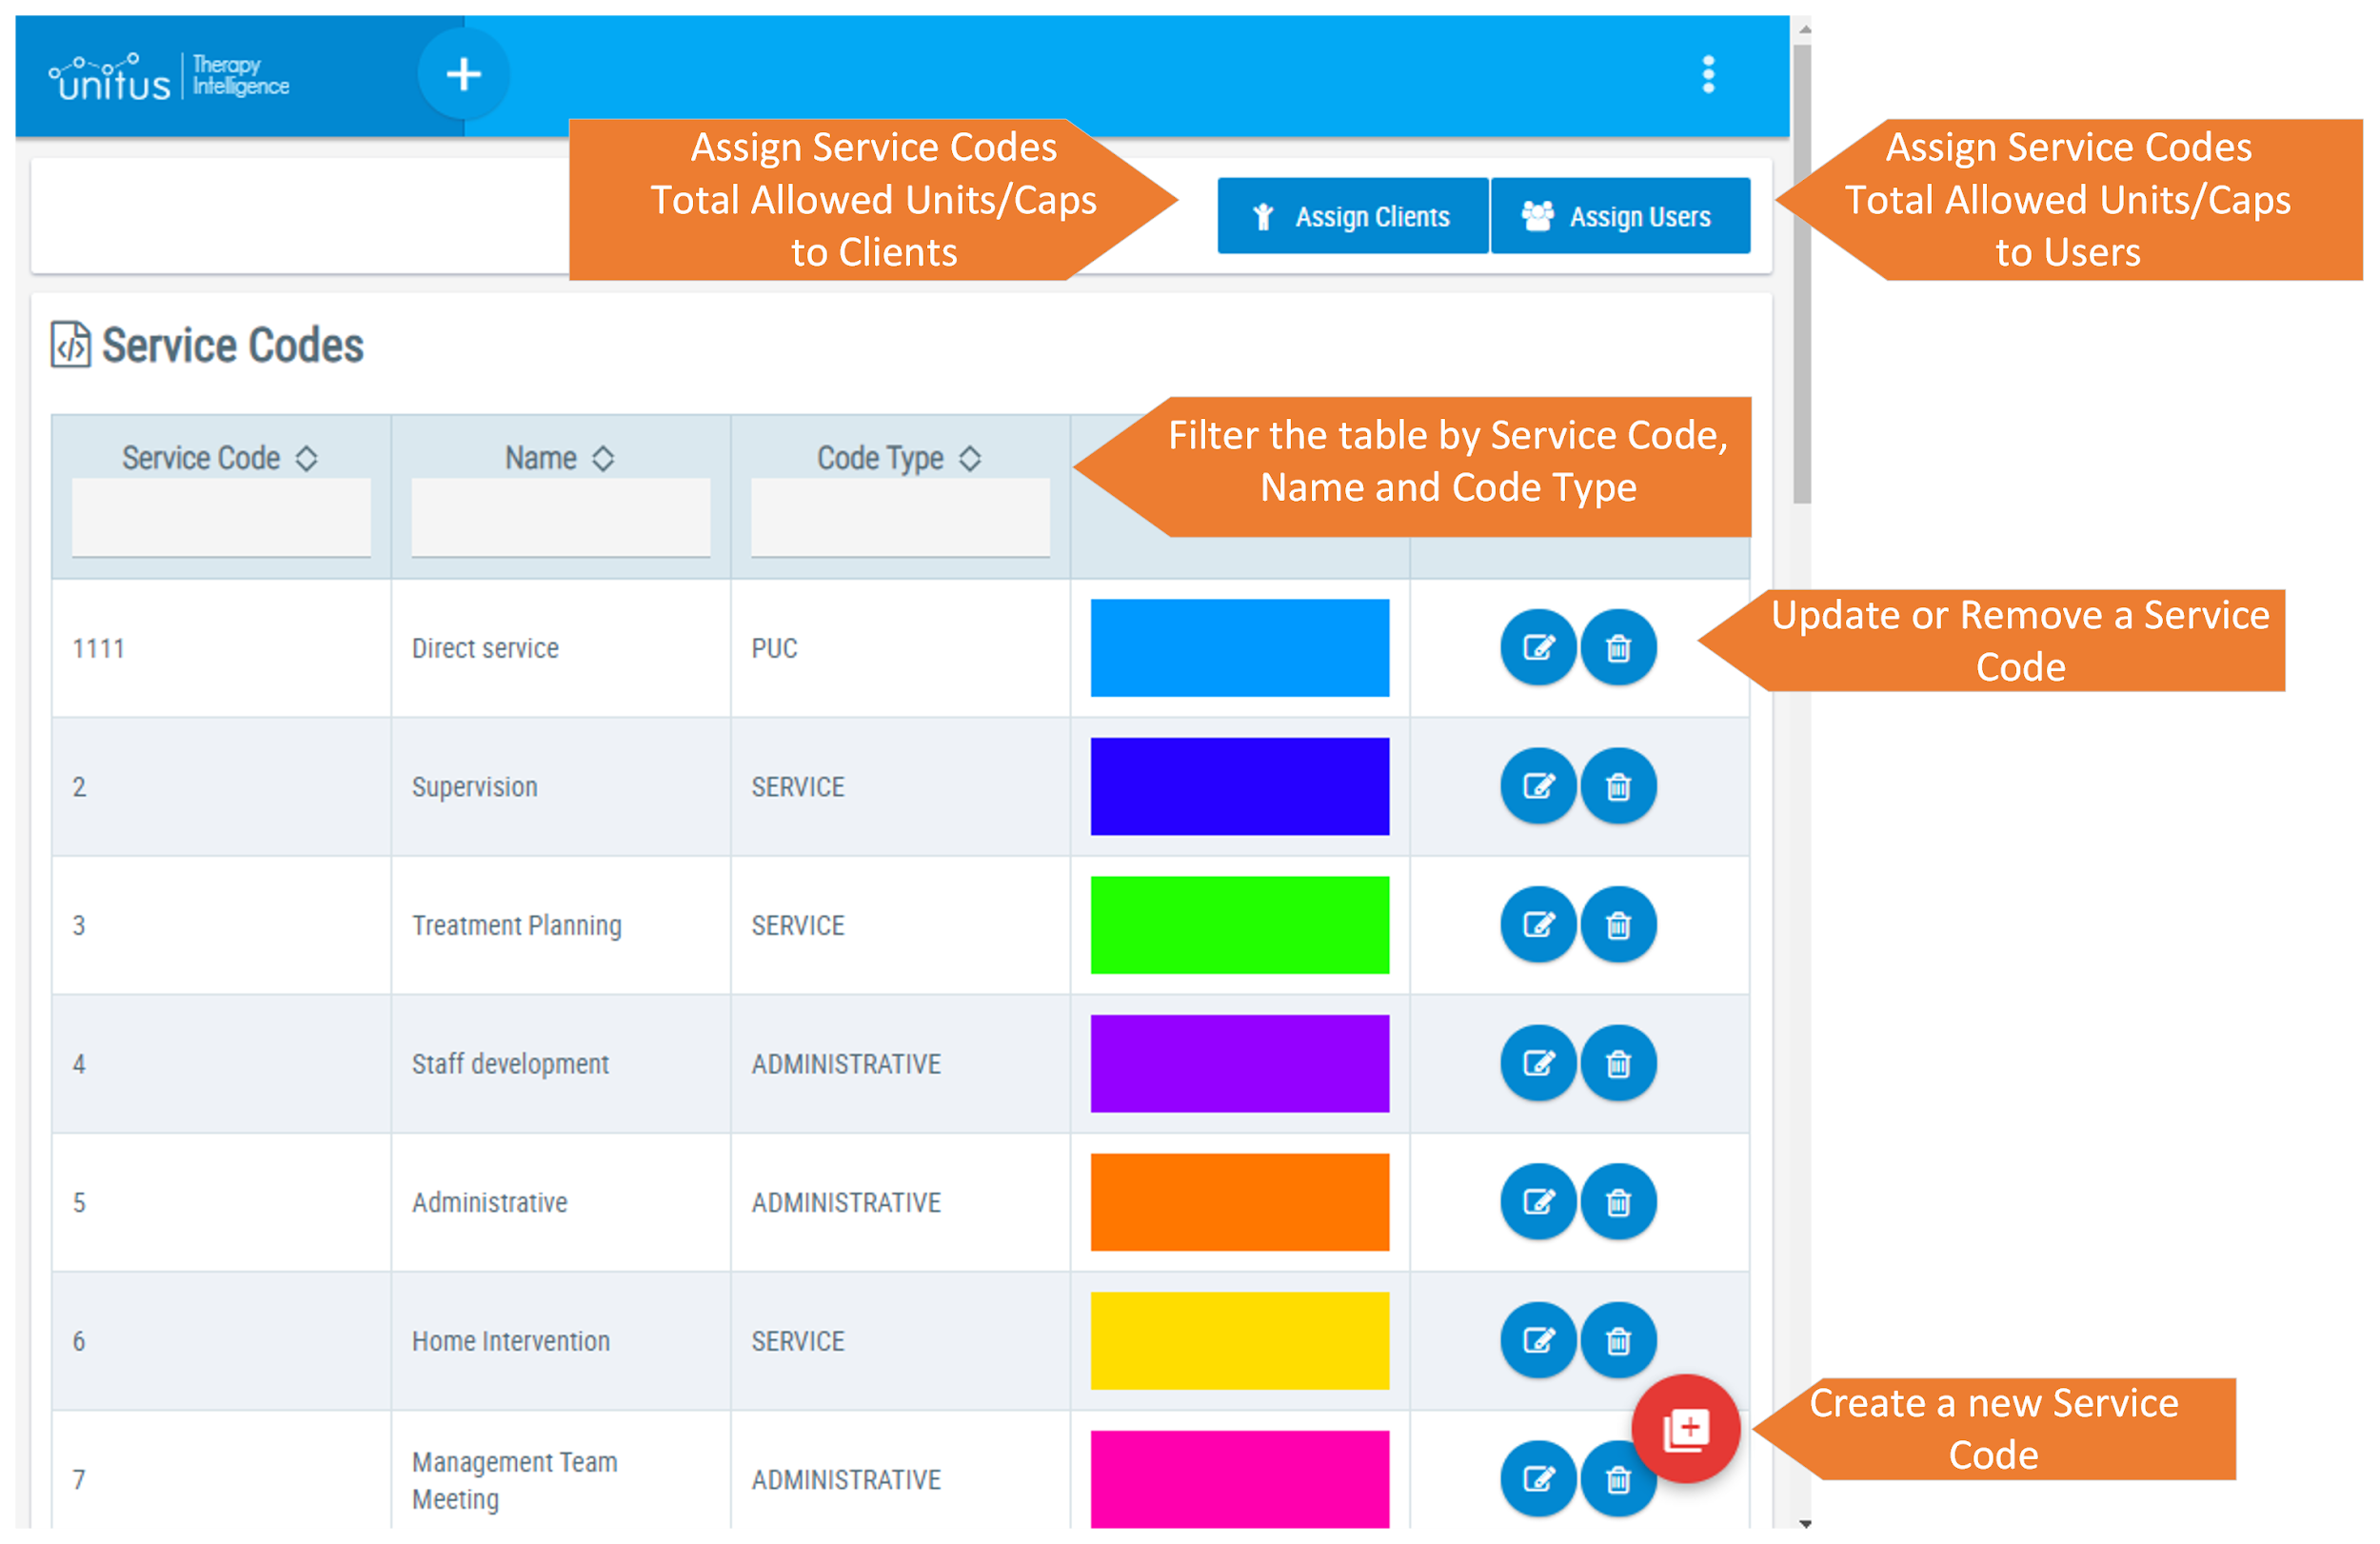
The Service Codes page displays a list of existing service codes and allows you to create new ones using the red button in the bottom right corner of the page. Existing codes are displayed with the service code, name, description, code type and color ID. In the Actions column on the right, you may edit or delete a code by selecting the appropriate icon. Using the “Assign By Clients” and “Assign By Users” buttons at the top right, you can assign service codes to each and designate validity, allowed usage and other customizations.
Creating a Service Code
Service codes are now created and managed in the “Service Codes” area found in the main menu under “Center”.
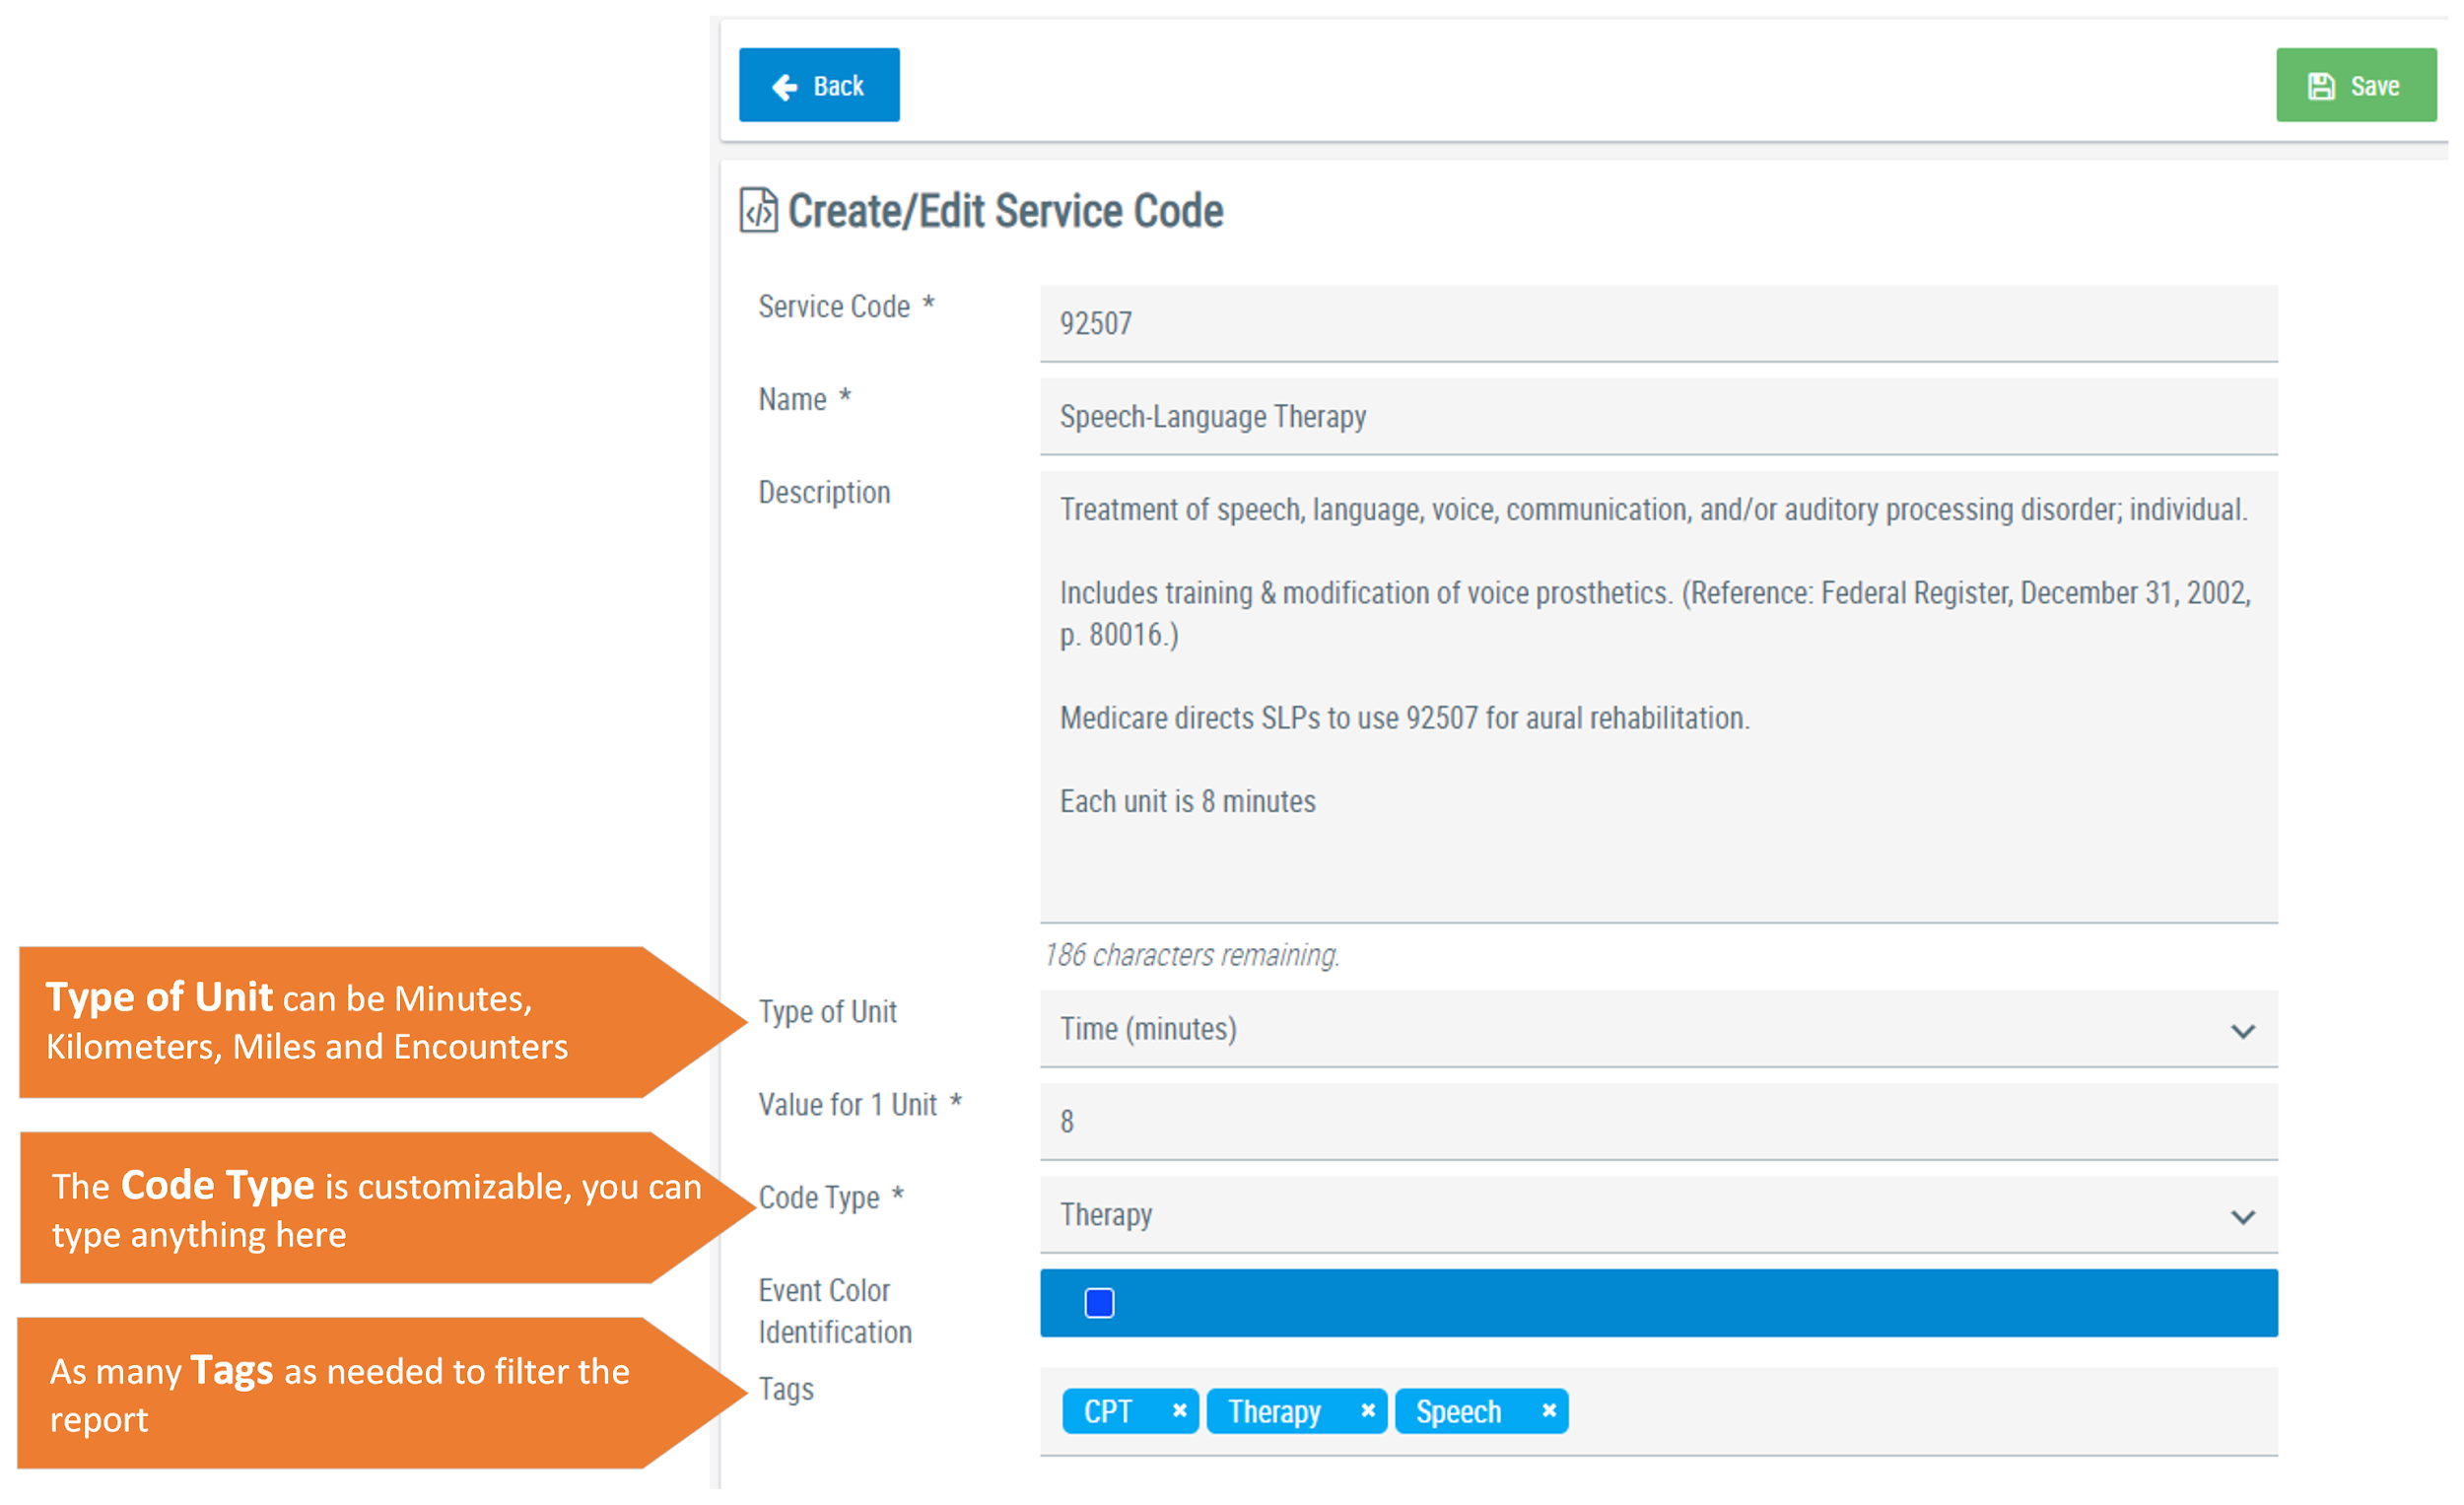
When creating service codes in UnitusTI, you can now assign a unit value for each code. A unit can be measured in various ways: for example, by minutes (if it is a time based service code), by encounters (if it is a service code based on sessions) or by distance (if it is a kilometers/miles based service code).
The unit value is set per service code; it is unique and its usage will be reported in the Session Notes Dashboard.
Unit Type & Value
The service code usage can be measured by units, you can decide what a unit is, it can be time, encounters or distance in kilometers or miles. Unit caps (maximum allowed amount) can also be designated (see the sections below for assigning units to users and clients).
- Time units: If the service code is time based, you can type the value in minutes. For example, CPT code 97110 for Therapeutic Exercise is a time based code and each unit is 23 minutes.
- Encounter units: The service code unit can be measured by sessions, encounters or visits. For example, code H0032 for Individual Treatment Plan (ITP) Development and Monitoring measures units as the number of encounters.
- Distance units: The service code can measure distance in miles or kilometers. For example, a service code for transportation might be measured in number of miles, with the value set as 1 unit equaling 5 miles.
Tags
Tags allows you to organize your service codes and filter the dashboard by the service code tags.
Assigning Service Codes to Clients and Users
In the top right corner you will see two buttons “Assign by Clients” and “Assign by Users”:
- Assignments by Client: From this section you can view, create and edit service code assignments to the clients you are assigned to.
- Assignment by User: From this section you can view, create and edit service code assignments to the users in your UnitusTI account.
You can assign caps or a limited number of units to one or multiple clients and users to restrict their use and track the usage of service code through time.
Assign By Clients
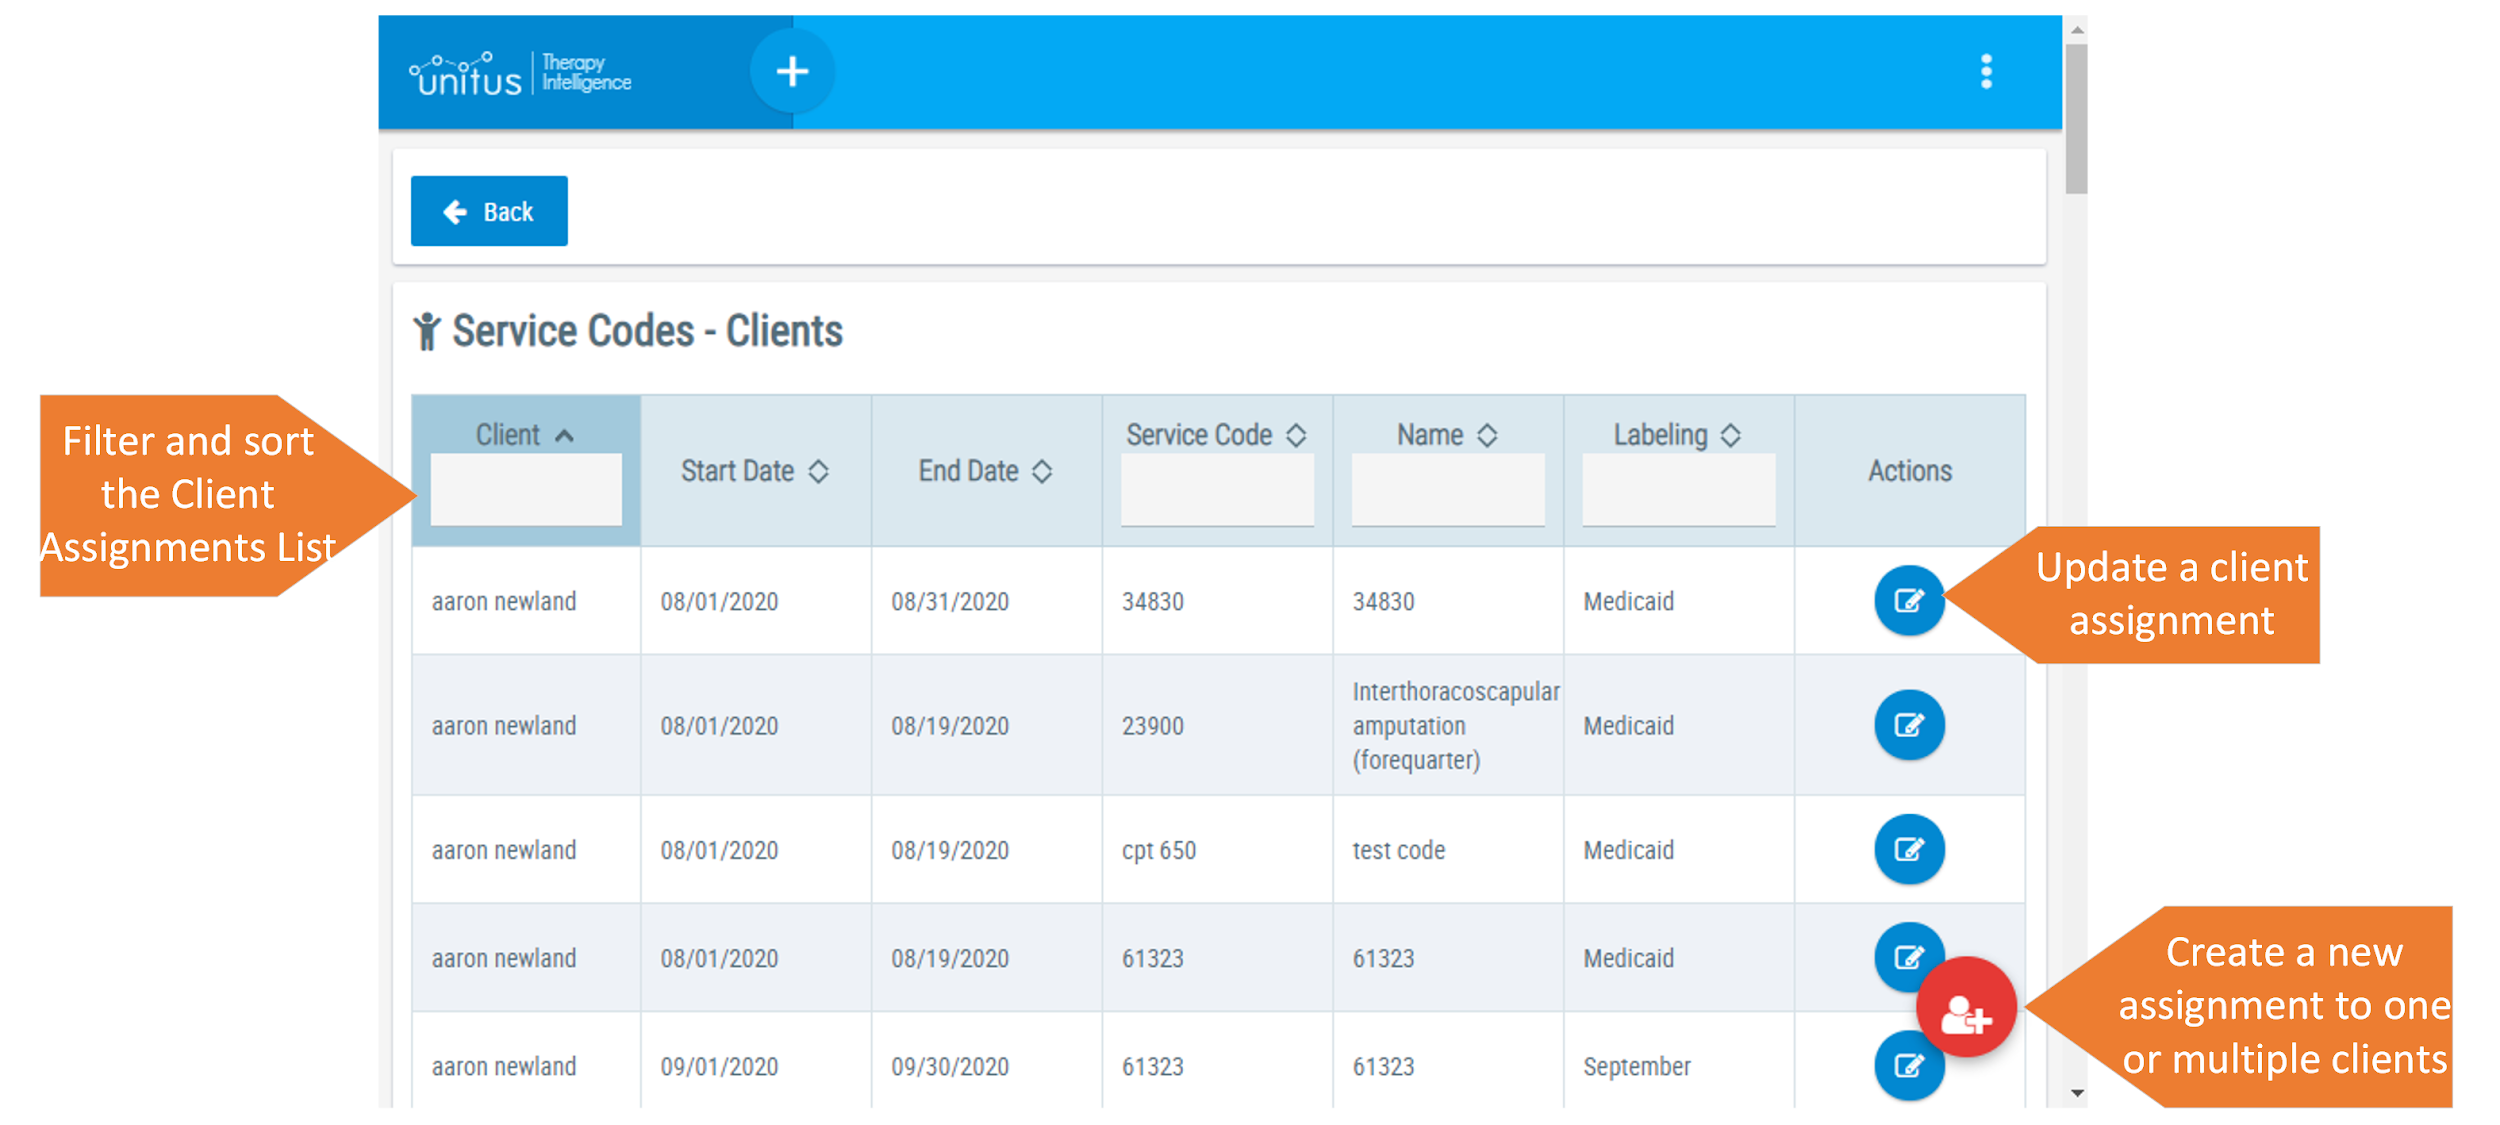
In the table of the assignments by clients you will be able to assign service codes to your clients to track and manage usage and allowed limits. Create new assignments using the red button in the right bottom corner. Update, manage and remove current assignments from the list:
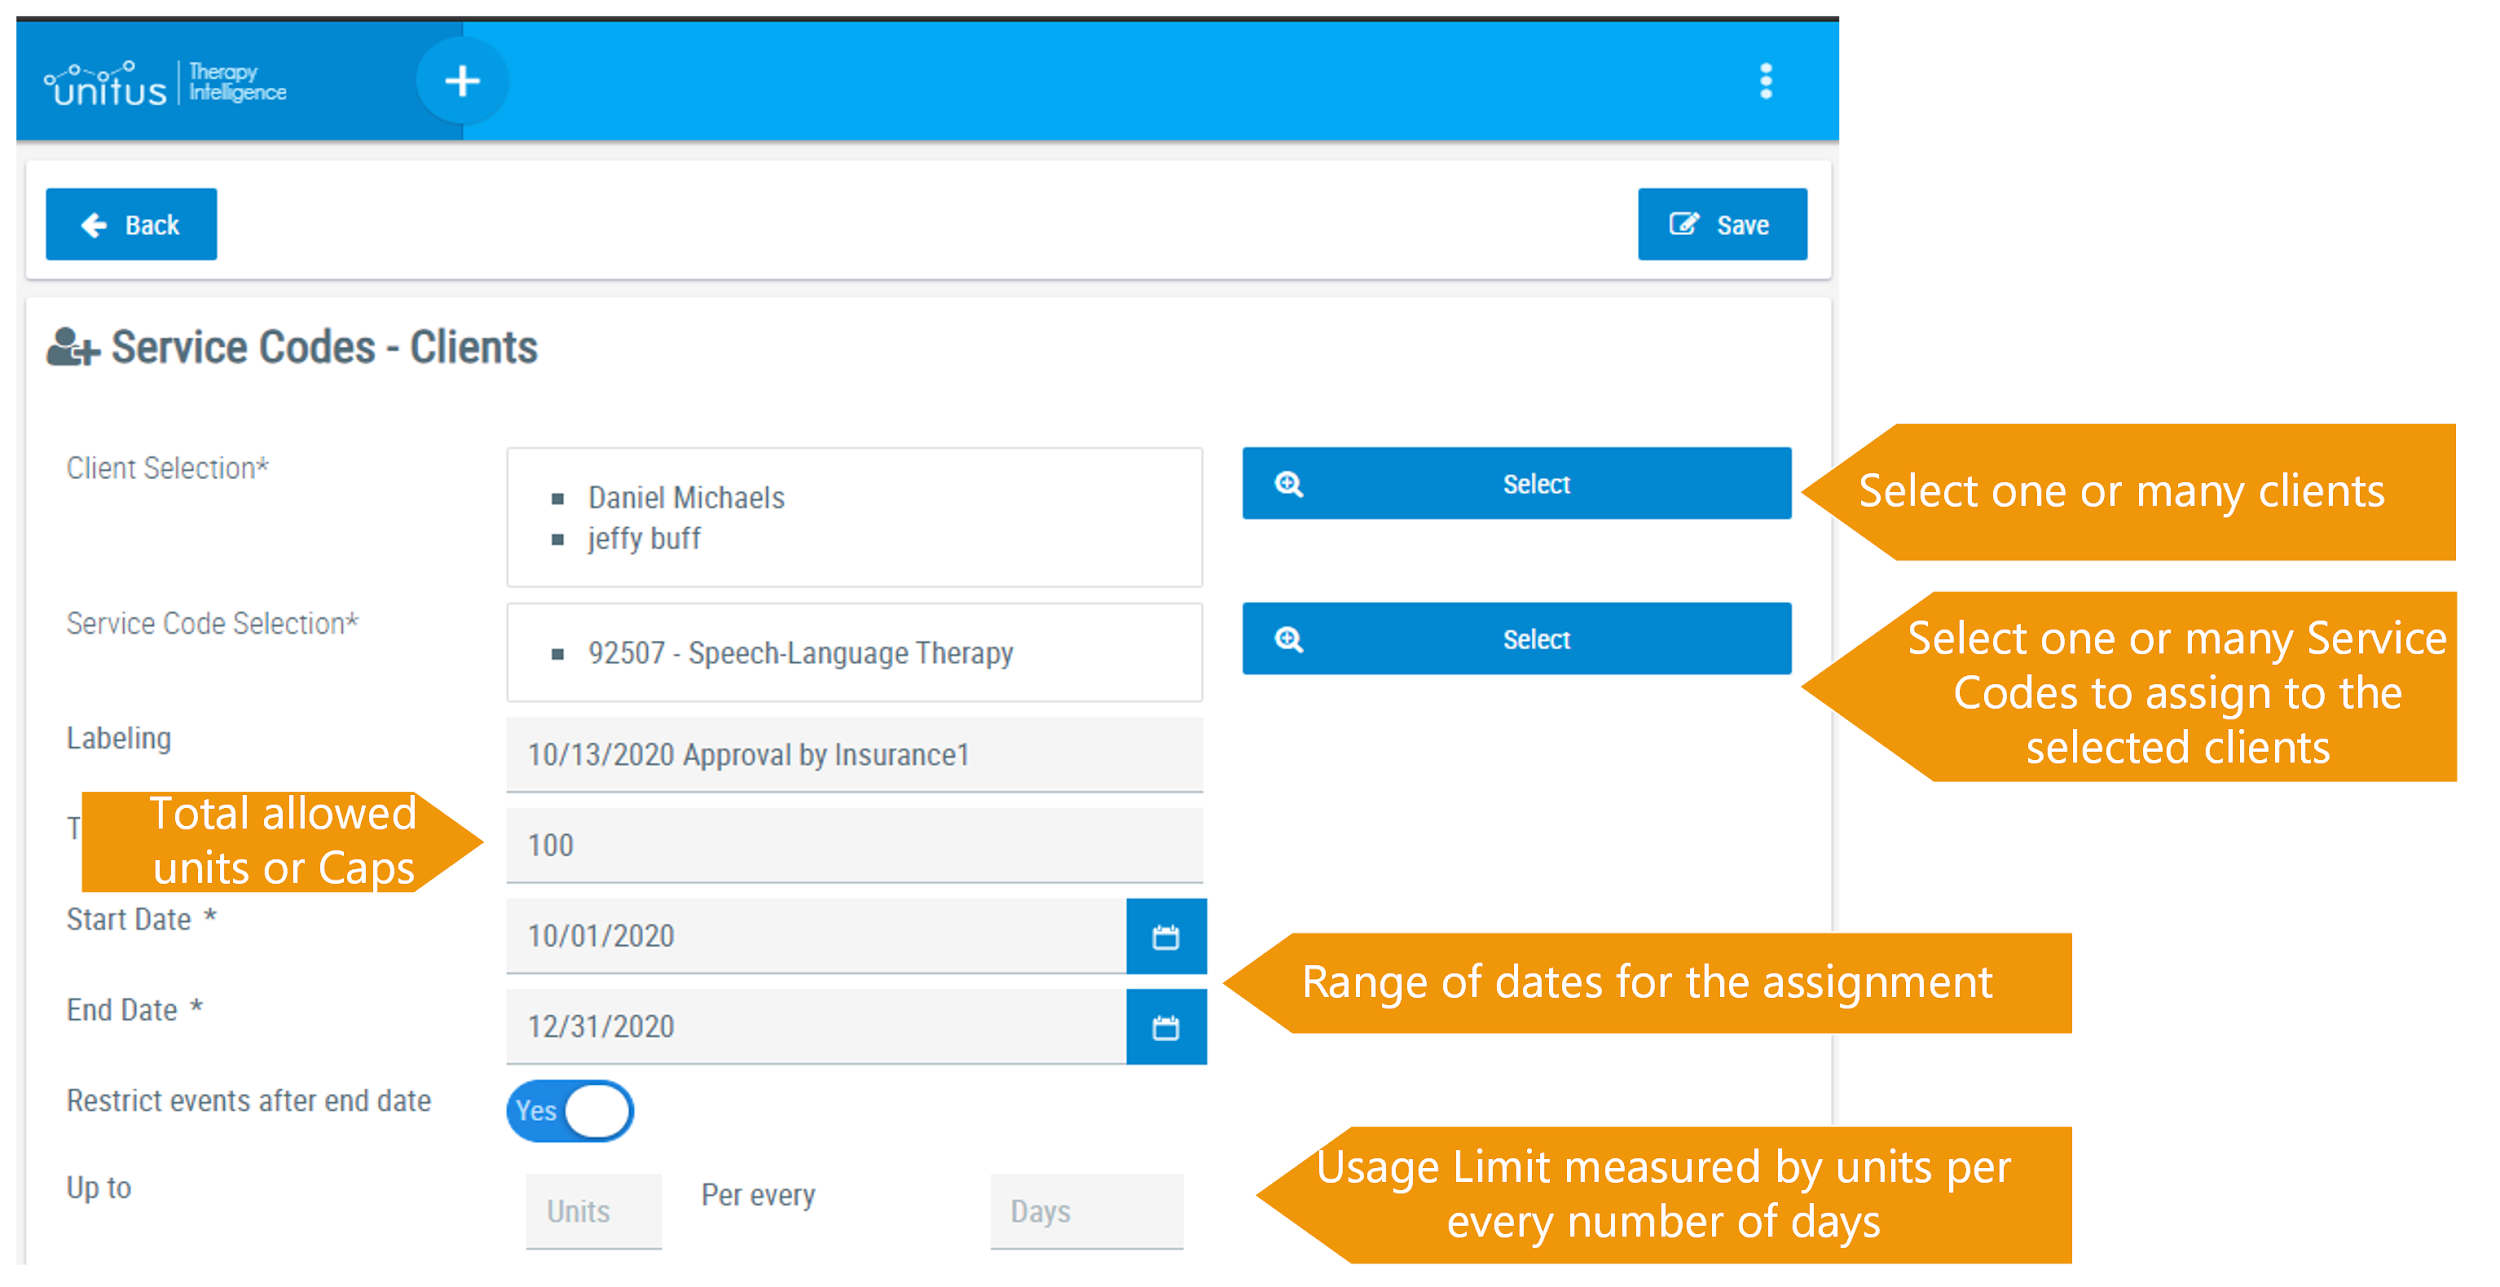
You can assign one or many service code caps to multiple clients at once by creating one assignment. The number of total allowed units/caps defines the total number of units that can be used with the clients selected. The validity period restricts its use to the given time period, and the usage can be also defined, if the units of service codes need to be provided by a fixed number of units.
Multiple assignments of the same code to a client in the same period of time
Perhaps you have two sets of units approved for the same service code in the same period? No problem! Assign service code units multiple times using the Custom label field to differentiate between those two assignments sharing the same period of validity and client.
The custom label will be displayed in the list of service codes available for use in the session note.
Assign By Users
In the table of the assignments by users you will be able to assign service codes to your users to track and manage usage and allowed limits. Create new assignments using the red button in the right bottom corner. Update, manage and remove current assignments from the list:
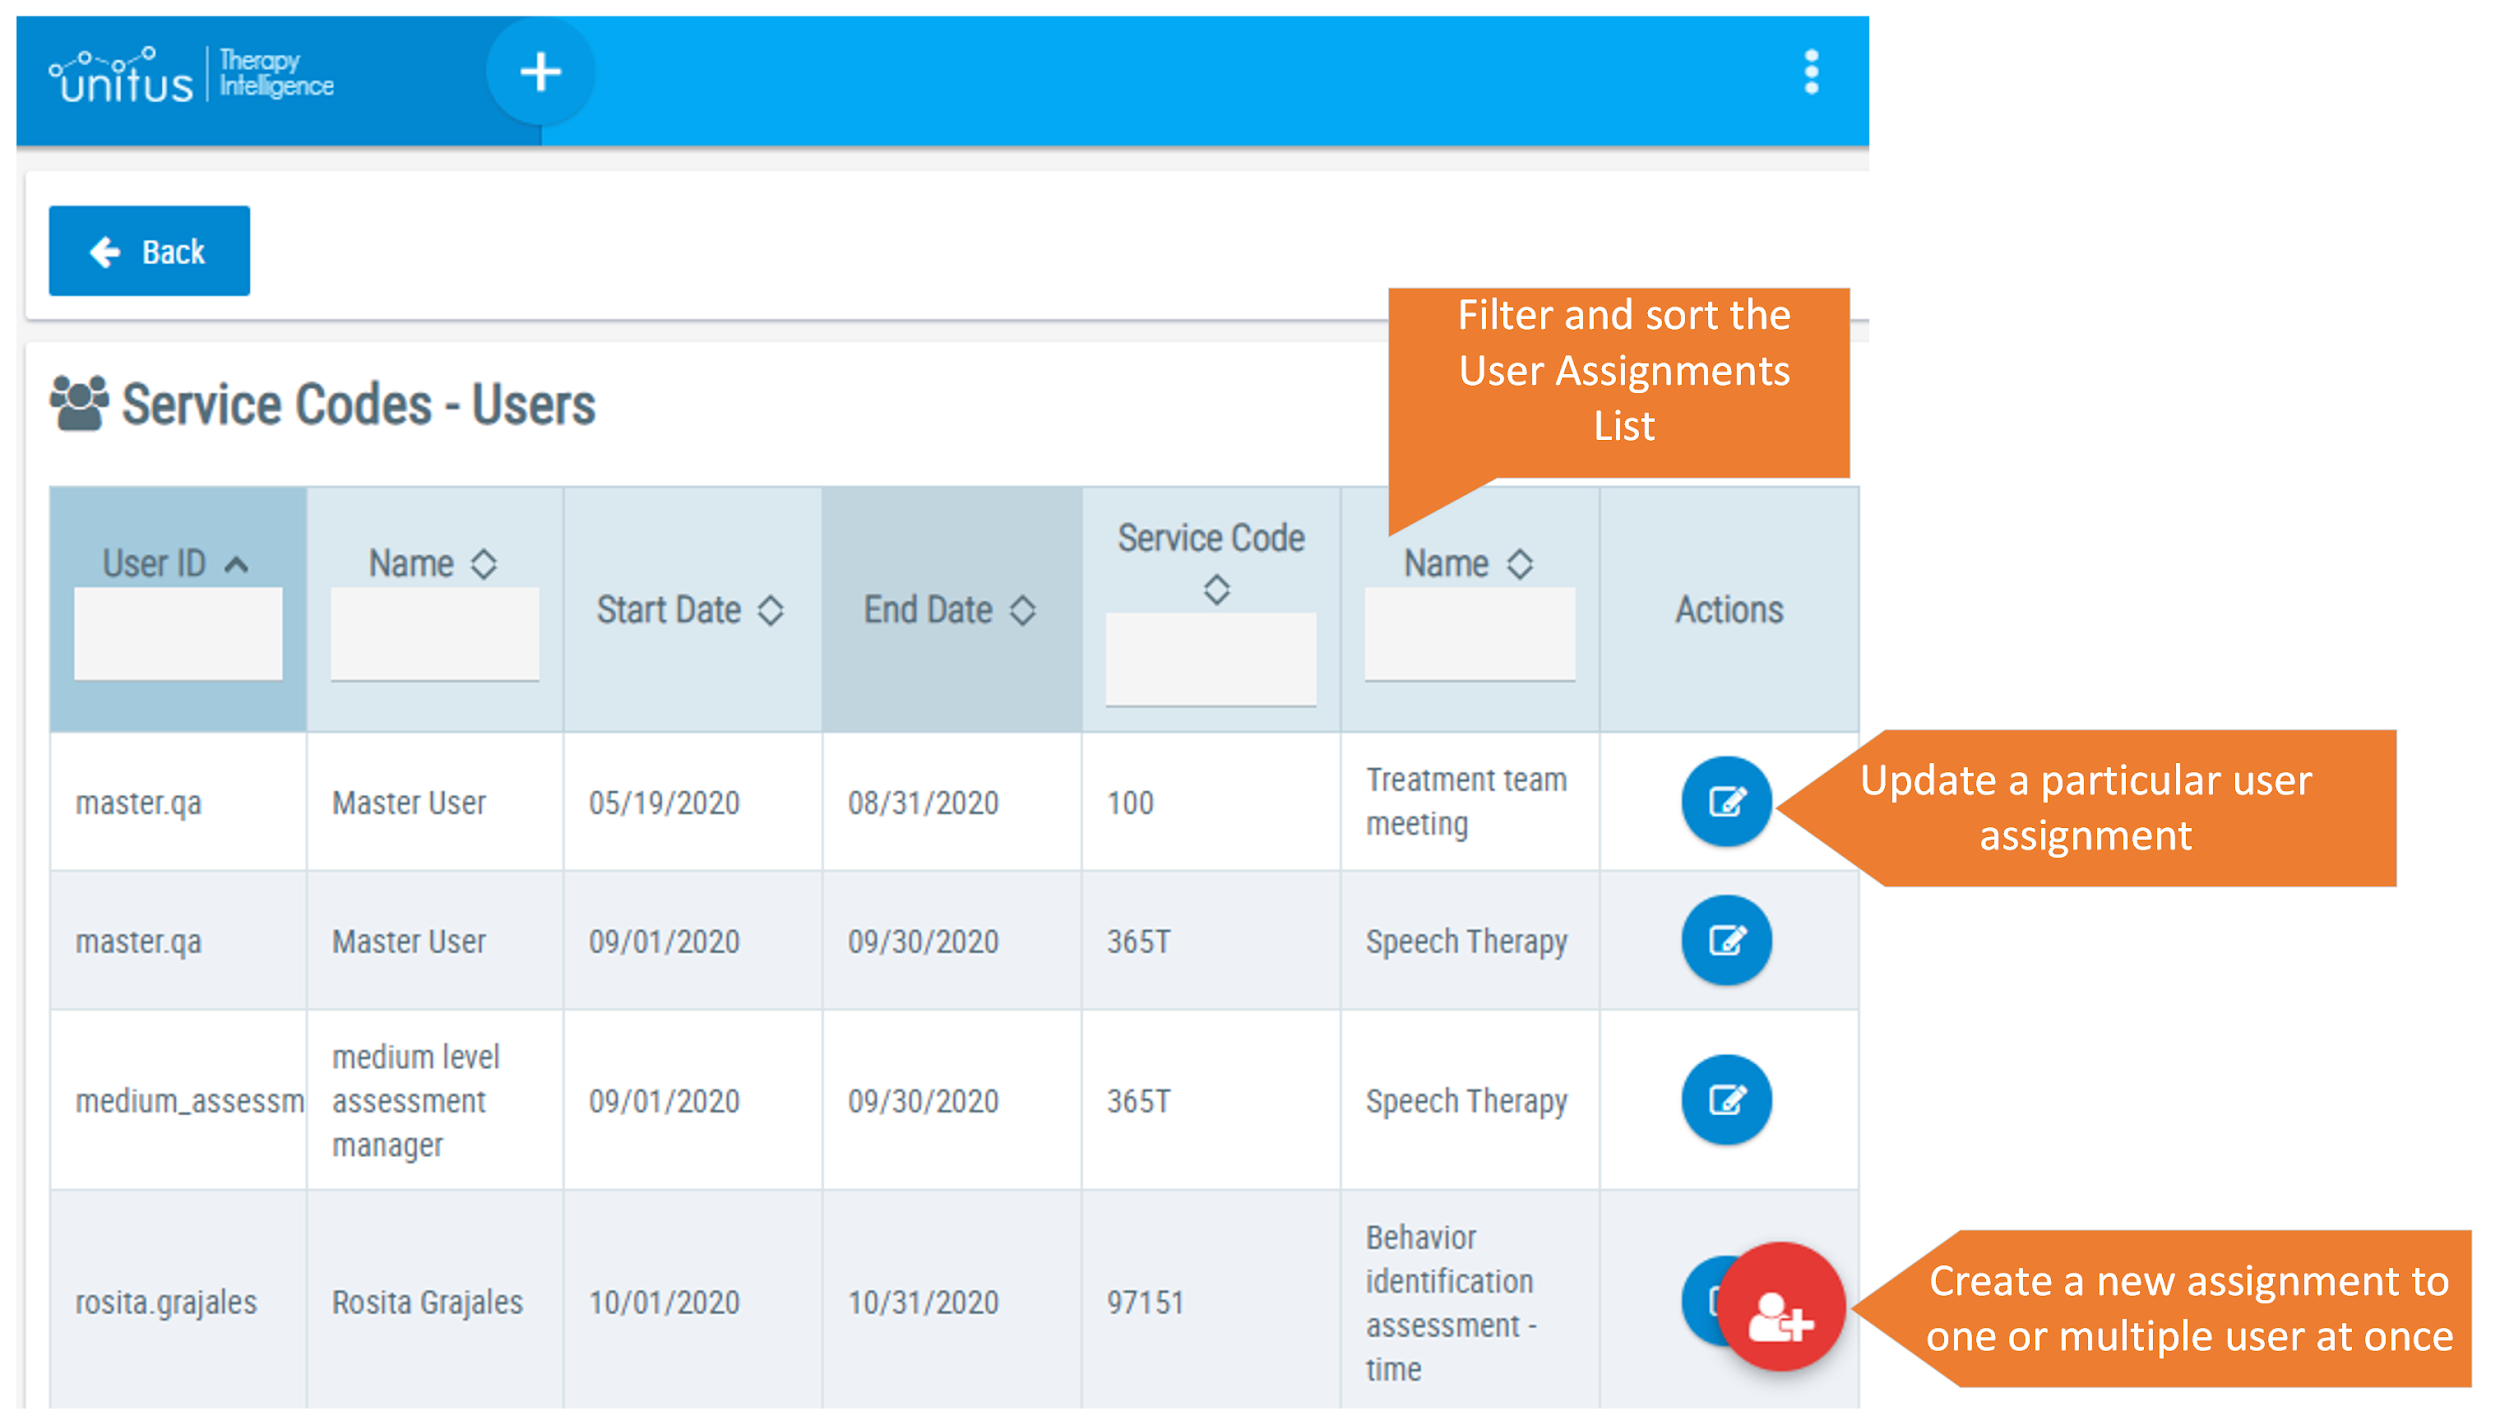
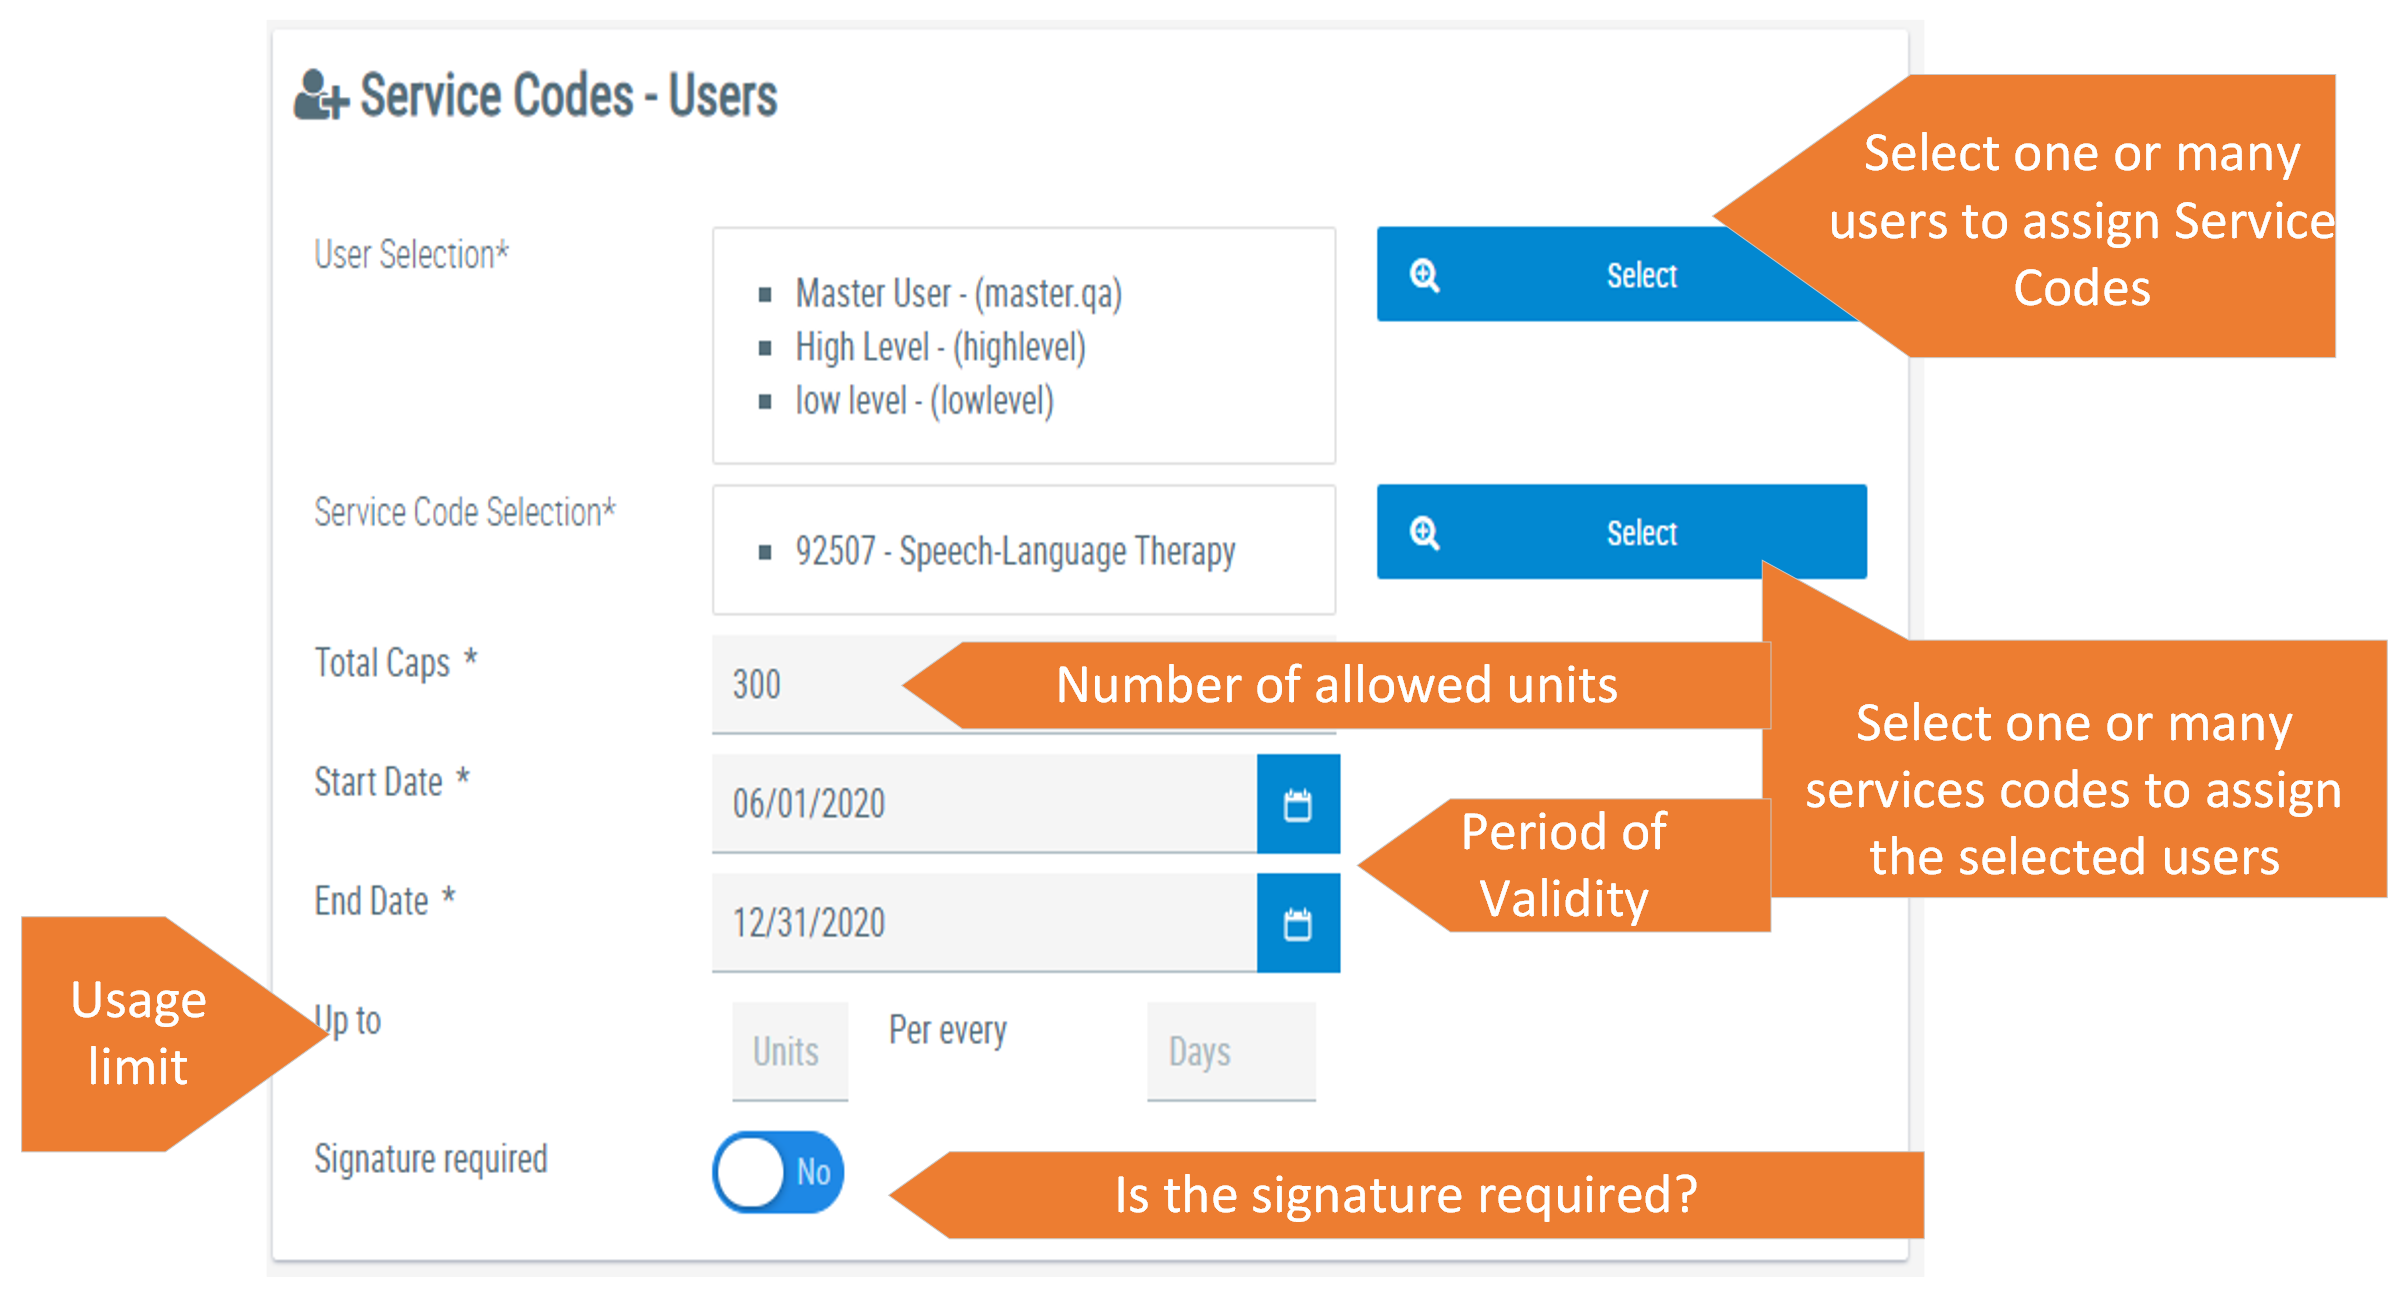
You can assign one or many service code caps to multiple users at once by creating one assignment. The number of total allowed units/caps defines the total number of units that can be used with the users selected. The validity period restricts its use to the given time period and the usage can be also defined by allowed units.

Using Session Notes in UnitusTI
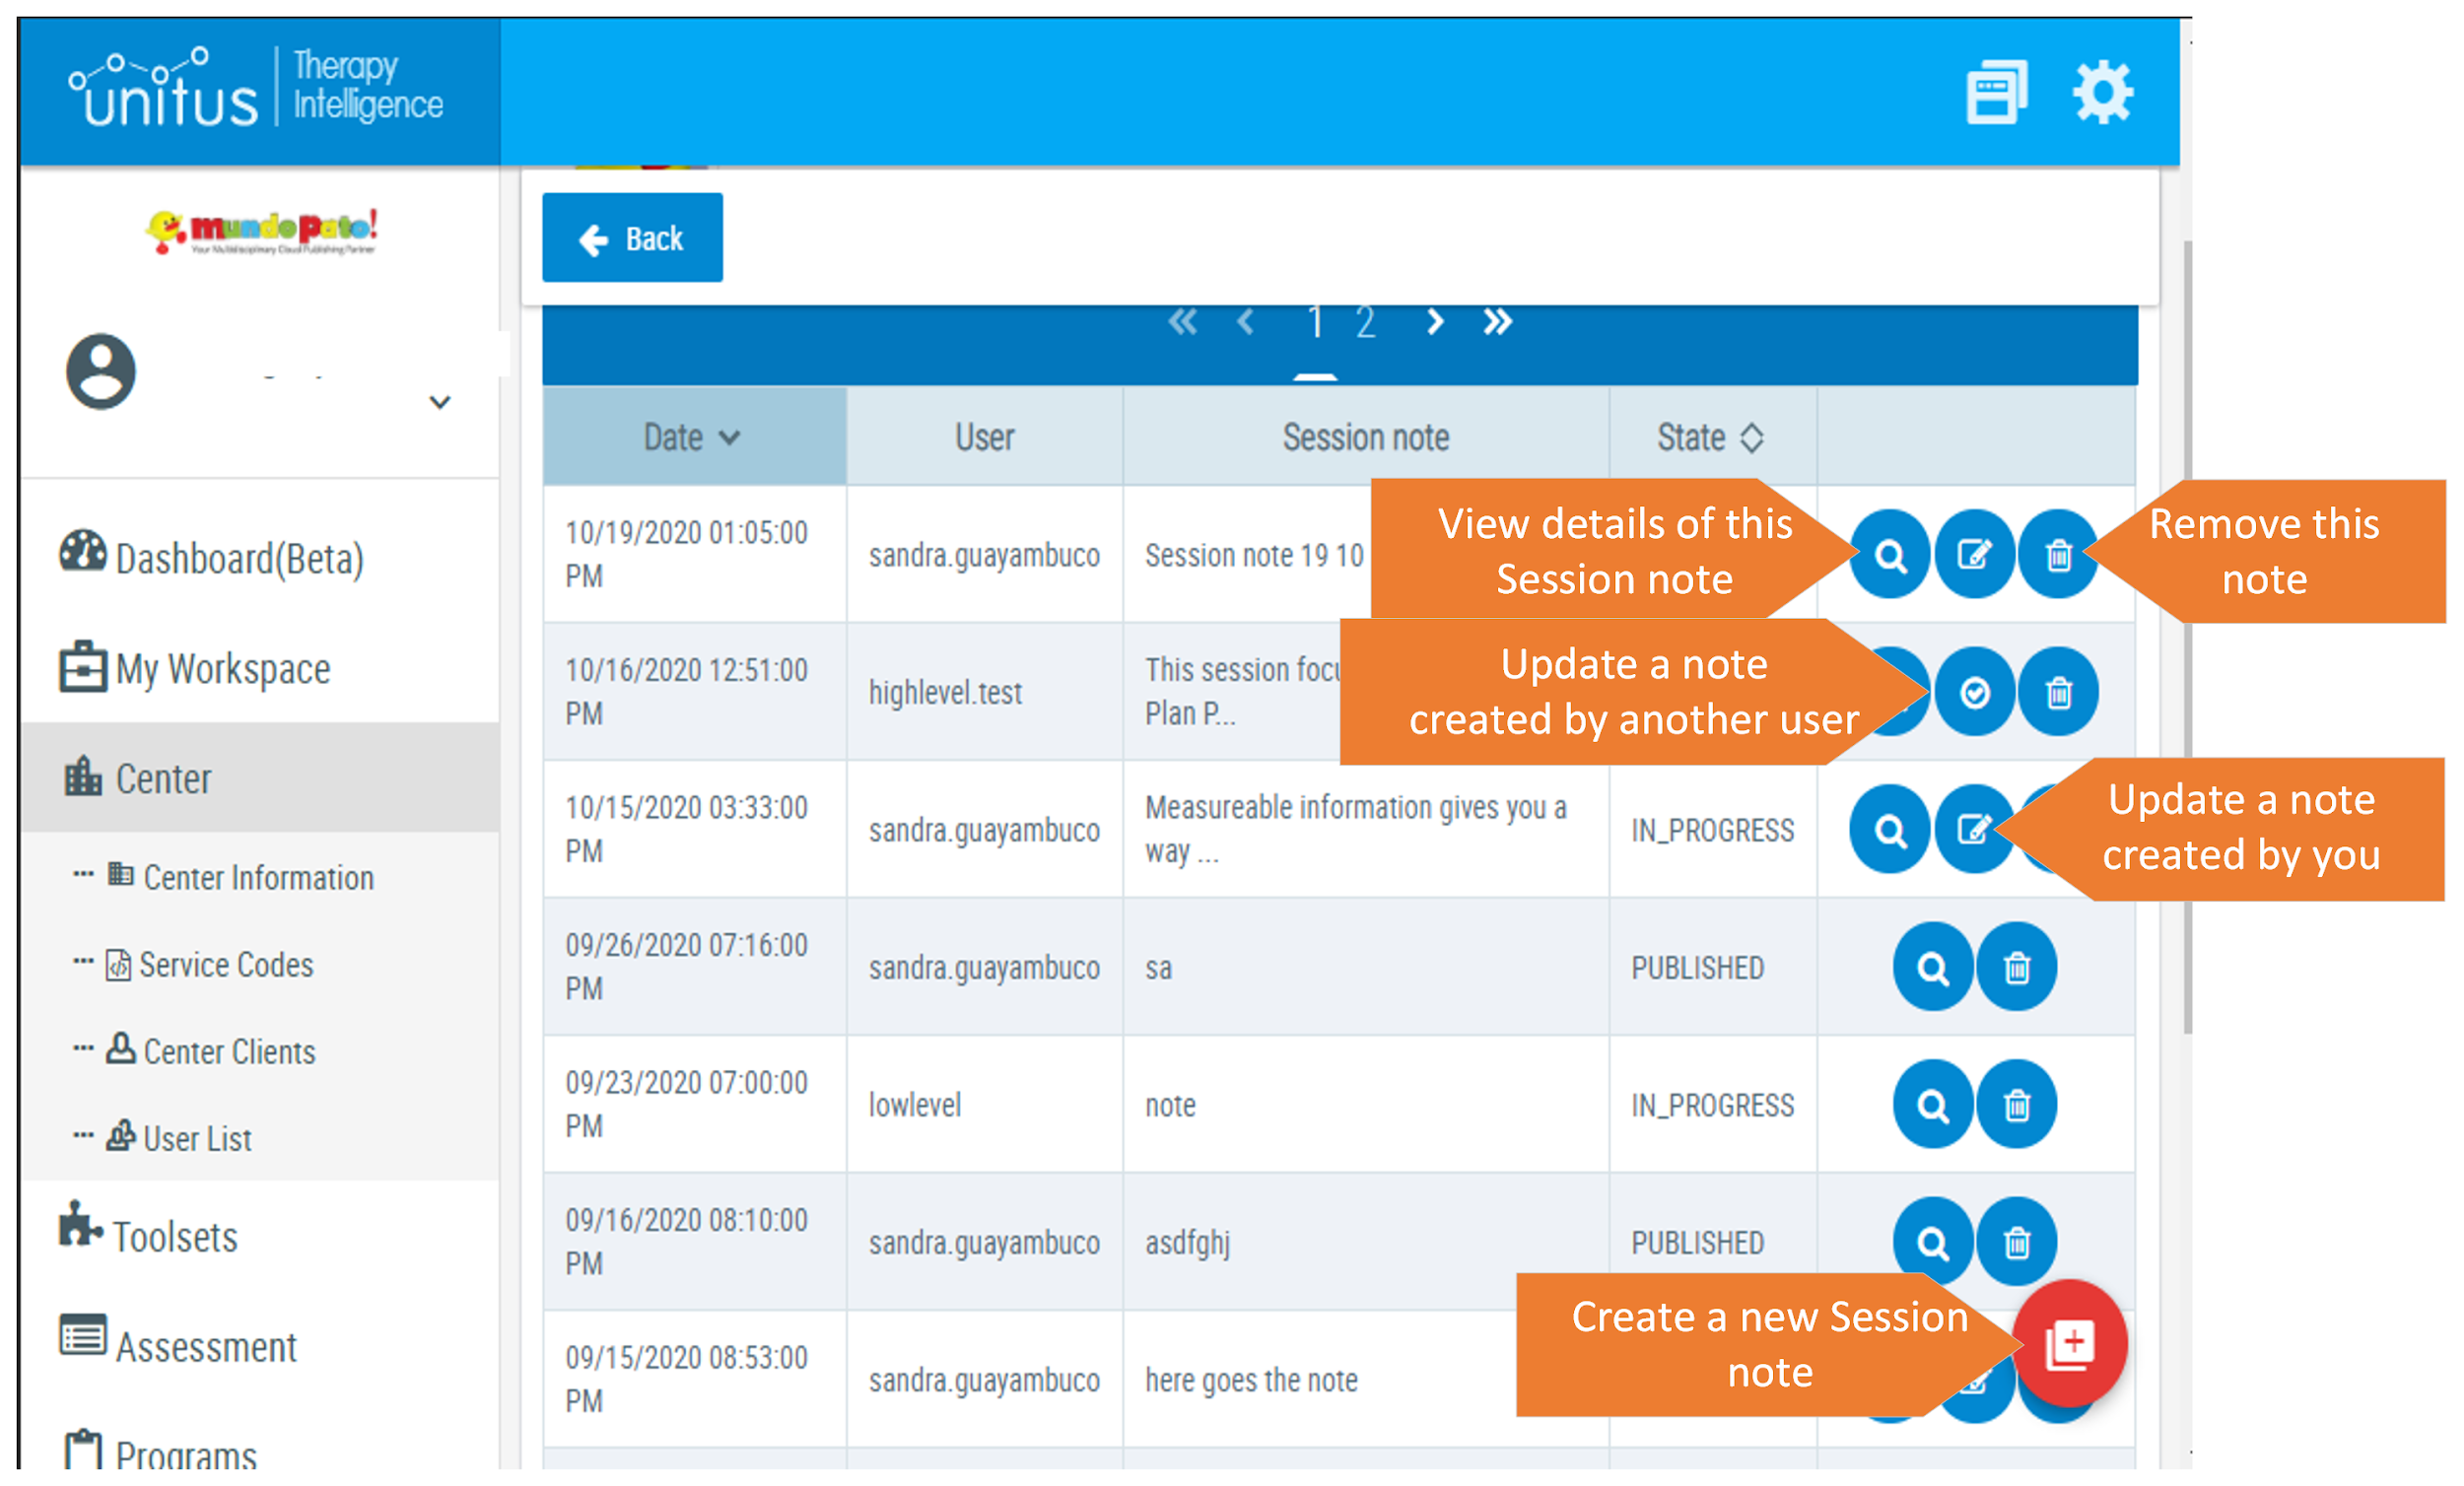
Session Notes serve as time-stamped case notes for each client session and are typically used to record notes about a session or to record observations about a missed session.
The Session Notes area in UnitusTI allows you to view, create, edit and manage session notes by client, and more (note that functionality within this area and accessibility to this area is governed by the user’s security role) :
- Create a note
- View details of notes you have created (details of other users’ notes are now available from the Session Notes dashboard reporting tool)
- Remove a note
- Update a note created by another user
- Update a note you created
Session Notes Template
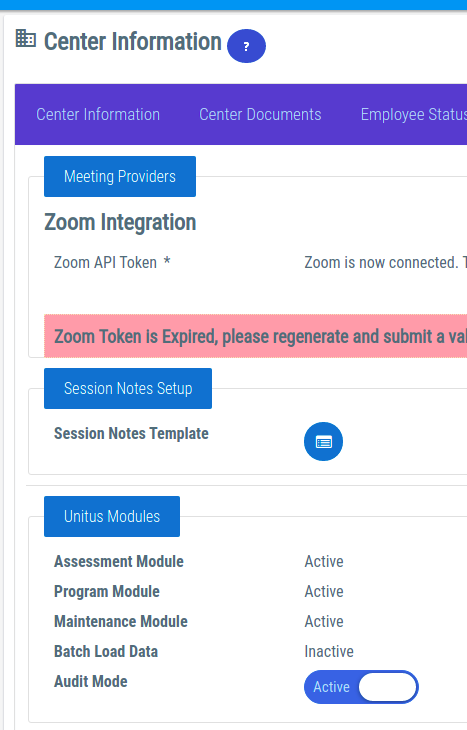
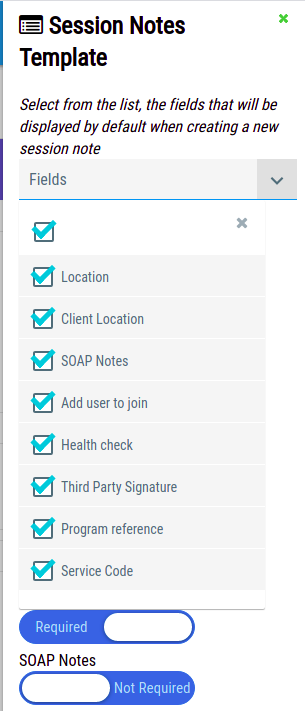
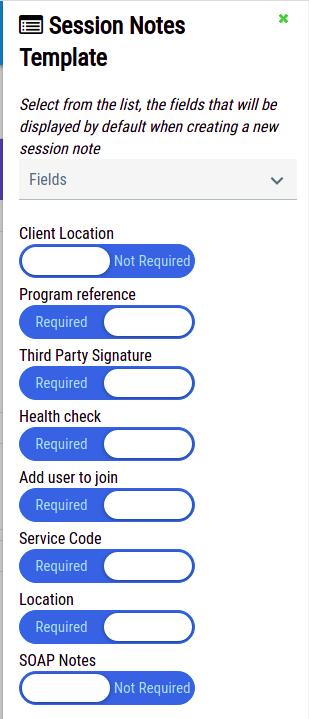
Only administrator users can edit the session notes template. You can select the fields you wish to include as default, mandatory fields to finish/publish all session notes. Setting a toggle switch to "Required" will add the field to all new session notes and be required for all note creators in your organization. Changes will be automatically updated (current notes will not be updated).
Users with roles Teacher, High Level Access, Paraeducator, medium level access, low level access and client/guardian can view the Session note Template setup.
There are many fields available for the creation of a Session Note. According to the needs of your center, you may configure what fields should be omitted, which ones are mandatory, and which ones are optional.
These settings are accessible only to users with the proper permissions in the Center menu in the “Session Notes Setup” section:
|
|
|
Accessing Session Notes
Session Notes are now available from three areas in UnitusTI: (Note that access to these areas will depend on a user’s security role.)
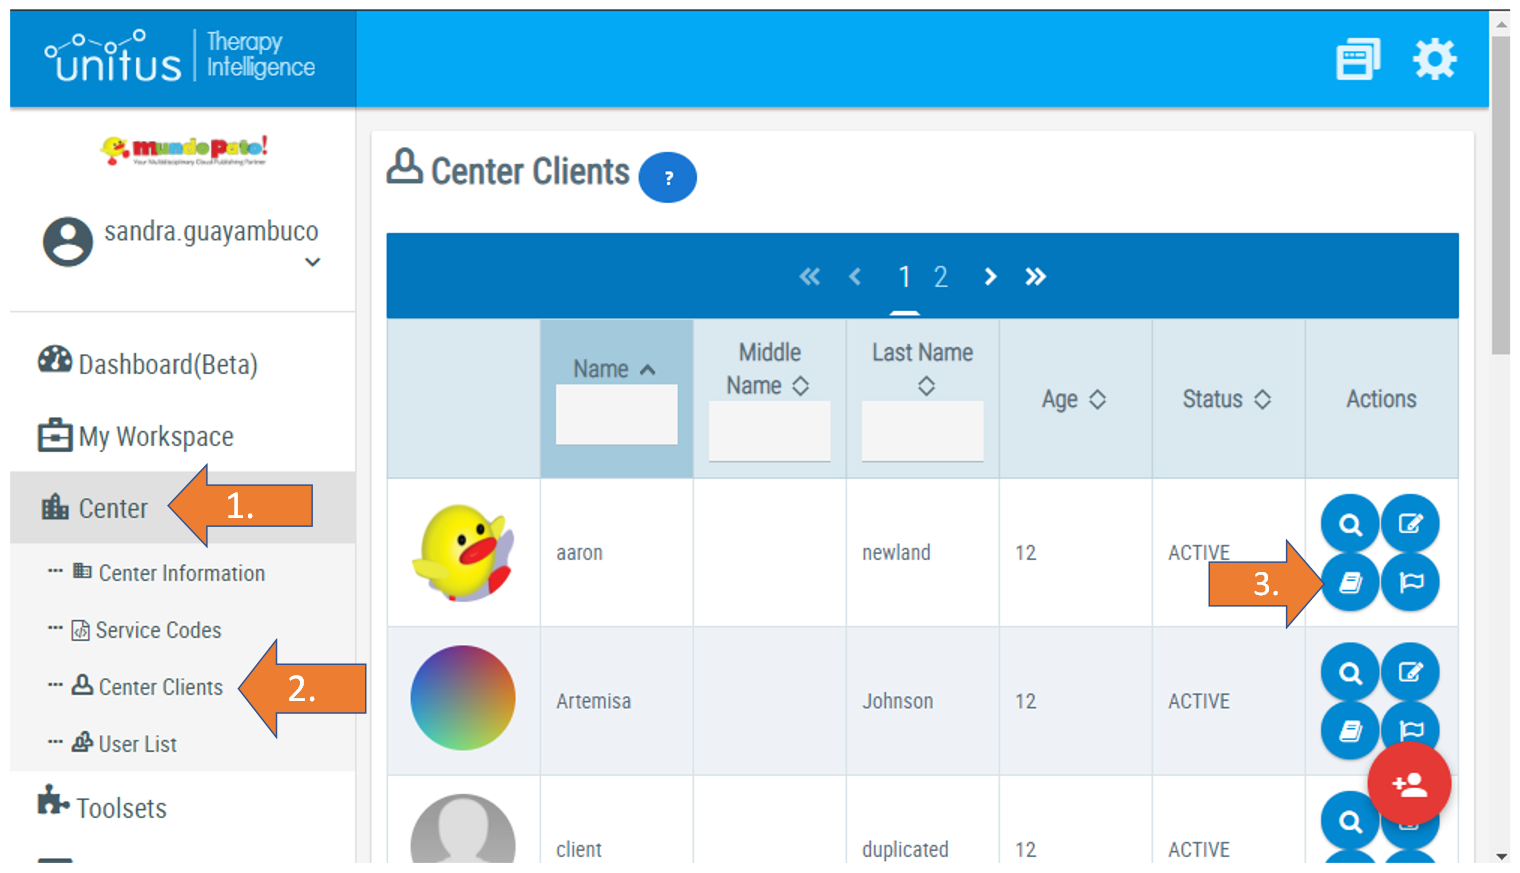
- Center Clients: as before, you can still access the Session Notes module from your Center Clients list of assigned clients using the Session Notes icon in the list (see screenshot below):
-
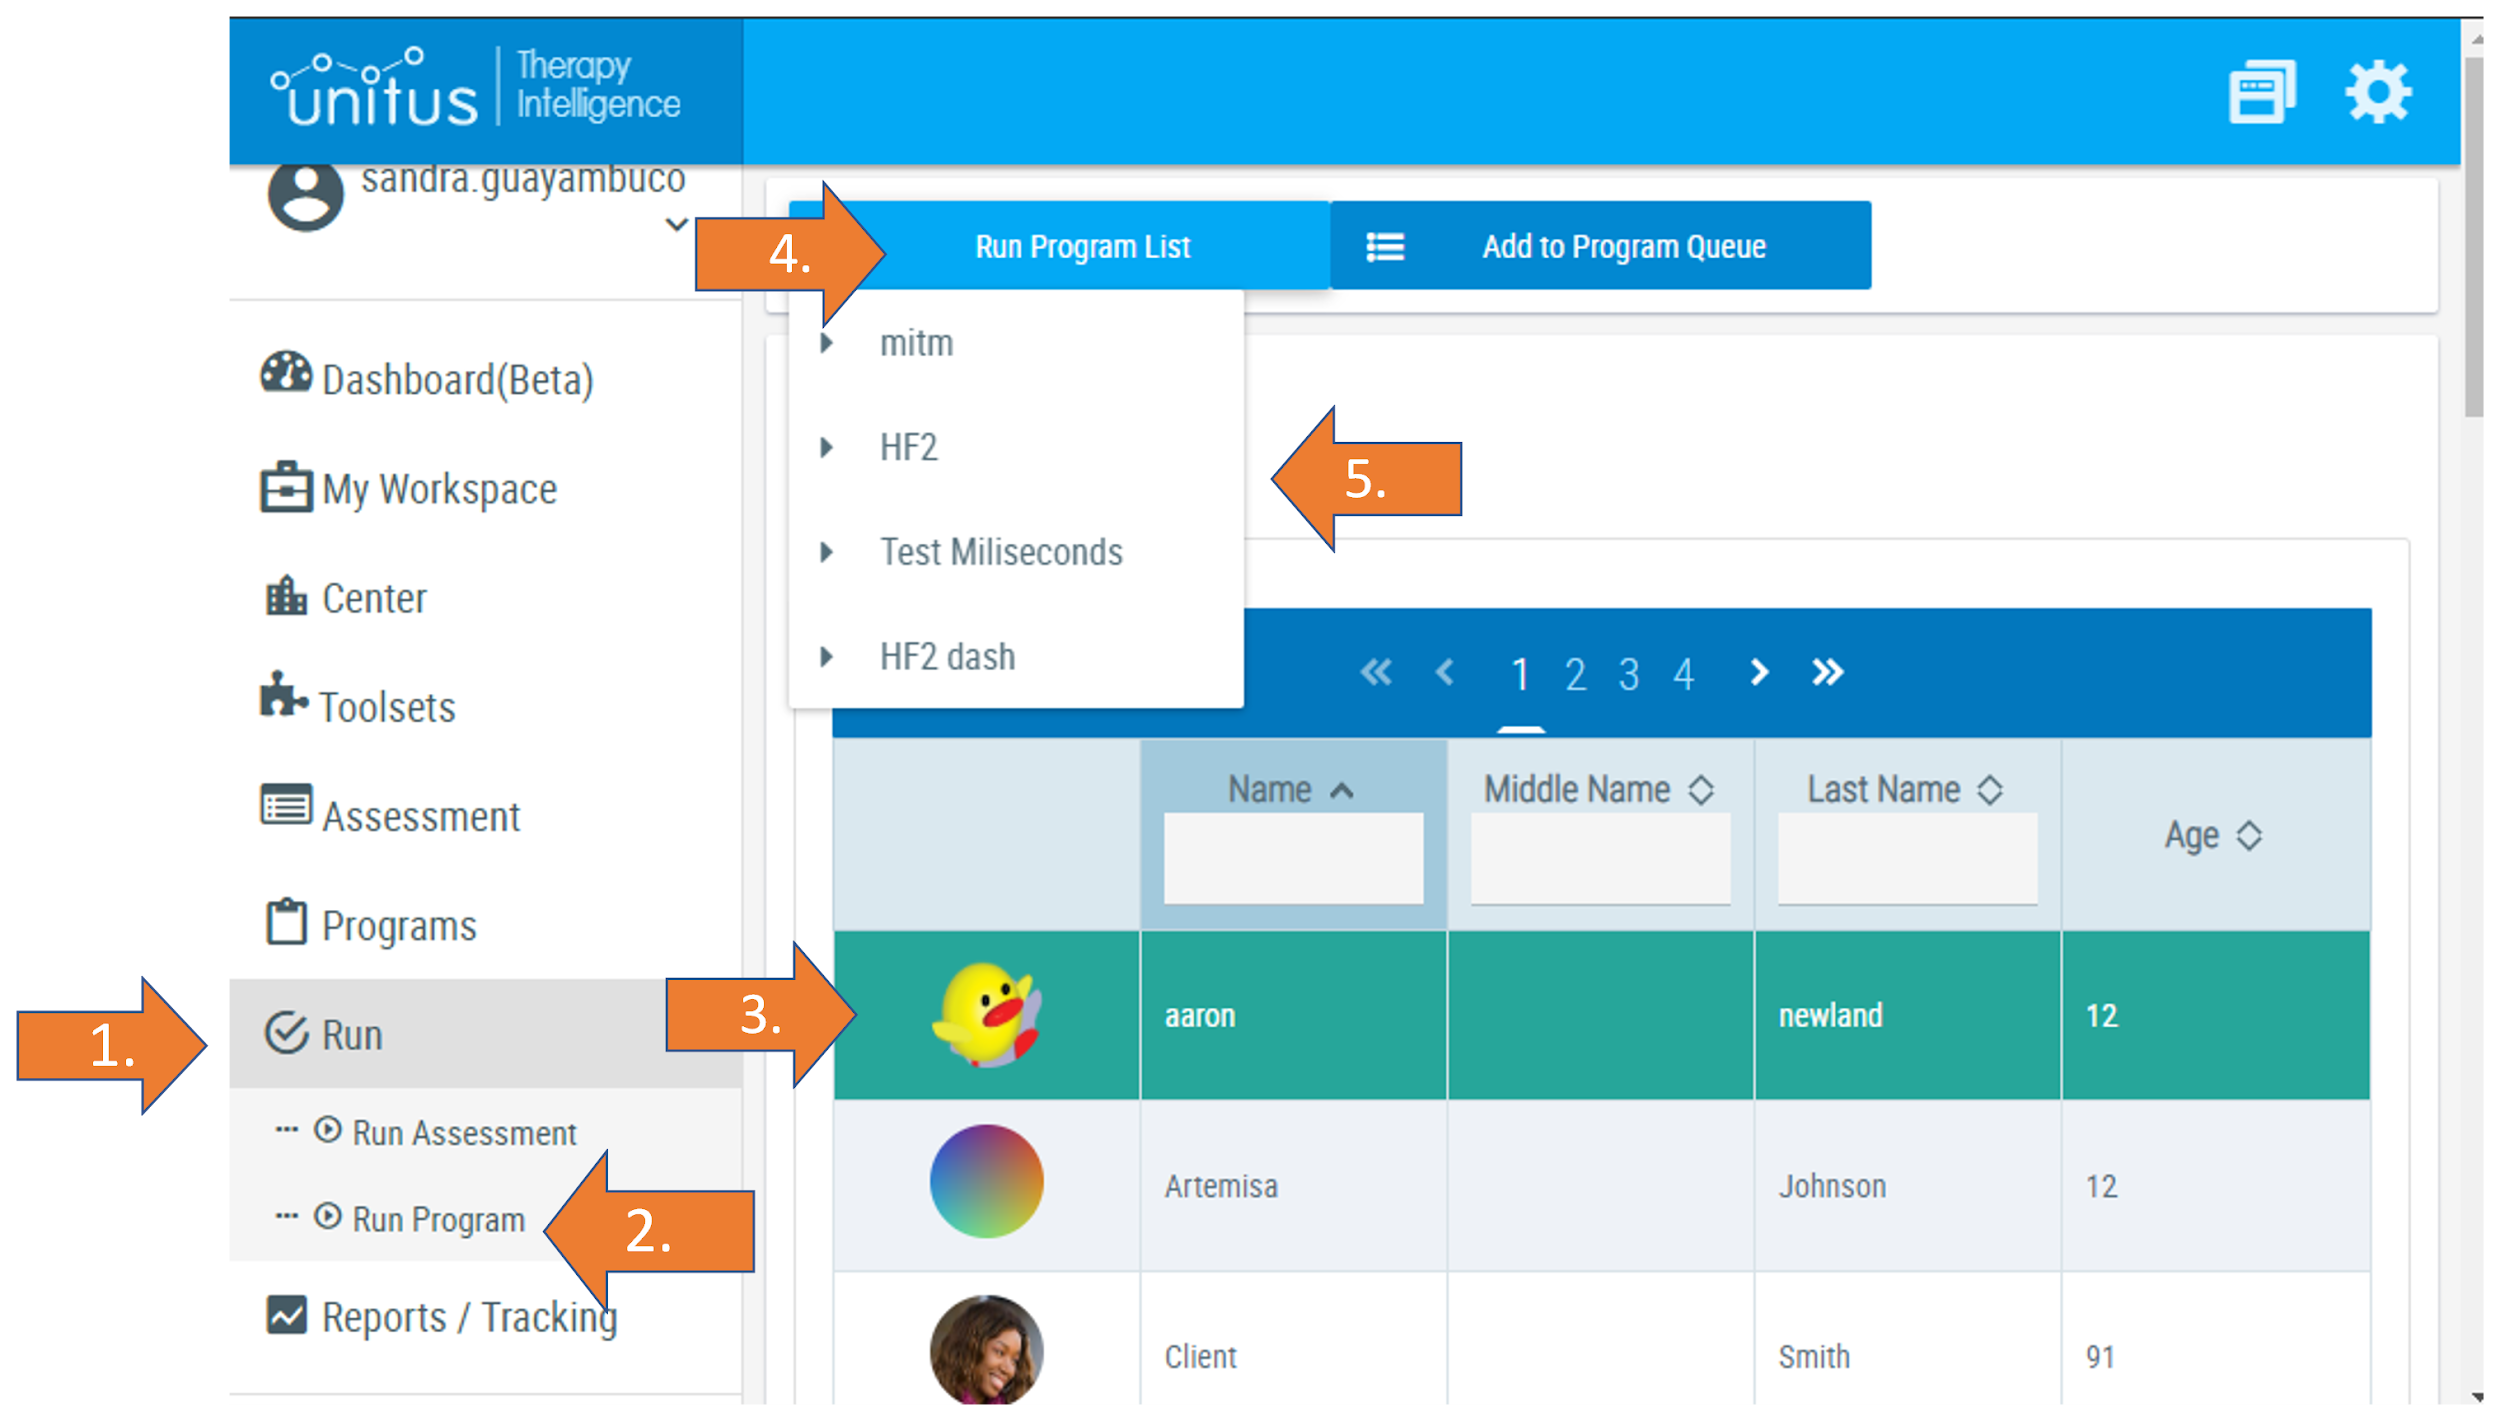
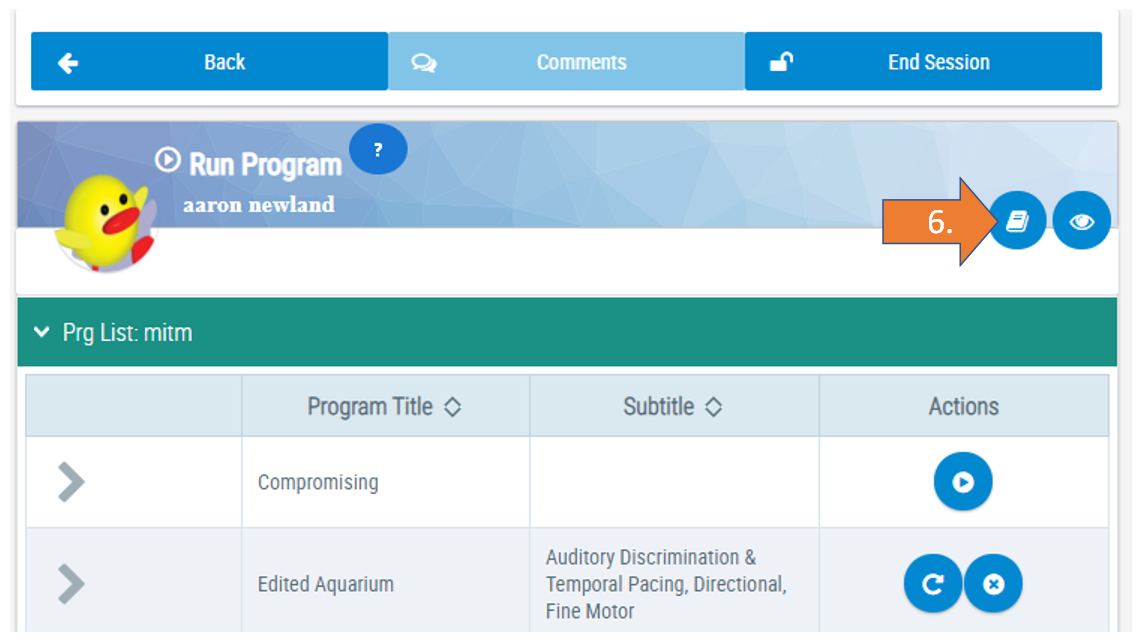
Run Program Area: as before, you can still access Session Notes while running a program for a client. Navigate to Run in the main menu, then Run Programs, select your client, then “Run Program List” and choose the program list to run. From the Run Program page, select the Session Notes icon in the top right corner (see screenshots below):
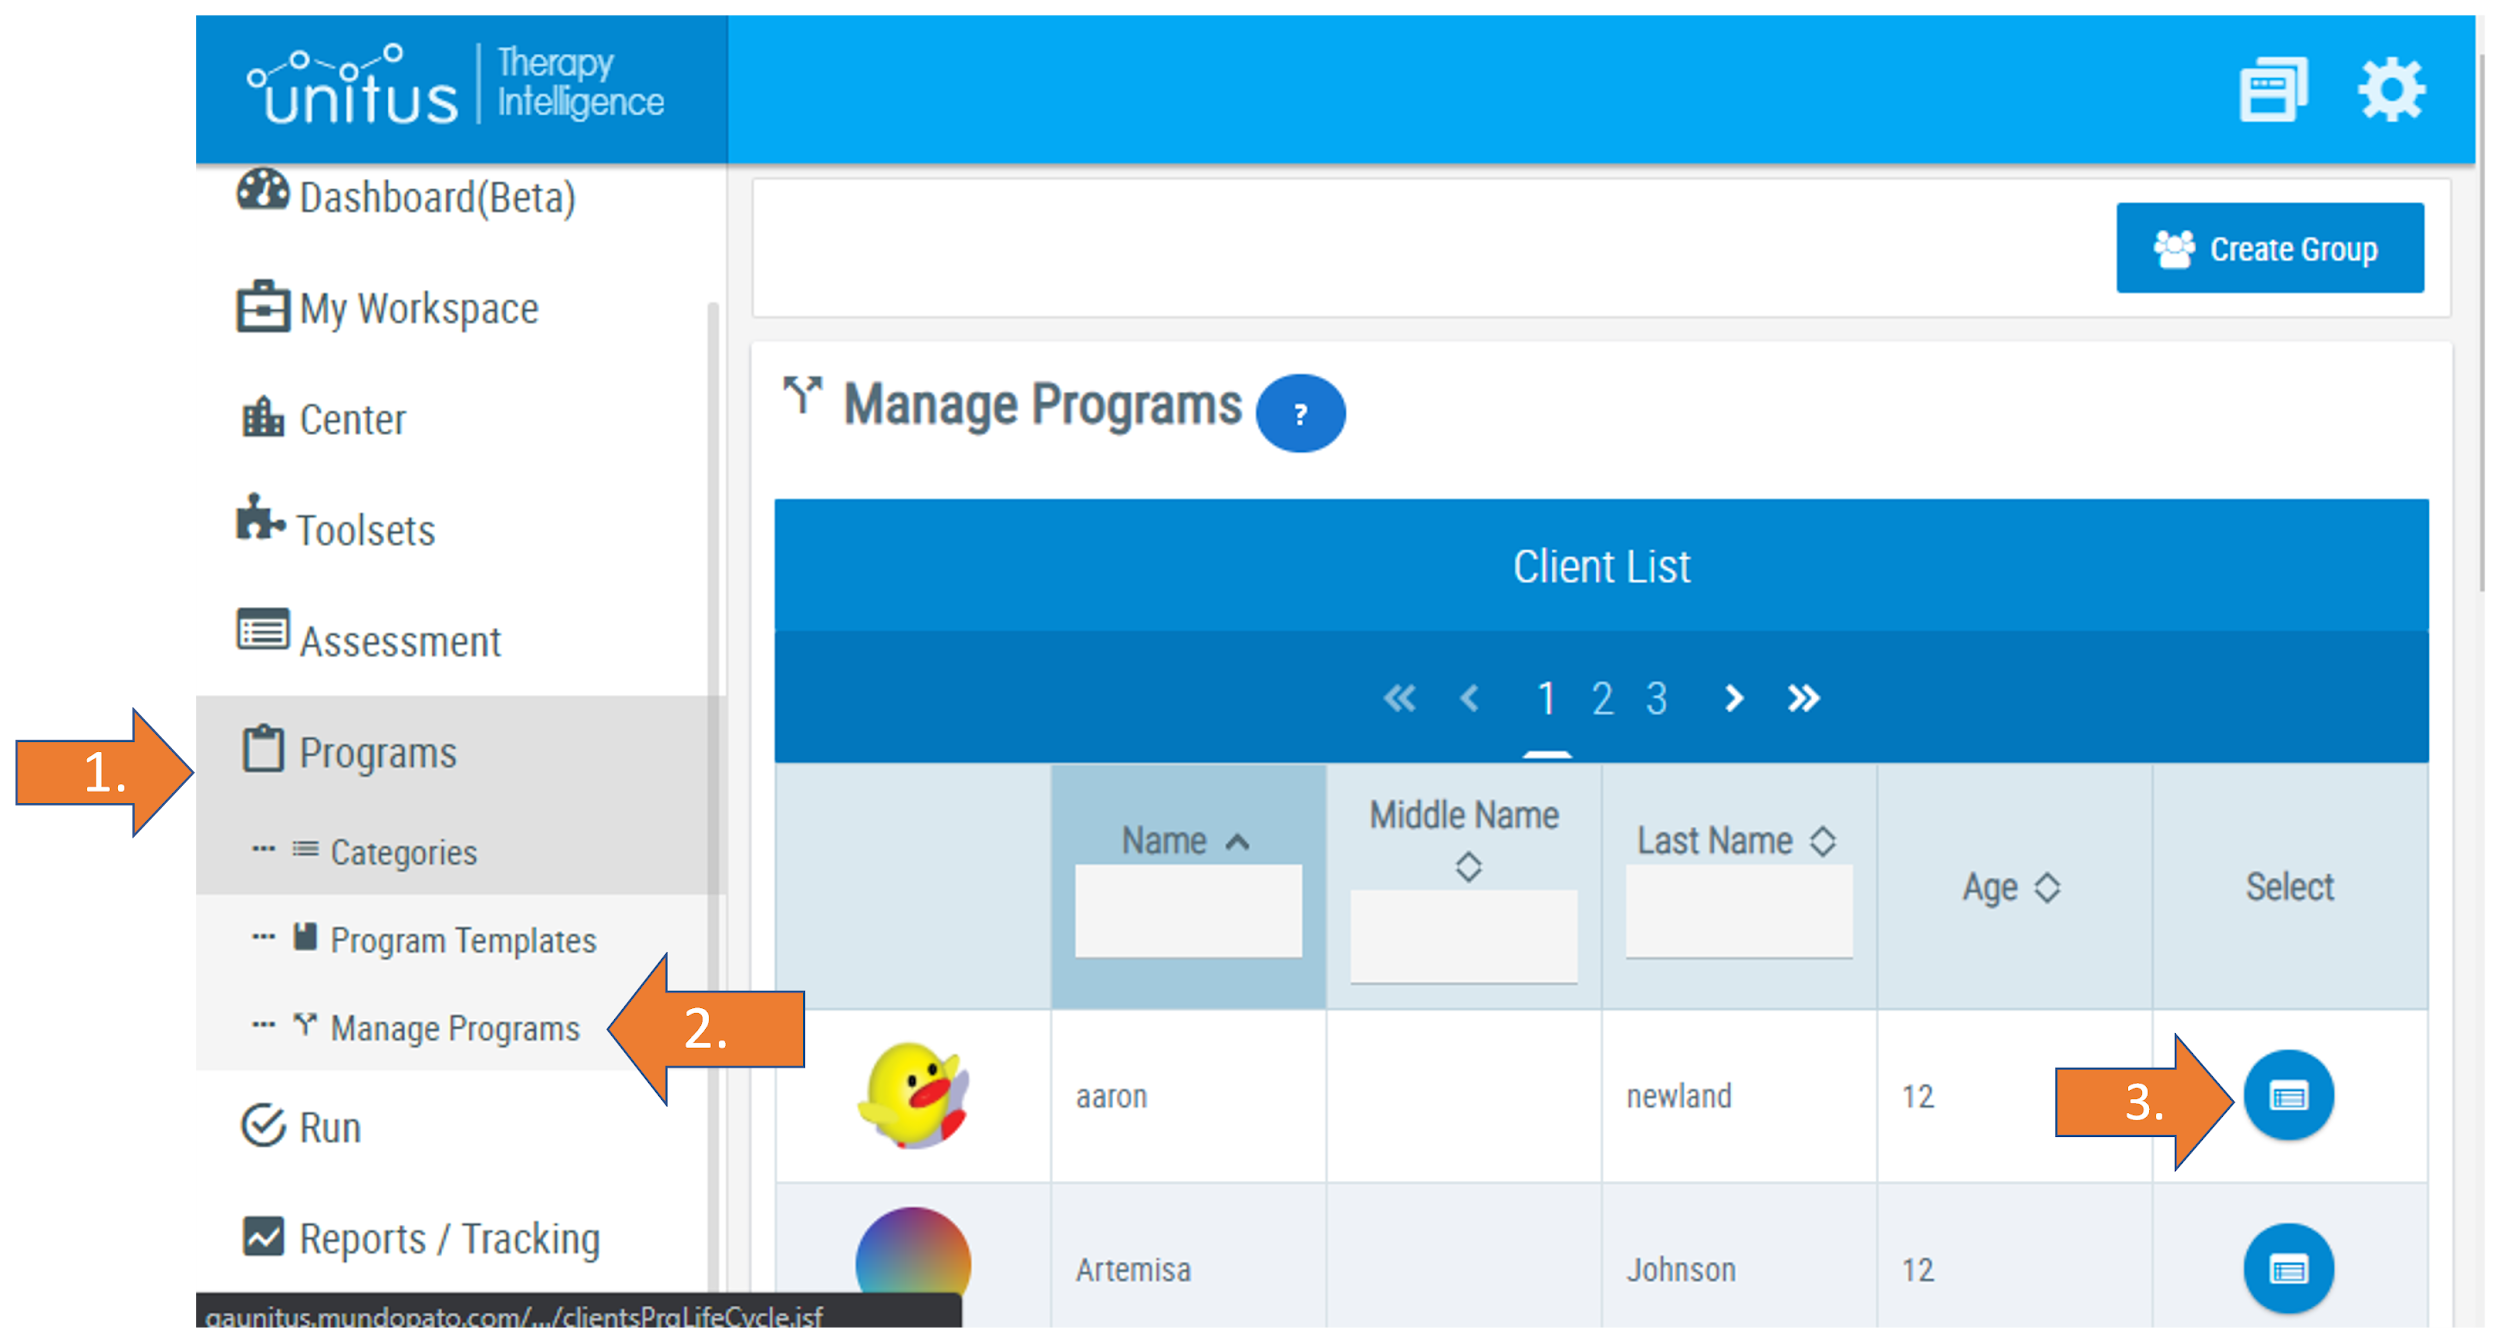
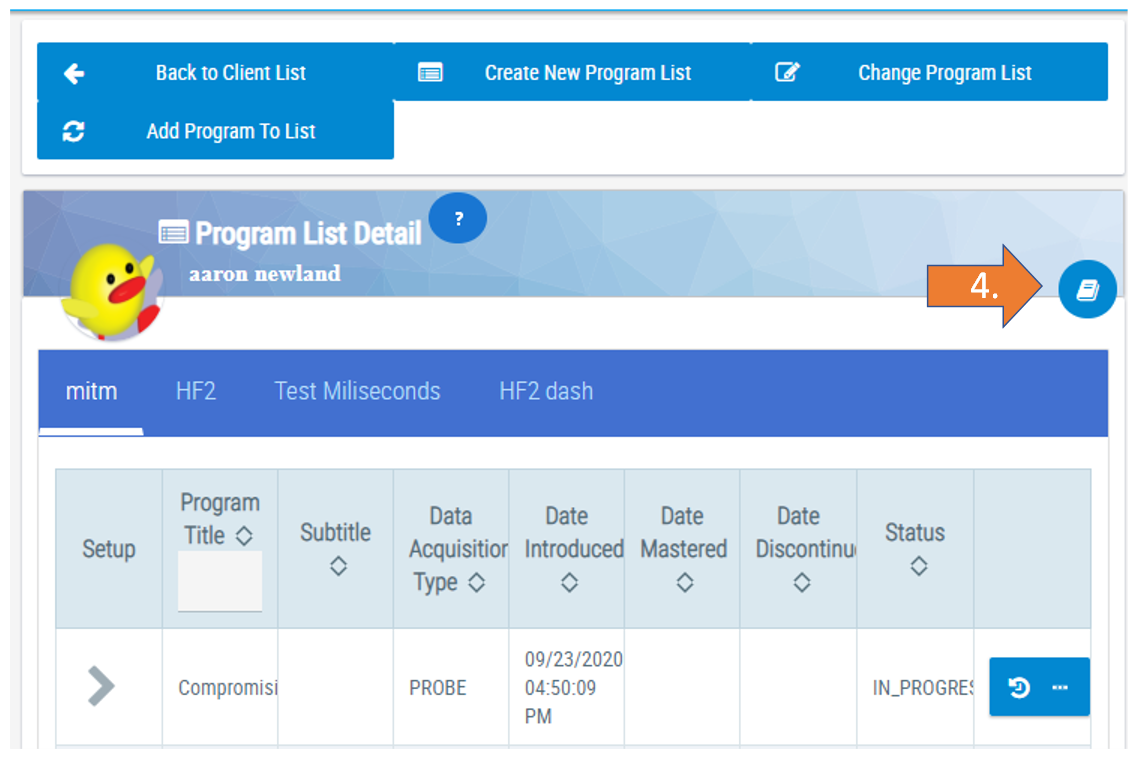
- New! Manage Programs: Session Notes can now be accessed from your client’s Program List Detail page by navigating to “Manage Programs” in the main menu, then selecting your client (see screenshots below):
Creating a Session Note
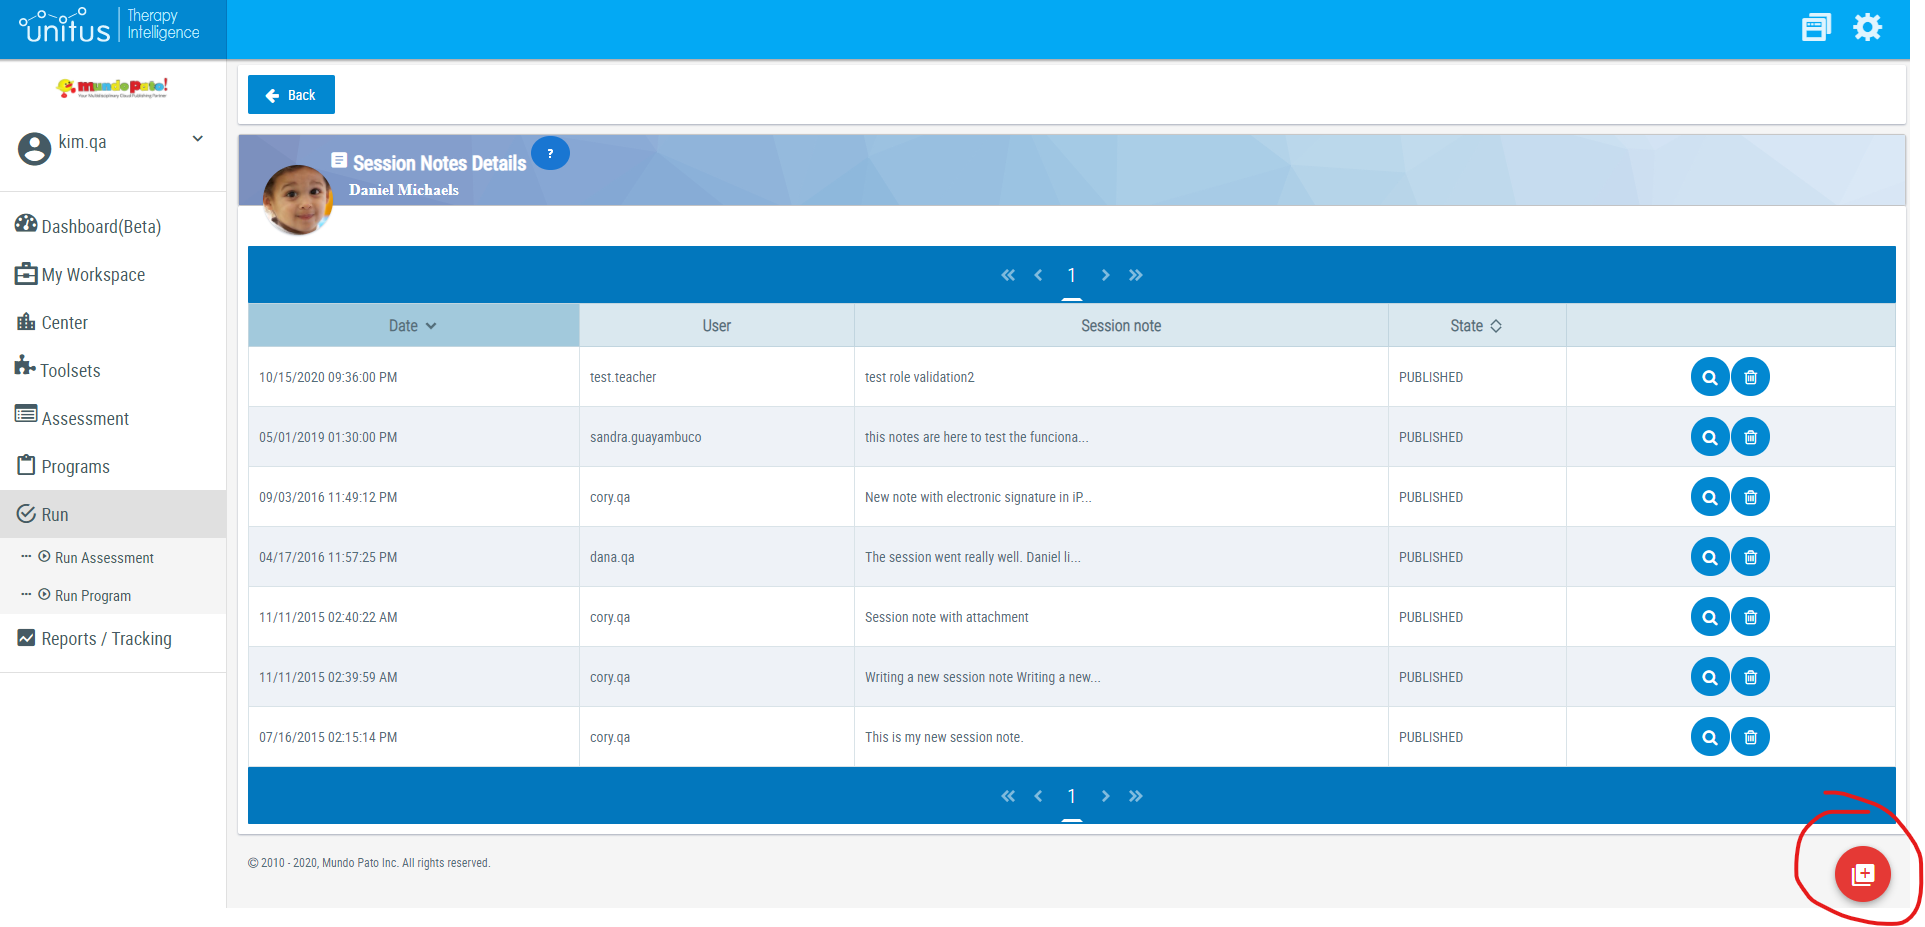
To create a new session note, select the red button at the bottom of the Session Notes Details page:
-
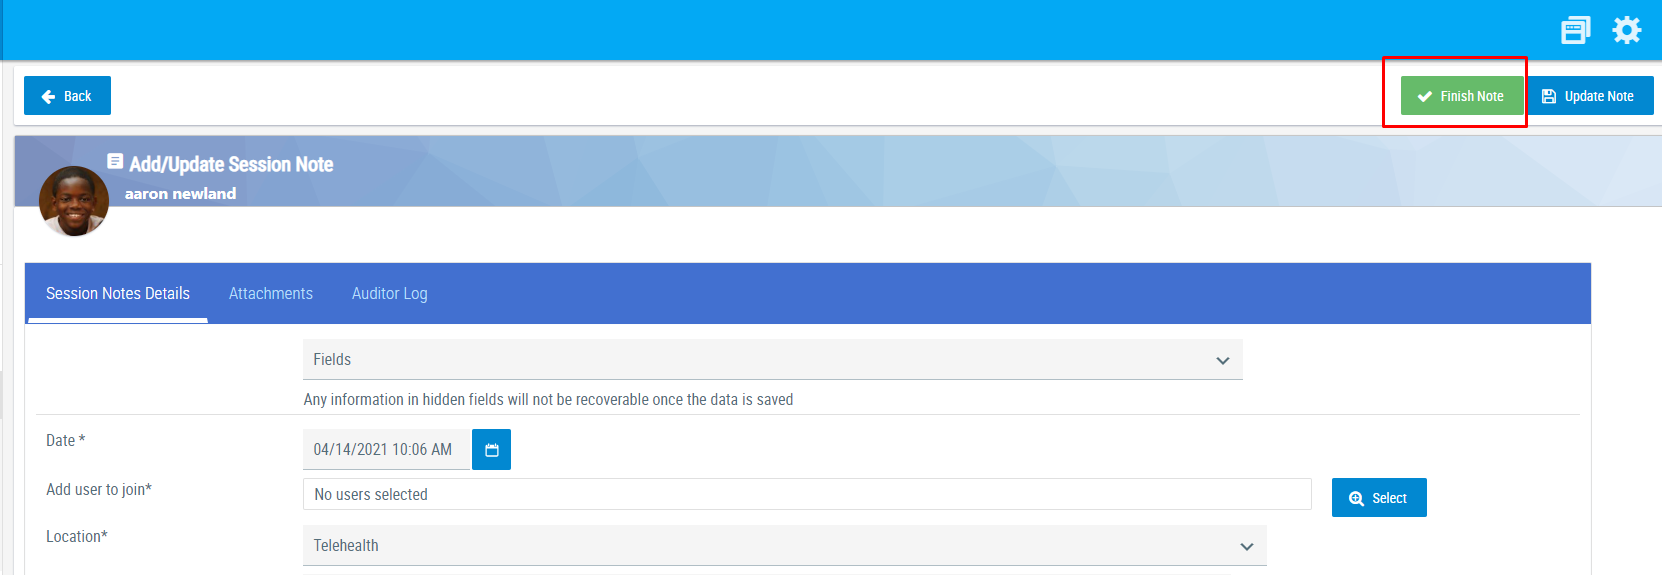
On the Add/Update Session Note page, the following fields are available (fields with an asterisk * are required):
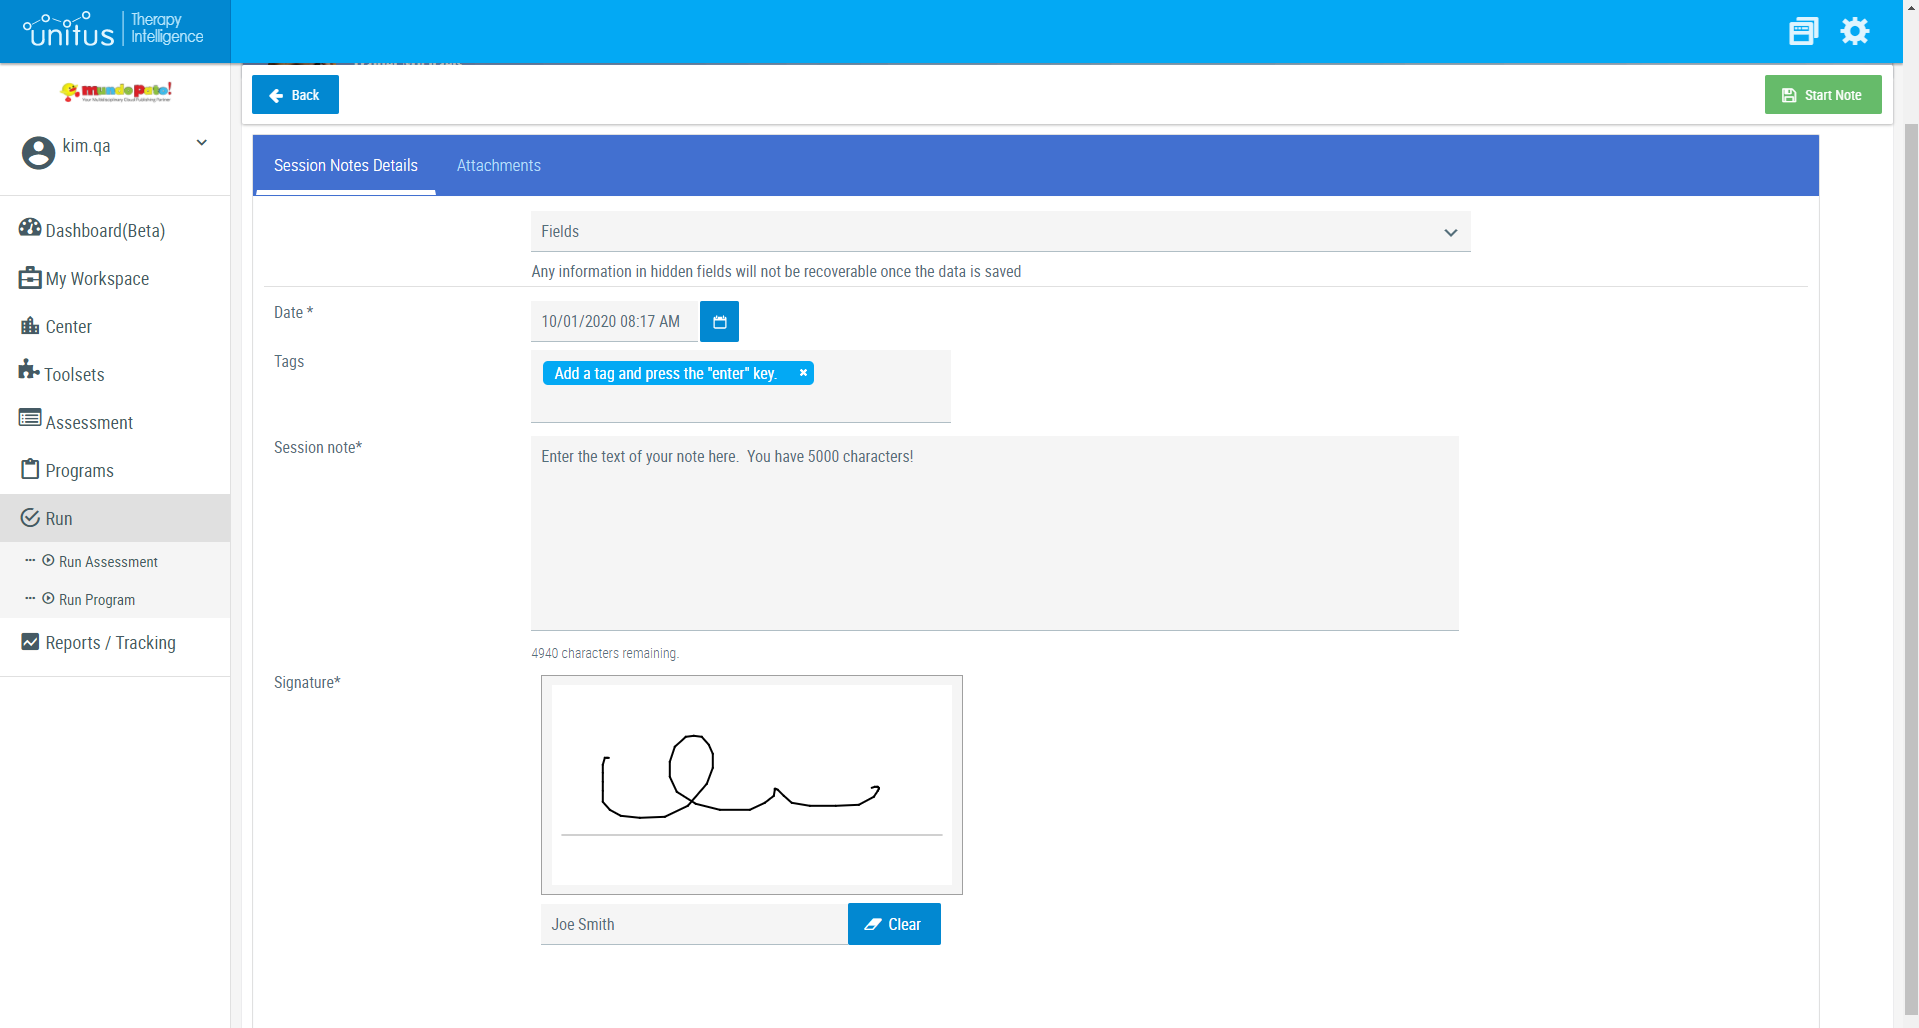
- Fields : This dropdown list allows you to choose additional fields to add to the note that are not included by default. We’ll discuss these options in more detail below.
- Date* : The date/timestamp is by default the current date and time, but you can change this using the blue calendar icon.
- Tags : Type a tag and press “enter”. Tags are optional. Add as many tags as you wish; tags add enhanced search functionality to session notes.
- Session note* : Type the text of your note (up to 5000 characters).
- Signature* : Use your mouse, stylus or finger to add a digitized signature. Type in the name of the signer in the field below the signature box. Use the “clear” button to erase both, if needed.
Additional fields: the dropdown selector “Fields” at the top of the page allows you to add other fields to your note. Check the boxes next to the fields you wish to add and the fields will be added immediately to the page:
Important: If you do not see all the fields shown in the screenshot below, it may be possible that your administrator has set a different session note template ( for more information about session notes template click here )
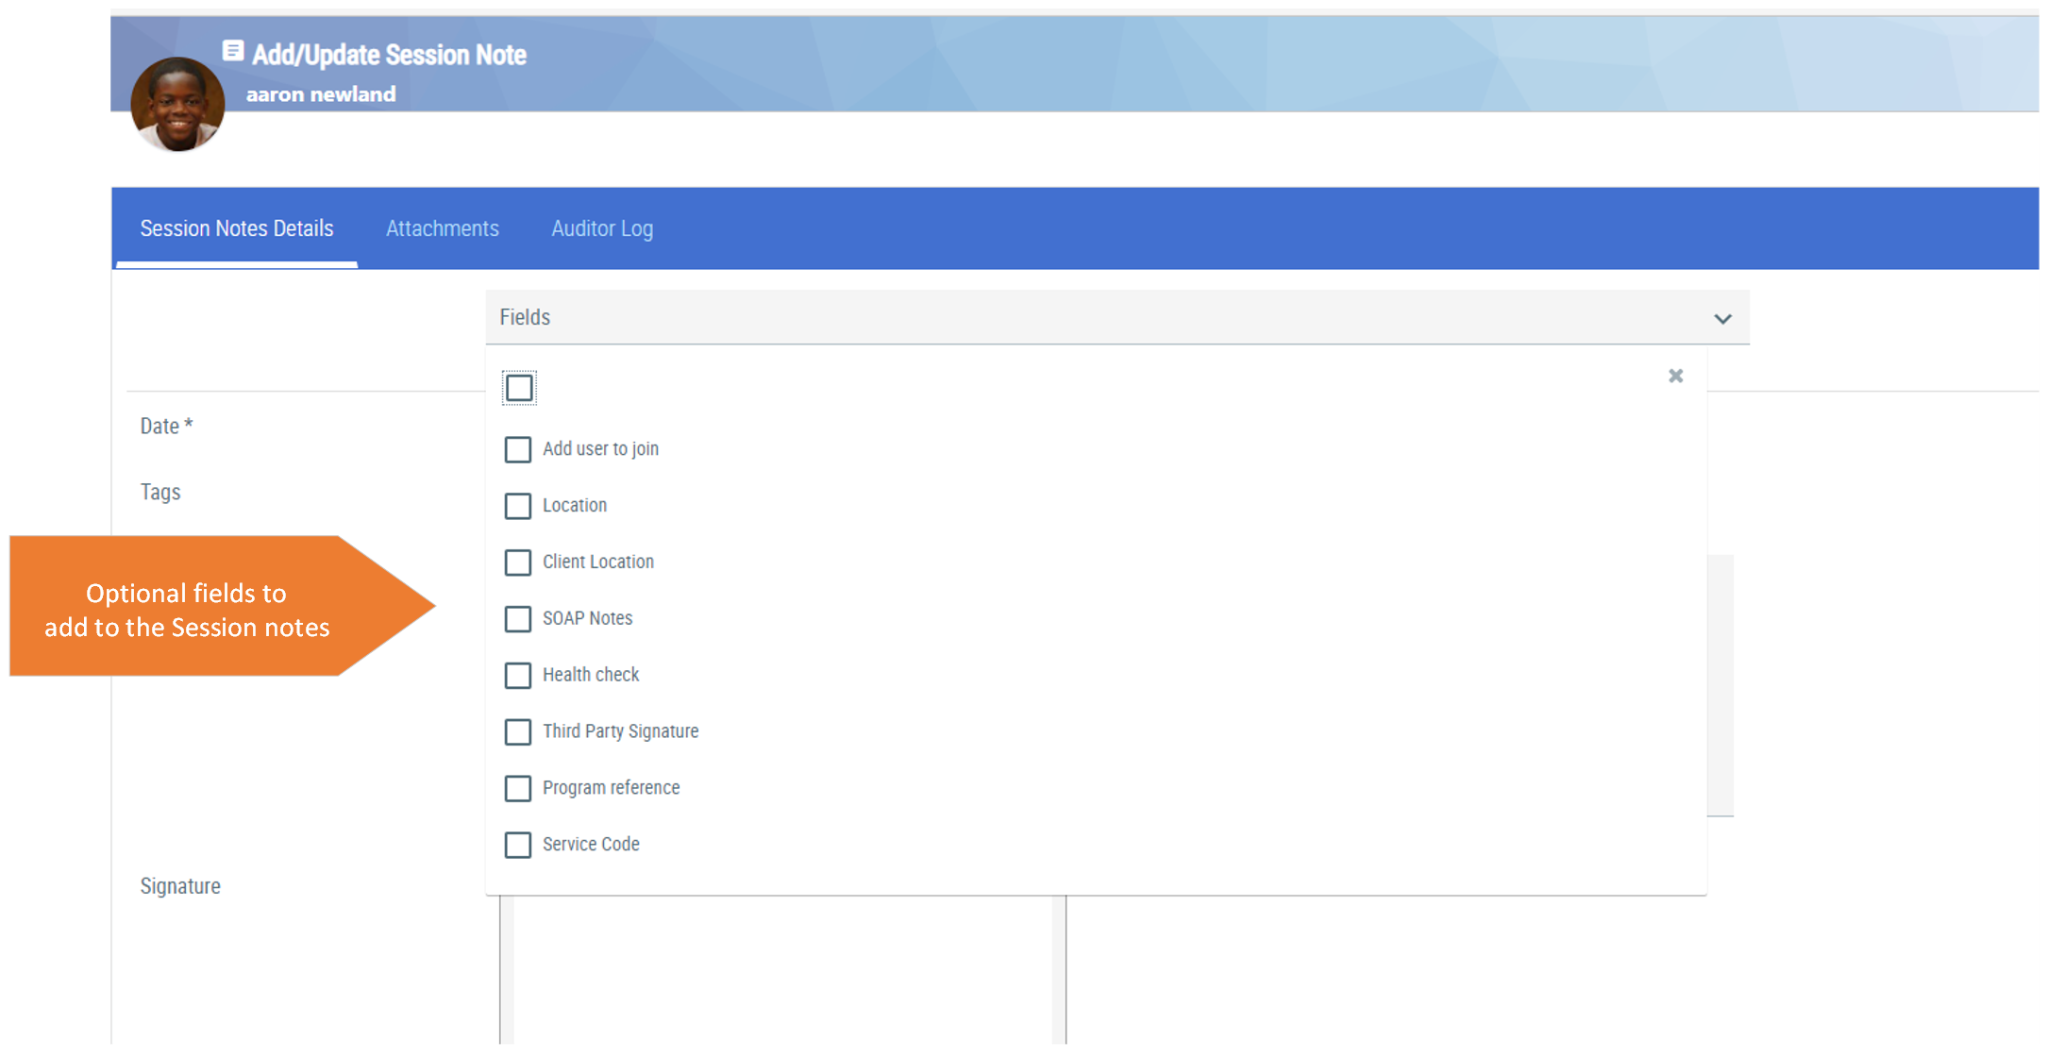
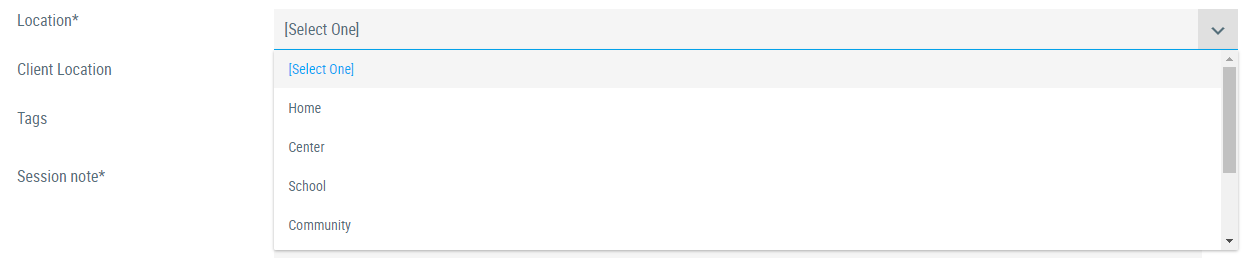
- Location : Choose from the options: Home, Center, School, Community, Office, Telehealth or Clinic. (Use the scrollbar in the dropdown list to scroll through all options; you may need to move your mouse or finger over the right edge of the dropdown list to make the scrollbar appear.)
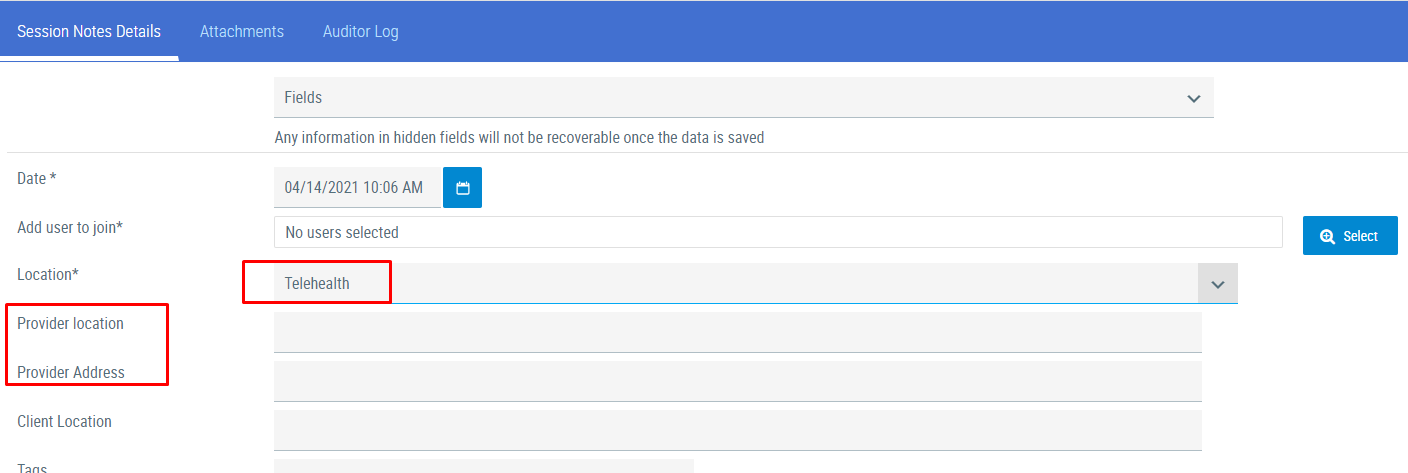
- Provider Address and Location : If you select telehealth as the location, these two fields are available to record the provider’s location and address.
- Client Location : Type the location where the client got the service. Use this field for additional details about the client's location - e.g. a physical address or additional note.
- SOAP Notes : Adds four additional fields for: Subjective, Objective, Assessment and Plan.
- Health and Medication Notes: These fields can be used to add health and medication notes of the therapy session.
- Add user to join: Adds additional team members (users who are also assigned to this client) to the session note. Joined users can add their session note, service codes and signature from their UnitusTI account.
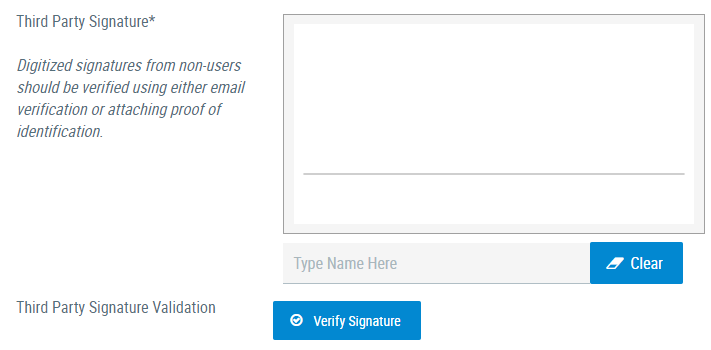
- Third Party Signature : This allows another person to sign the session note, either while logged into UnitusTI directly in the note, or via remote verification of their signature via email validation or submitting a file such as an image of their signature, their ID or a picture of the signer. (Note that to finalize the session note, it is required to have the third party signature verified). Use your mouse, stylus or finger to add a digitized signature. Type in the name of the signer in the field below the signature box. Use the “clear” button to erase both, if needed.
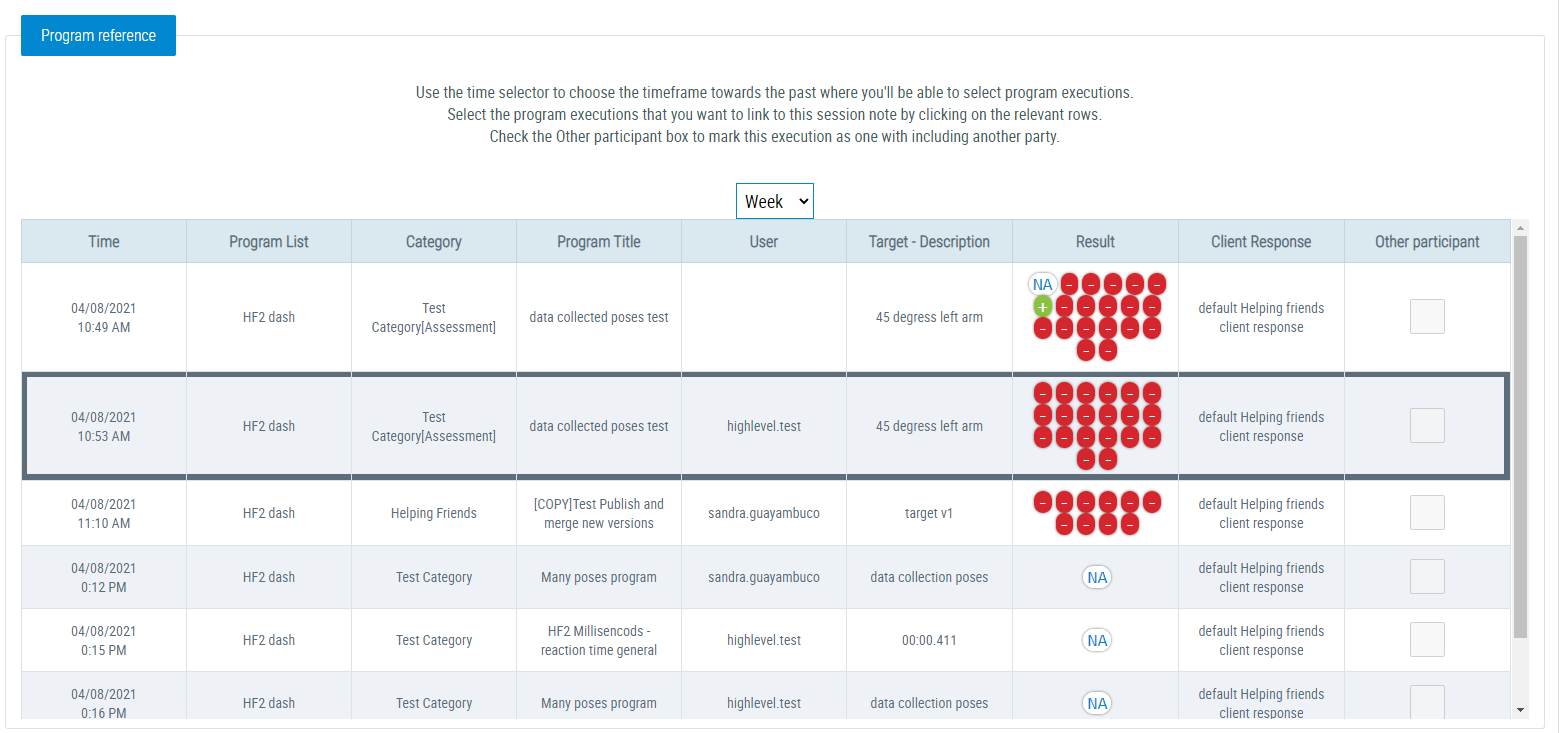
- Program reference: for more information click here
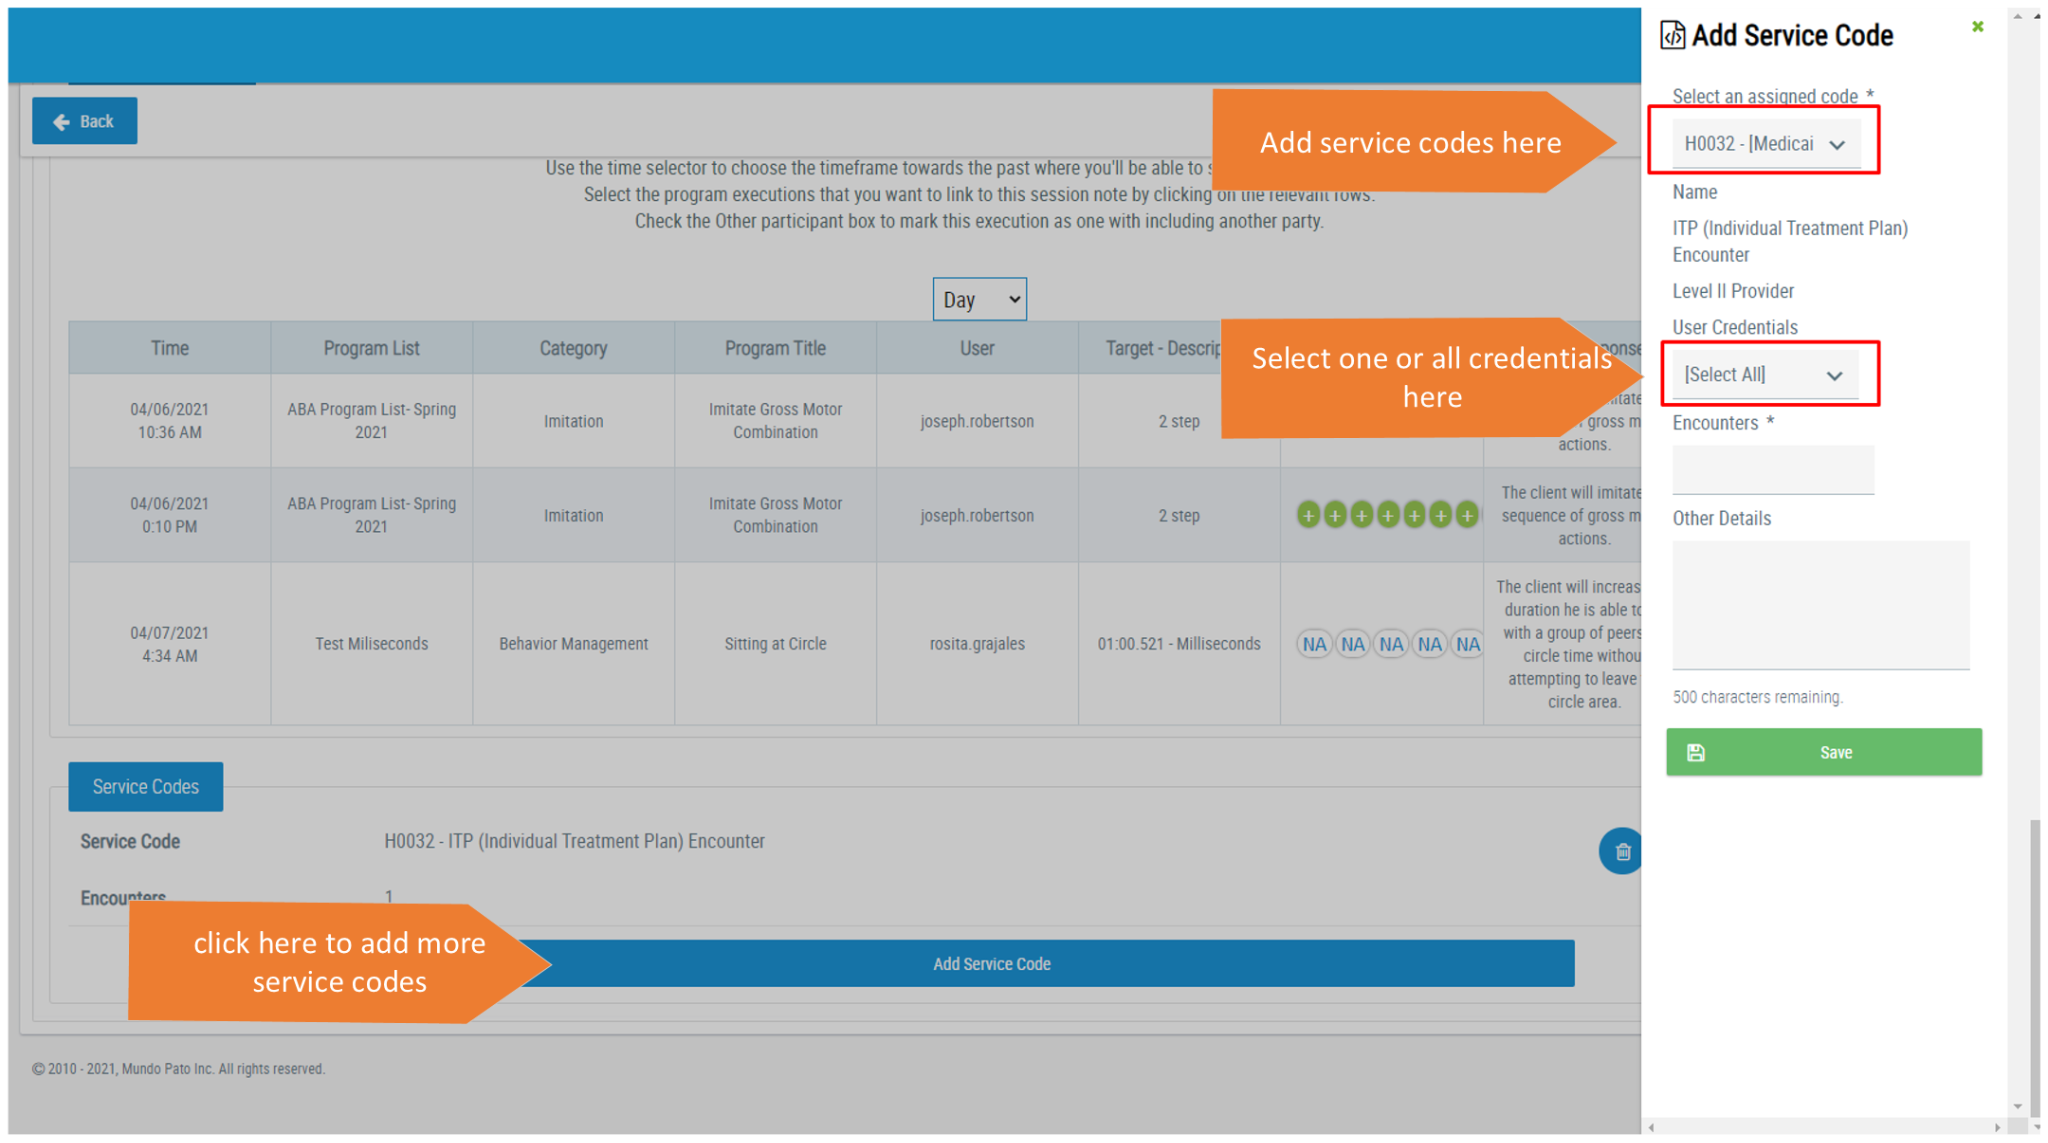
- Service Codes : Adding a service code, if appropriate, can simplify the data entry and data analysis processes. The screenshot belows displays where you can add service codes and where you can link a user credential to the service code.

Note : unchecking a box next to a field that has already been added to the page will hide it along with any text that was filled in. Rechecking it will unhide the field and recover the text; however, after you finish your note, the text in the hidden fields will not be recoverable.
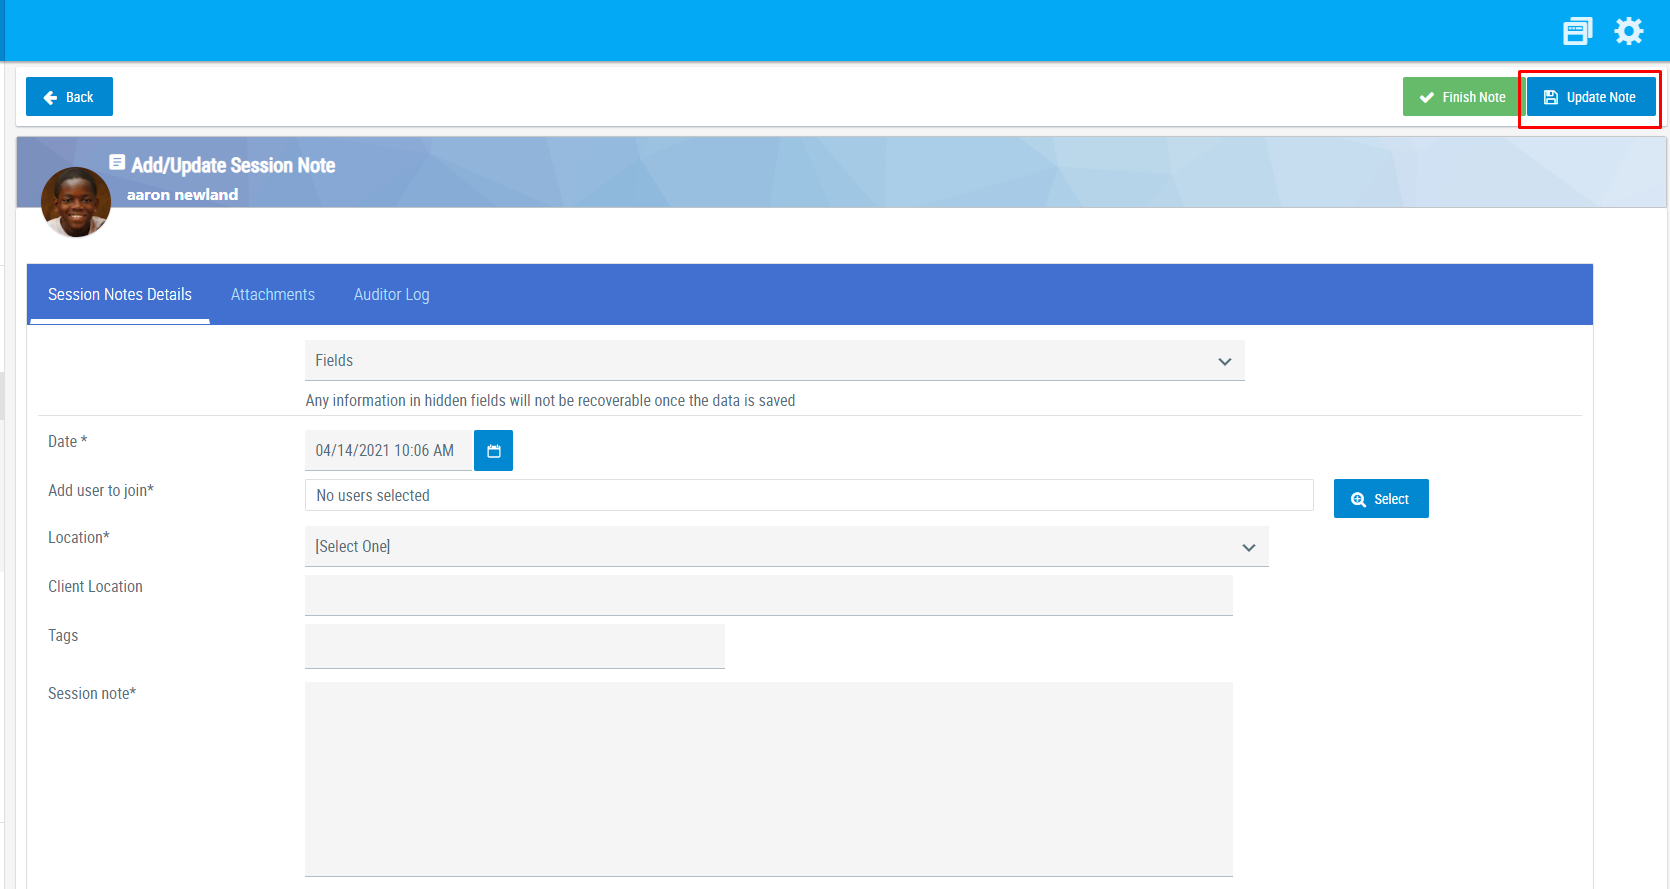
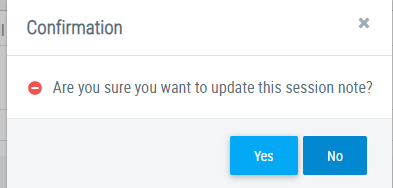
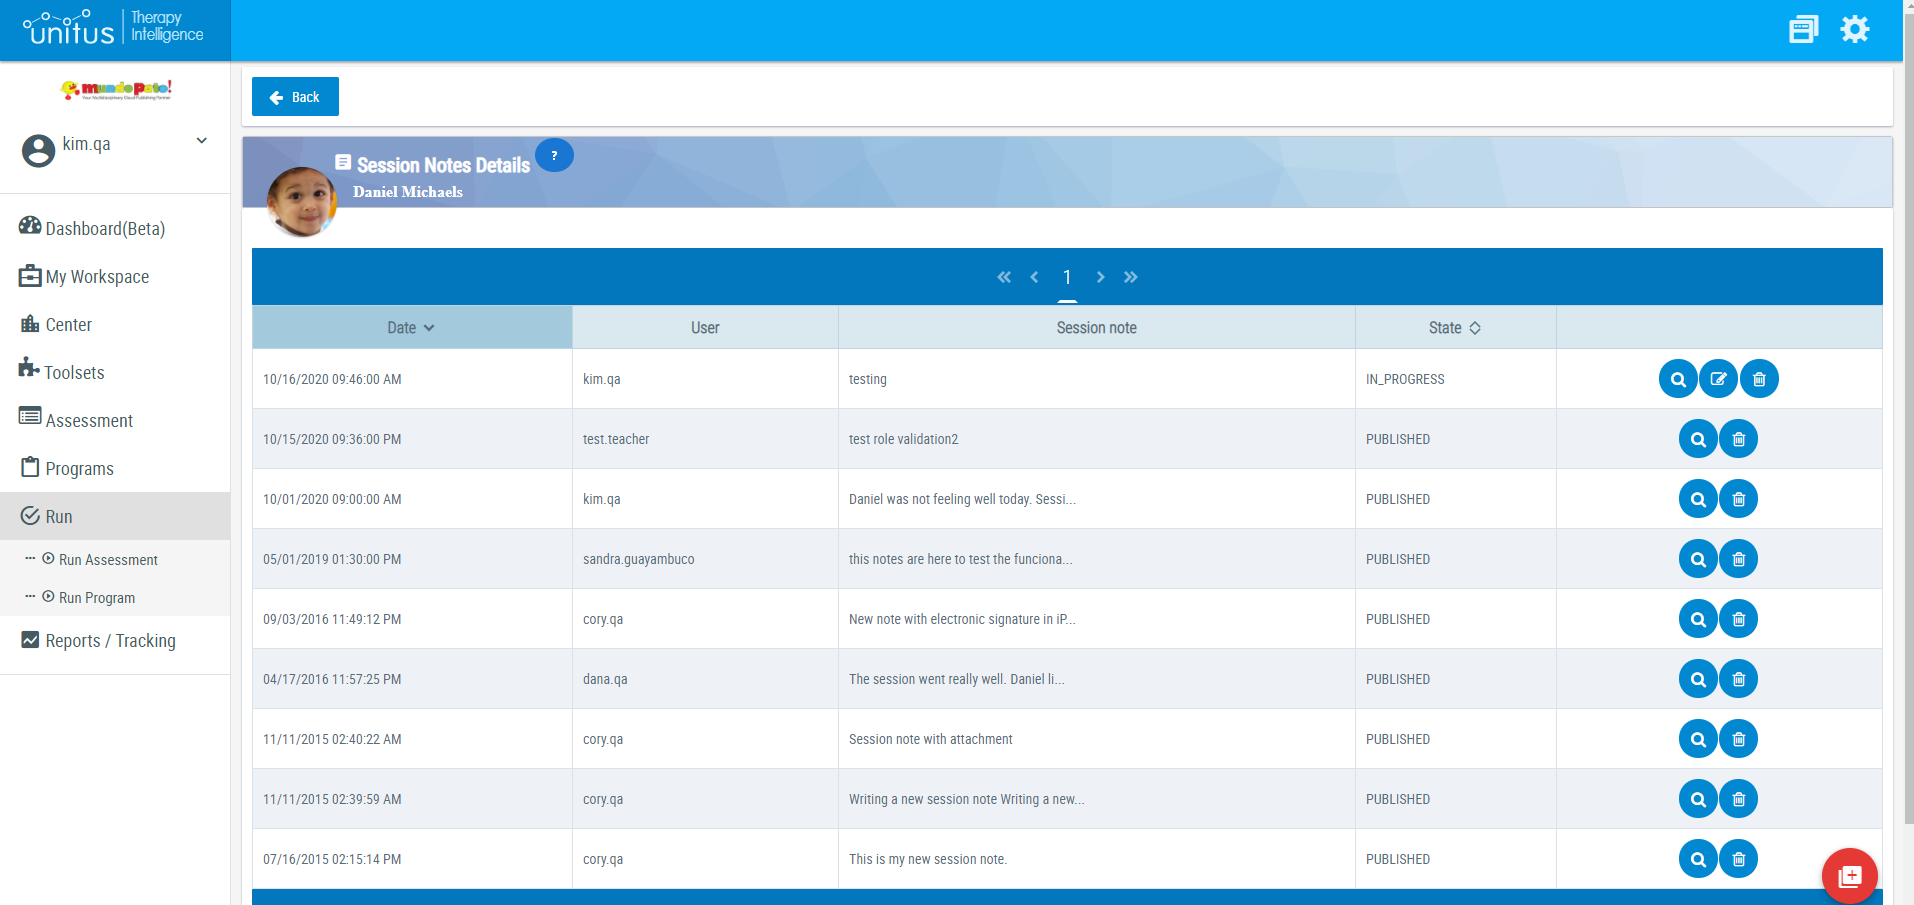
- Fill in the required fields and any additional fields you wish from the “Fields” dropdown list, then select the “Update Note” button in the top right corner of the page. To save the note and return to it at a later time, select “Update Note” in the top right corner). In the confirmation pop up window, select “Yes” to save or “No” to return to the page without saving. You can continue editing or select the “Back” button on the page to go back to the Session Notes Details page for the client, where you will see the unfinished note in the list with a status of “In Progress”.
-
Once saved, you may add more information to the note, including file attachments from the “Attachments” tab in the blue bar (see screenshot below):
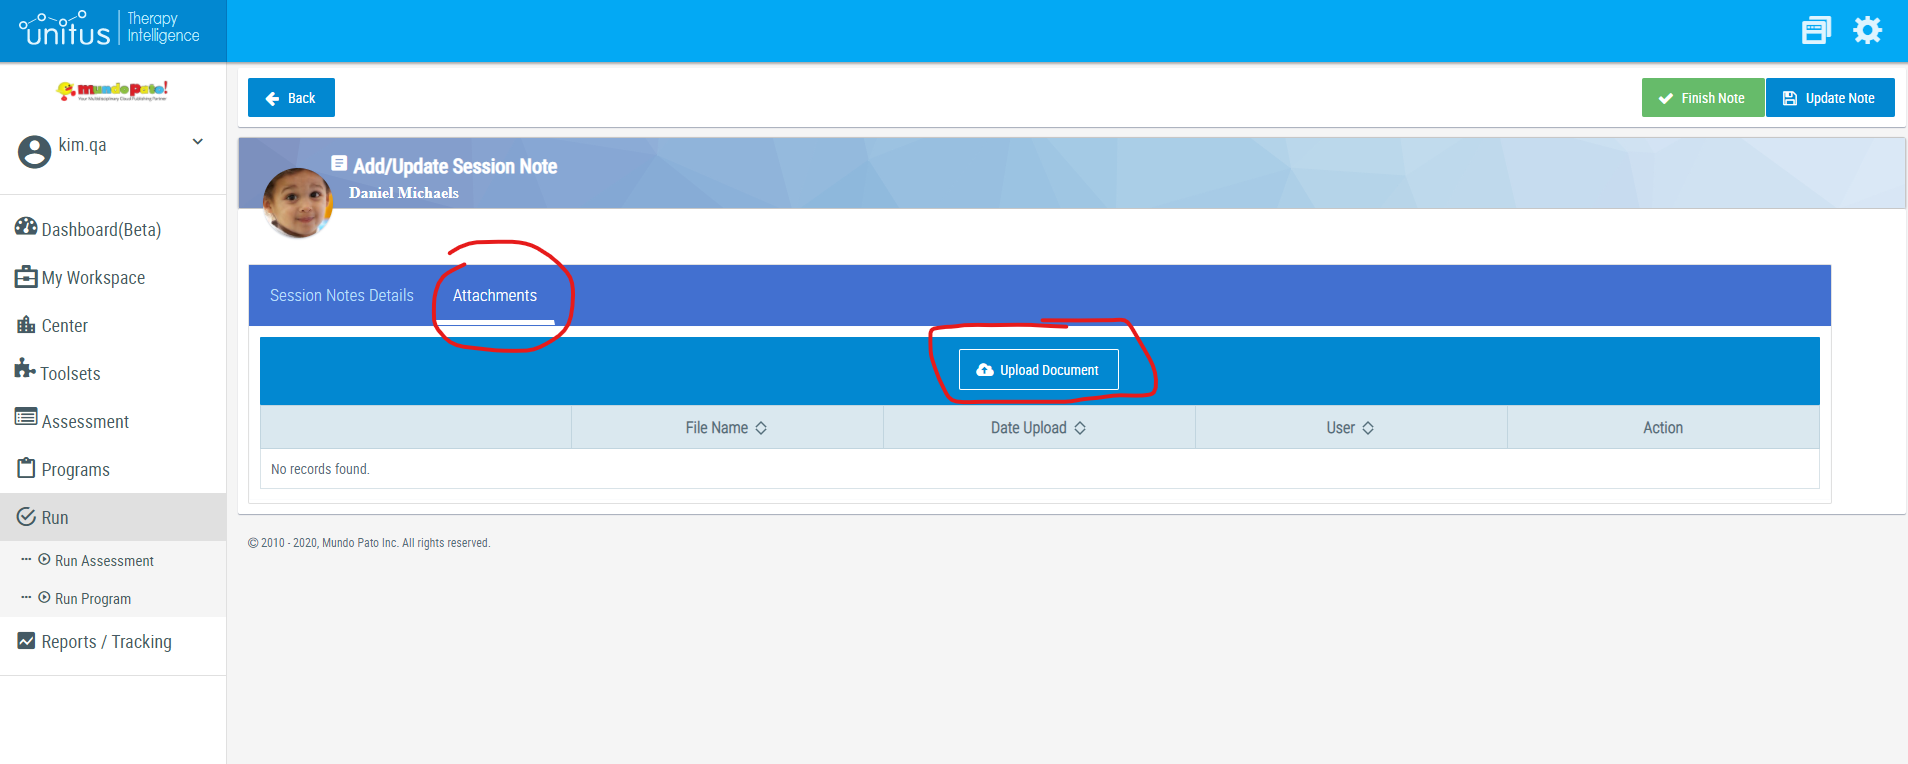
- Select Attachments (the tab next to “Session Notes Details”)
-
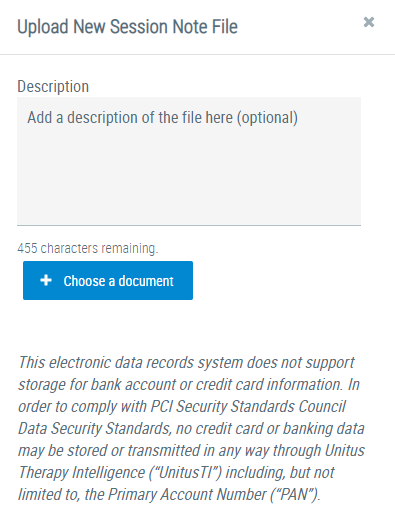
In the popup window,
add the description of the attachment
and use the blue button to select a file from your device and add a description, if you wish:
-
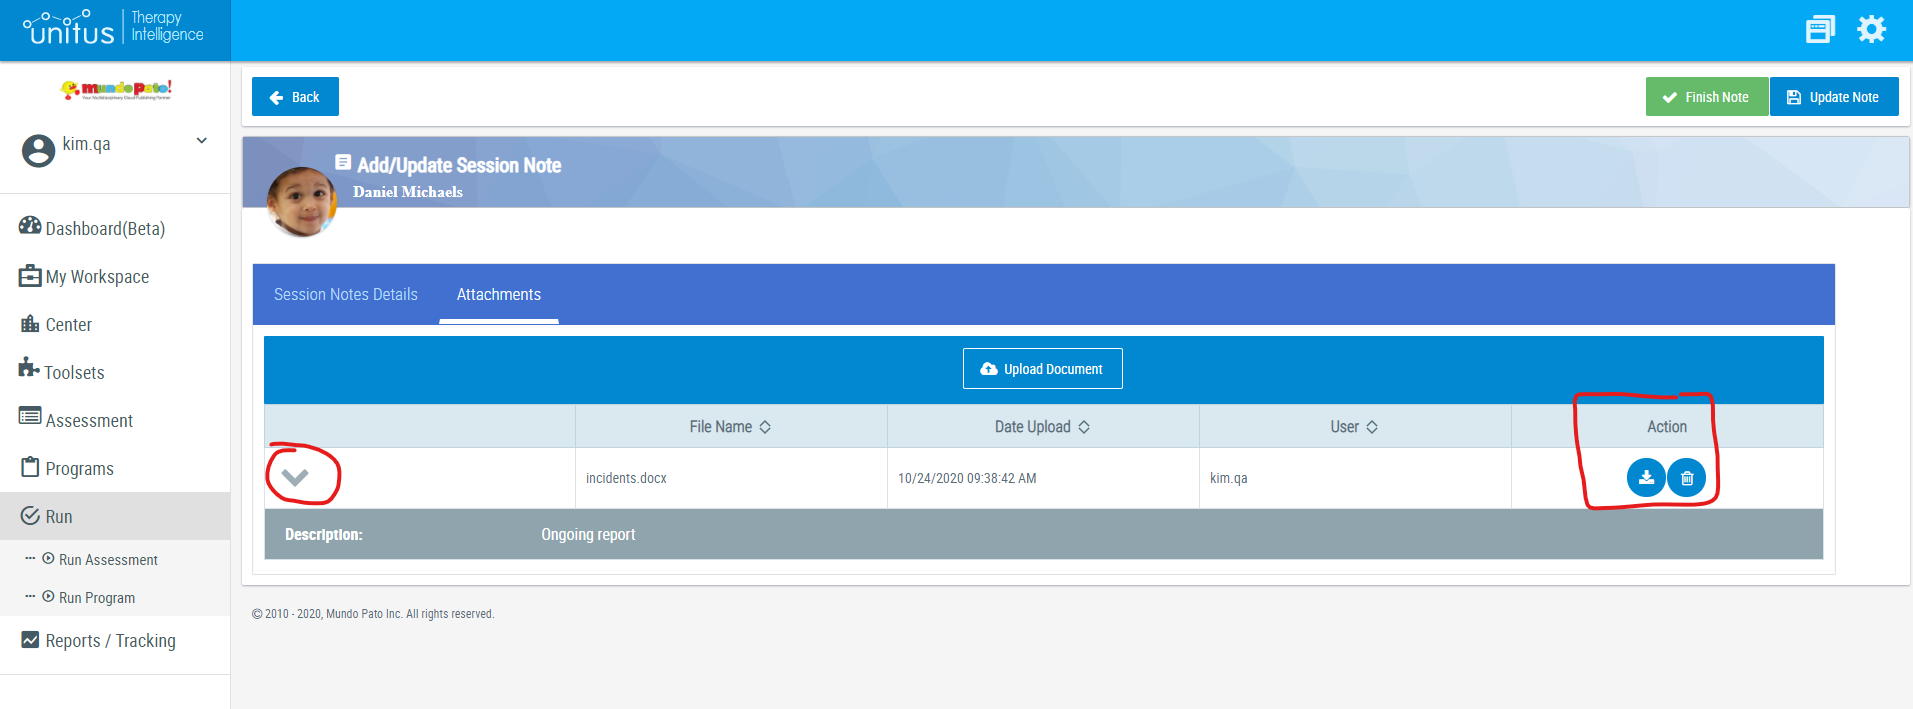
When the attachment has been added, it will display in the list of attachments. Use the gray arrow on the left side to expand the information to see the description field. Use the icons in the Actions column on the right to download or delete the attachment. Add more attachments, as you wish.
-
To complete the note and prevent further editing, select “Finish Note” in the top right corner of the page. In the confirmation pop up window, select “Yes” to complete this step or “No” to return to the page and continue editing. Selecting “Yes” will redirect you to the Session Notes Details page for the client and you will see the finished note will appear in the list with a status of “Published”.
Program Reference
This section allows you to link existing Program Executions to the current Session Note. It lets you search for Program Executions on the last day, week or month, by counting back the number of days from the current date.
For example: if you select “Month” you will see the Program Executions of the last 30 days.

Once the list of Program Executions is presented, you can highlight the records to link them to the Session Note and additionally you can check the “Other Participant” column.
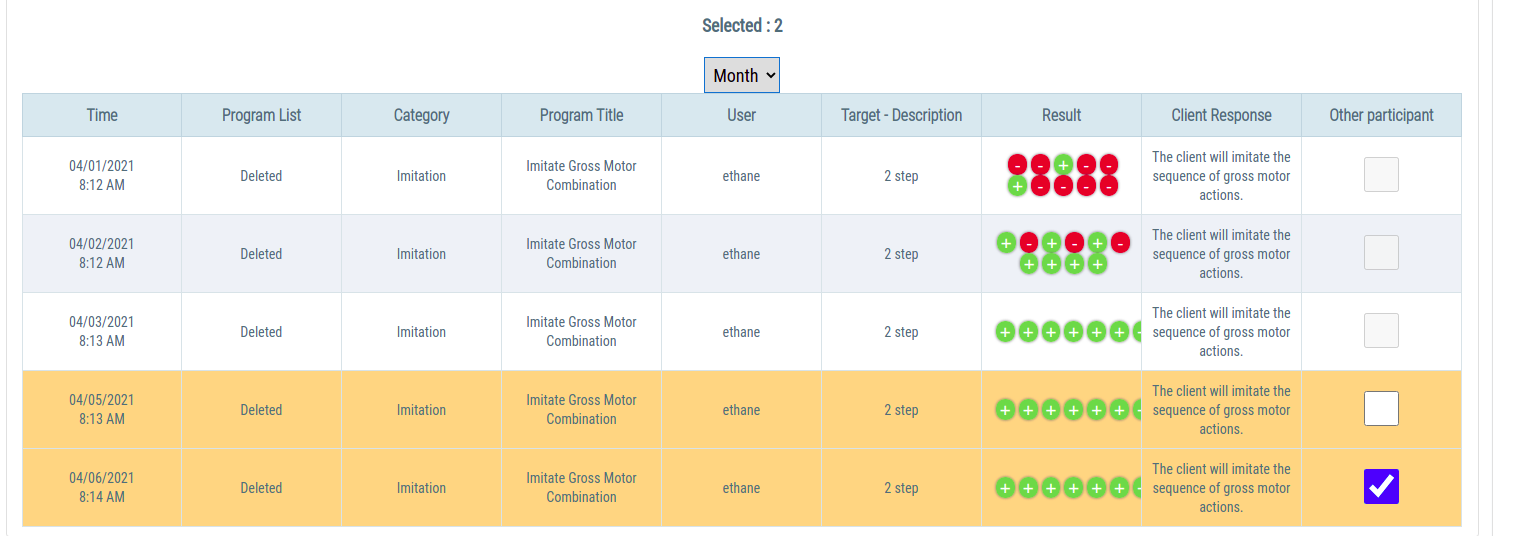
Once the Session Note is published, only the selected records will be presented:

Program Reference Report
The program reference can be viewed In the dashboard or reported to PDF and WORD. The following roles can access the session notes report:
- Administrator
- Teacher
- High-level access
- Medium level access
- Low-level access
- Execute Only
- Client Guardian
- Session Notes Editor
- Service Code editor
- VM Administrator
- VM Manager
To view the program reference information in the Session Notes Dashboard, follow these steps:
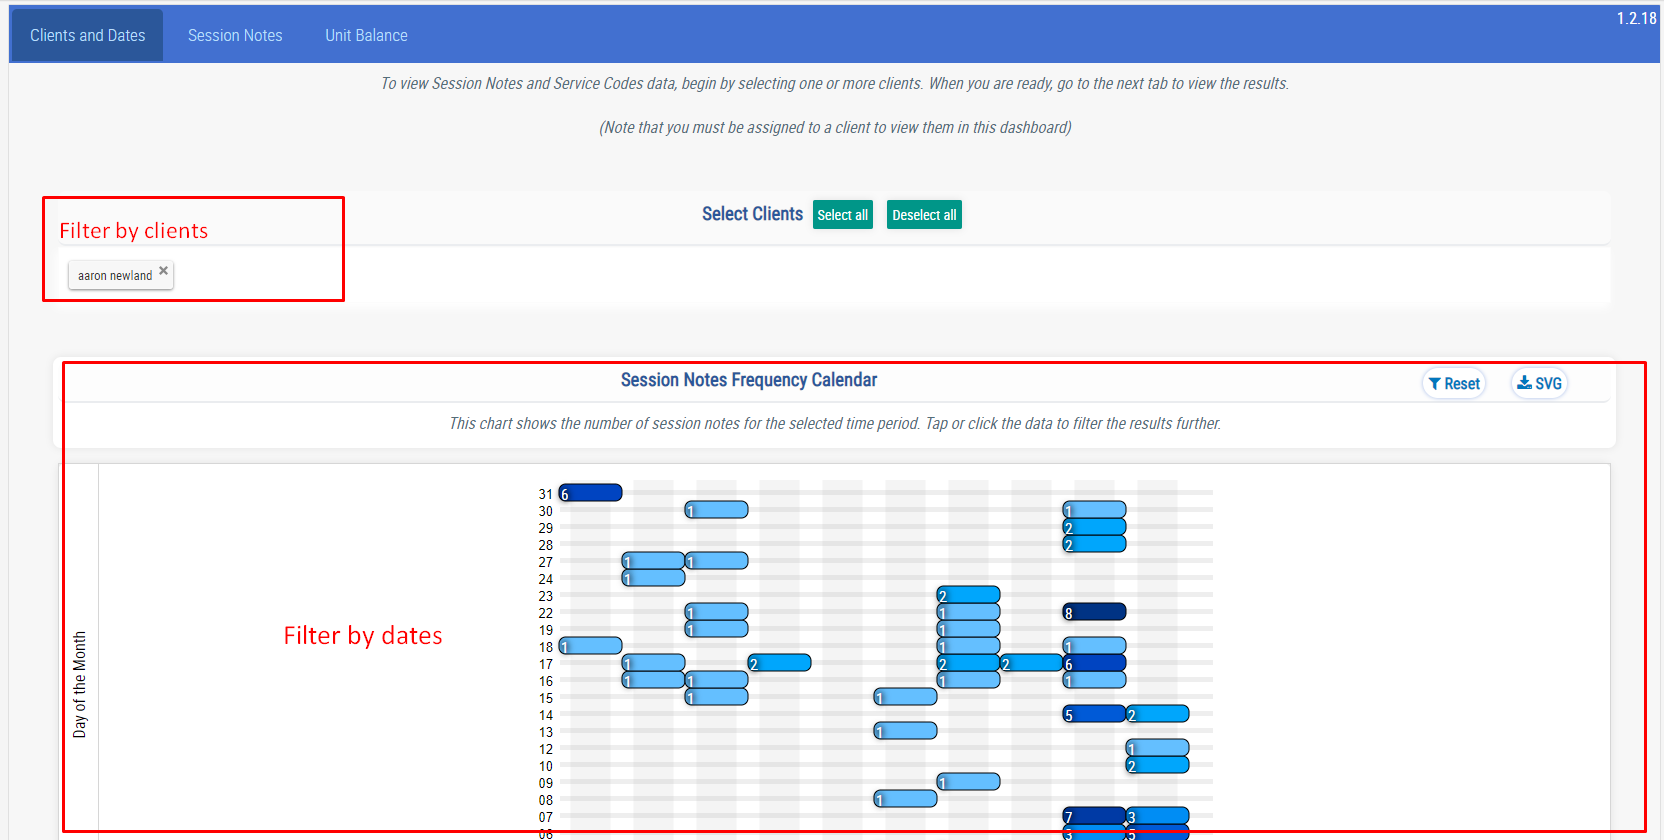
In the first tab (Clients and Dates tab): Users can filter the dashboard by clients and dates,
In the second tab (Session Notes tab), in the table “Session Notes Summary” a button “Program Reference” is available for each note that has programs referenced.
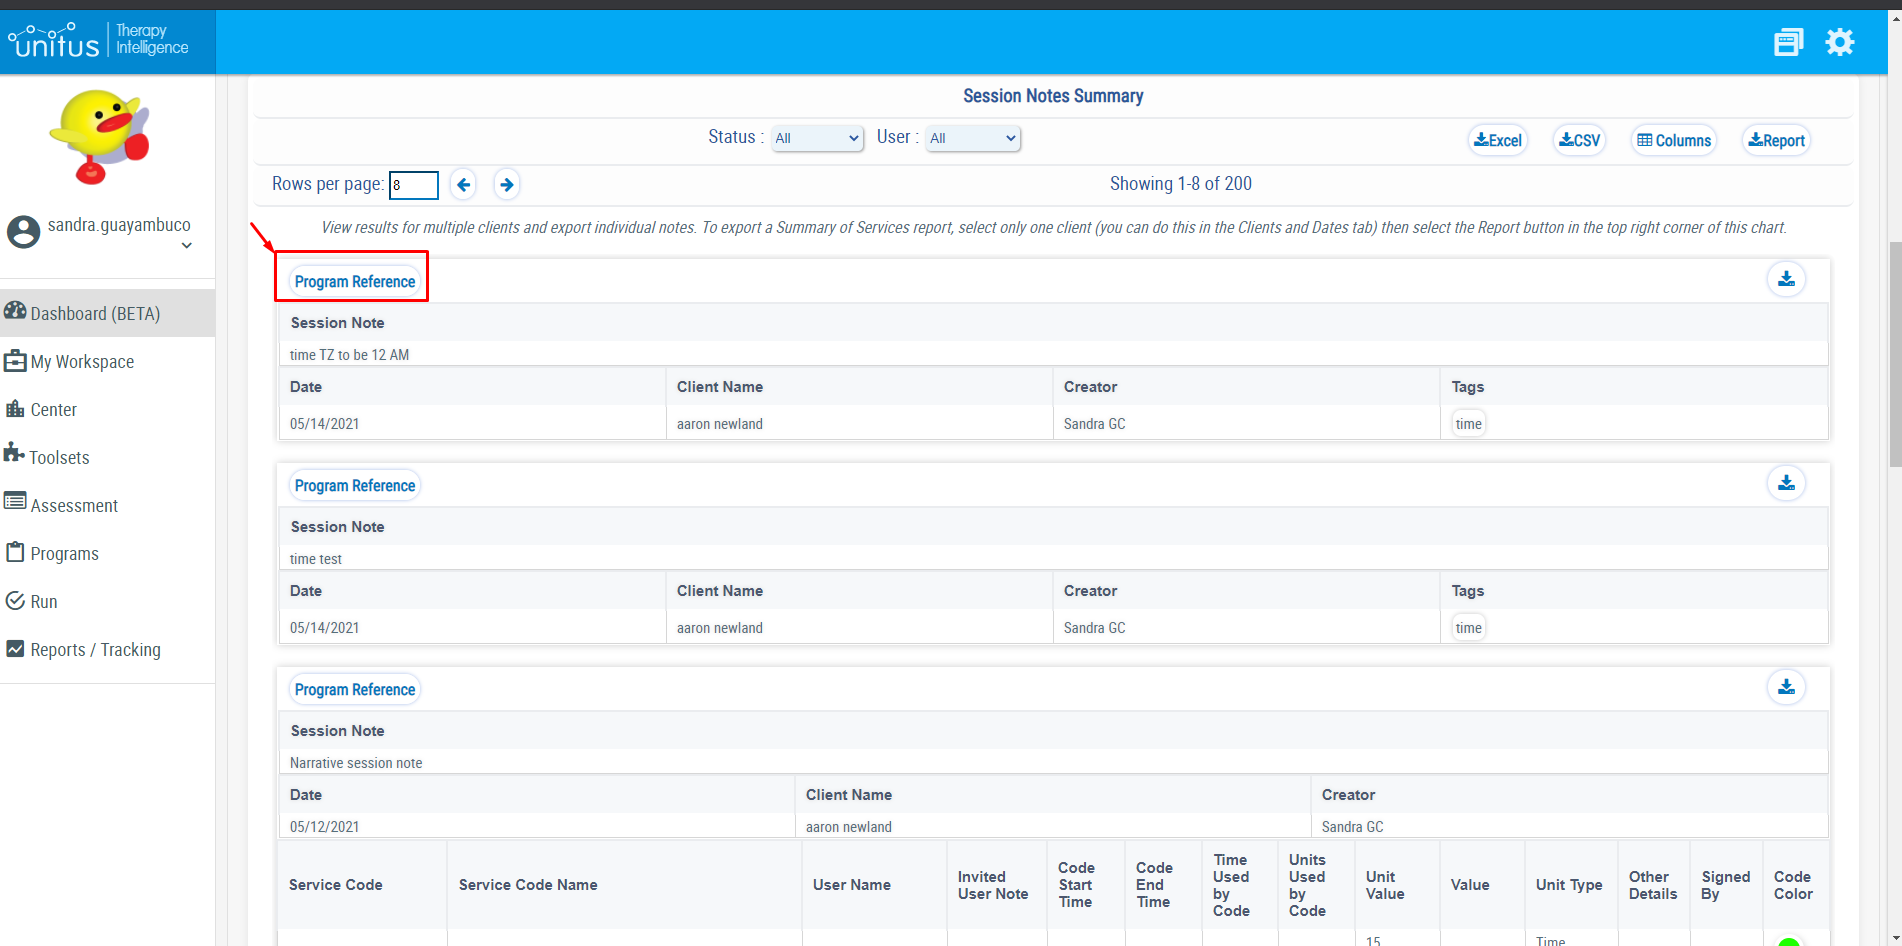
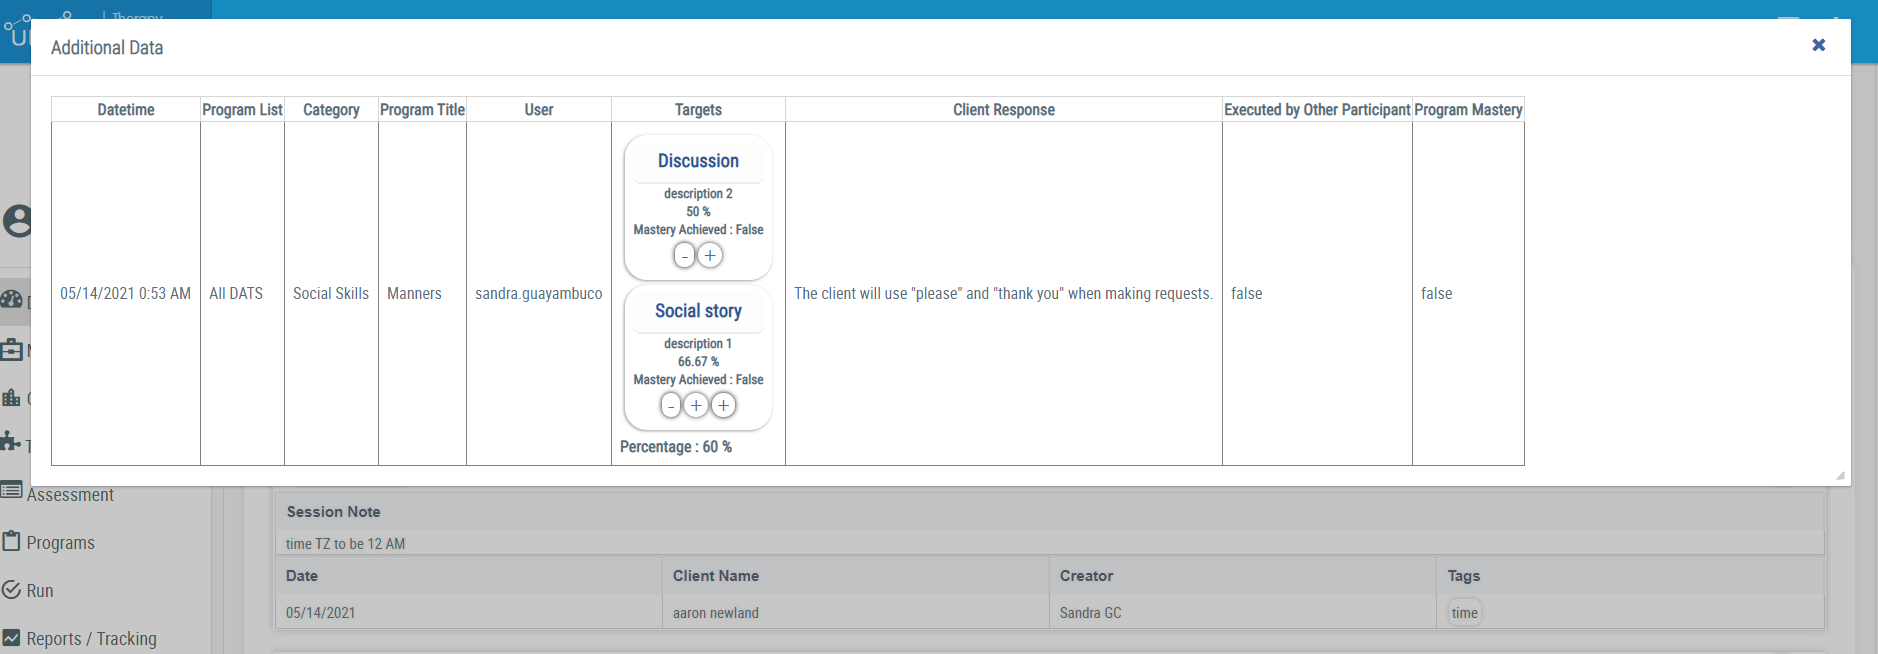
Selecting the Program Reference button for a note will display a table with the program execution detail for the executions chosen by the session note creator. The table has the following columns:
- Datetime : The date and time recorded for the program execution
- Program List : The client’s program list that this program is in
- Category : The category assigned to the program
- Program Title : The title of the program
- User : The team member that executed the program and recorded the session data
- Targets : The target value, target description, trial results, and the mastery percentage for the targets included in the program execution
- Client Response : The expected client response for the program (this is set up as part of the program template)
- Executed by other participant: This field is True if the session note creator checked “Other participant” checkbox in the session note
- Execution Mastery: True or false, depending if the percentage set in the mastery criteria is reached.
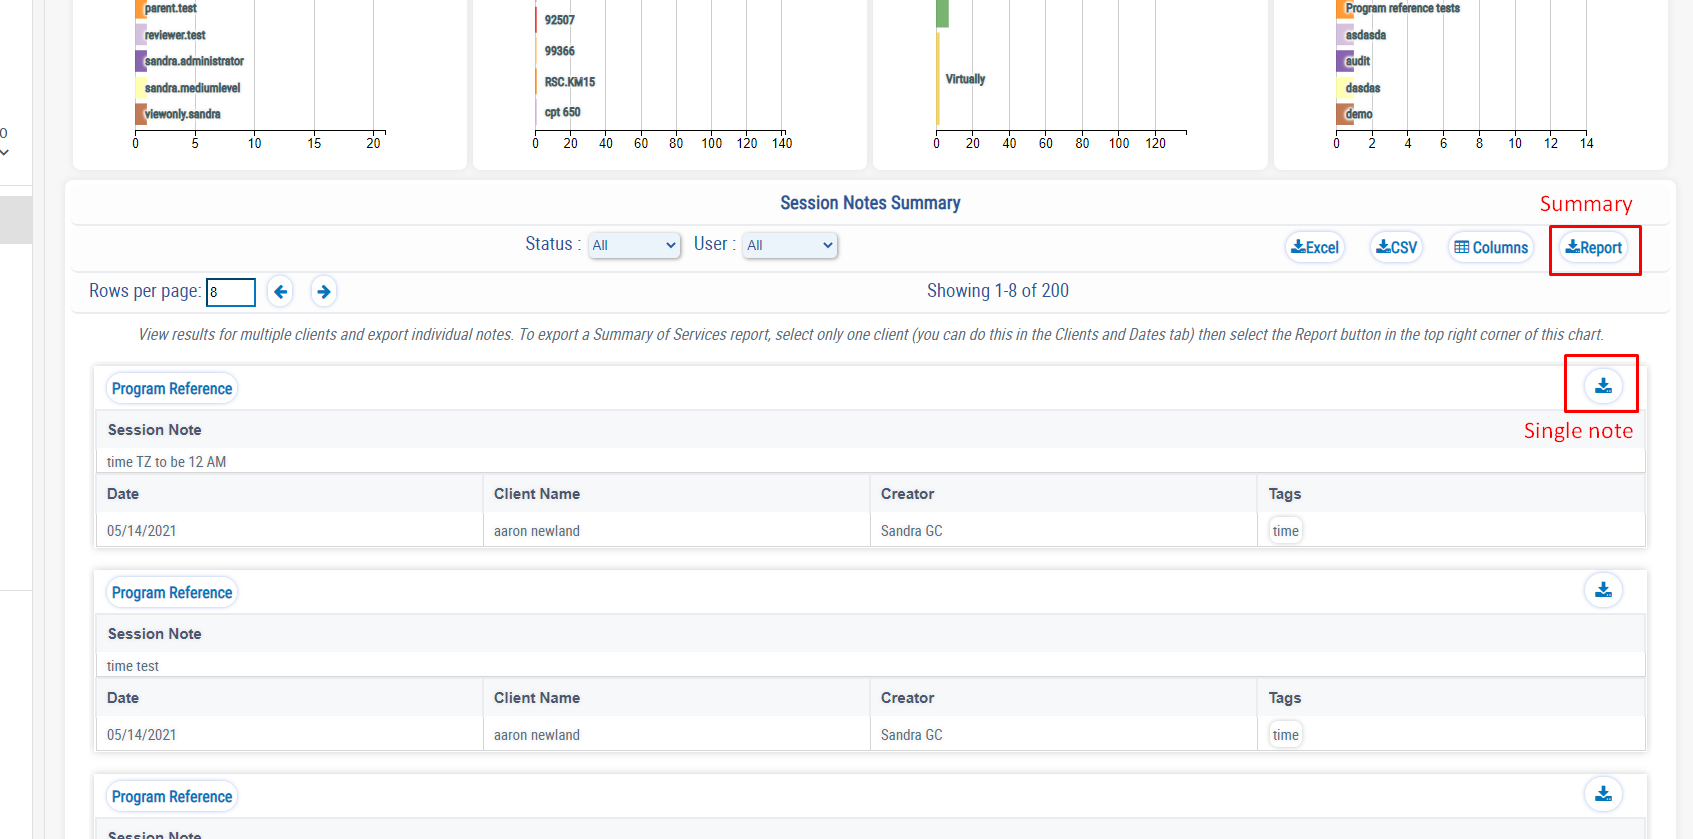
Users can also export a report of the session note with the program reference information:
-
For a summary of multiple session notes, select the “Report” icon

-
To export a report of a single note, select the download icon

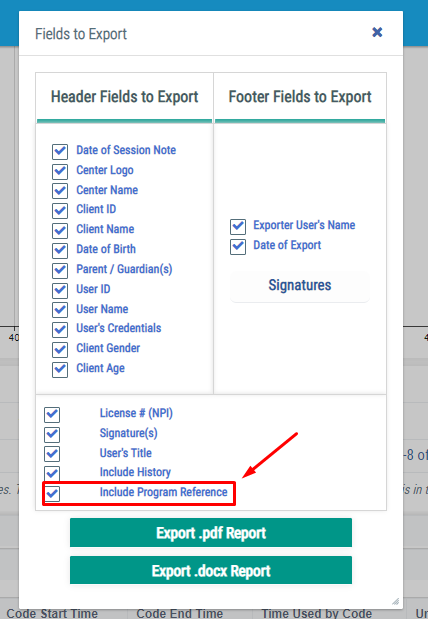
A pop up with a checkbox list opens for users to select which information to include in the report, including the program reference.
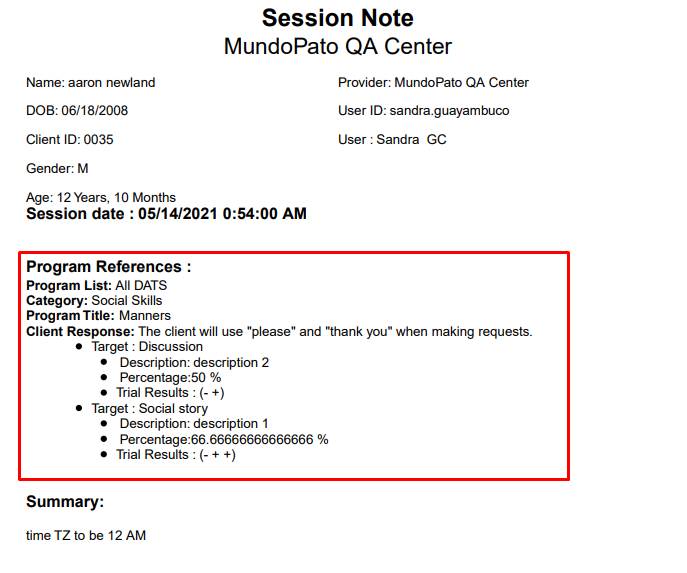
The PDF and Word report display the information of the program reference as shown below:
Invite Other Users to Session Notes
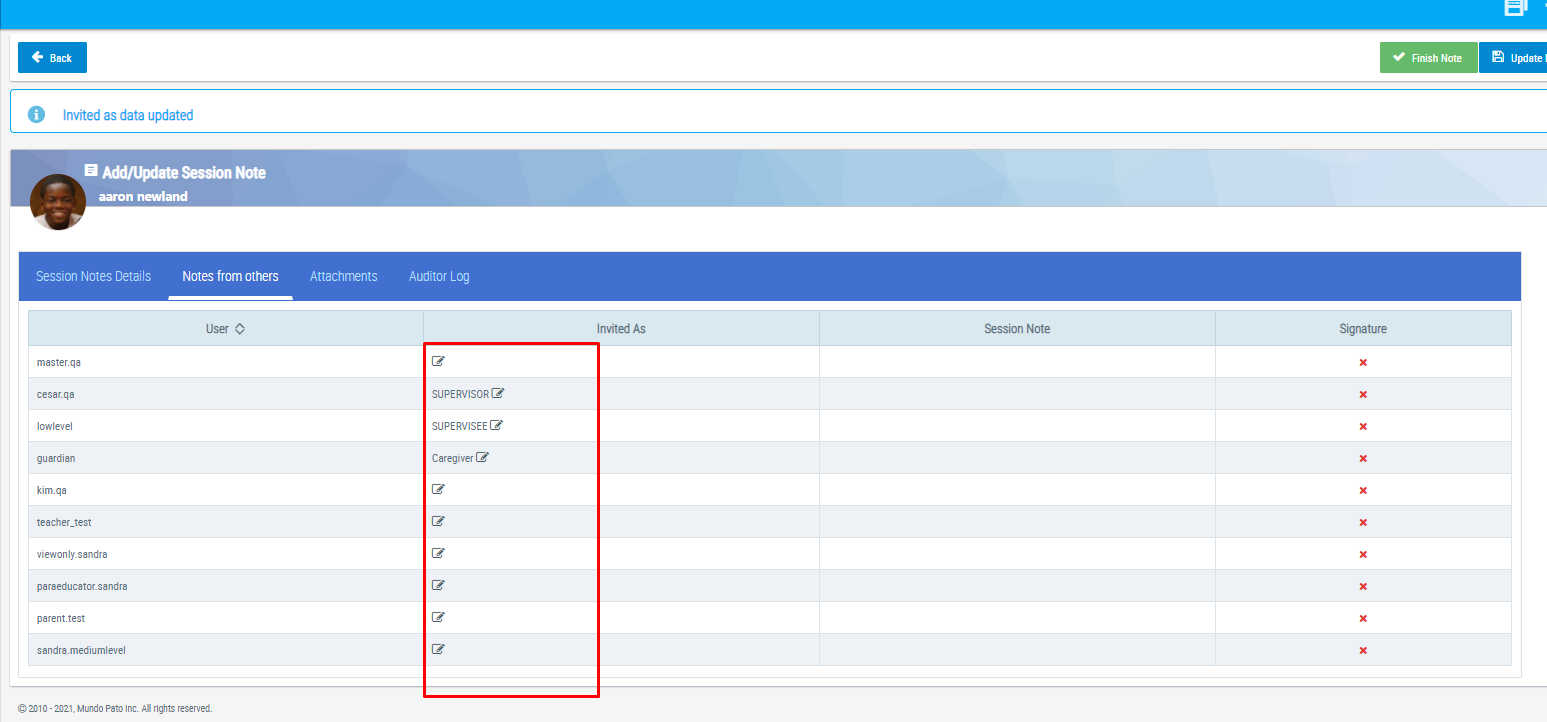
Add additional team members to the note: Using the “Fields” dropdown selector, you may add additional team members (users who are also assigned to the client) to the session note. Joined users can add their own note, service code(s) and signature from their UnitusTI account. Joined users can also be invited as Supervisors, Supervisees, or any custom role. (Note that a joined user should have a security role that allows them to edit session notes. All roles and permissions can be reviewed in the security roles guide .)
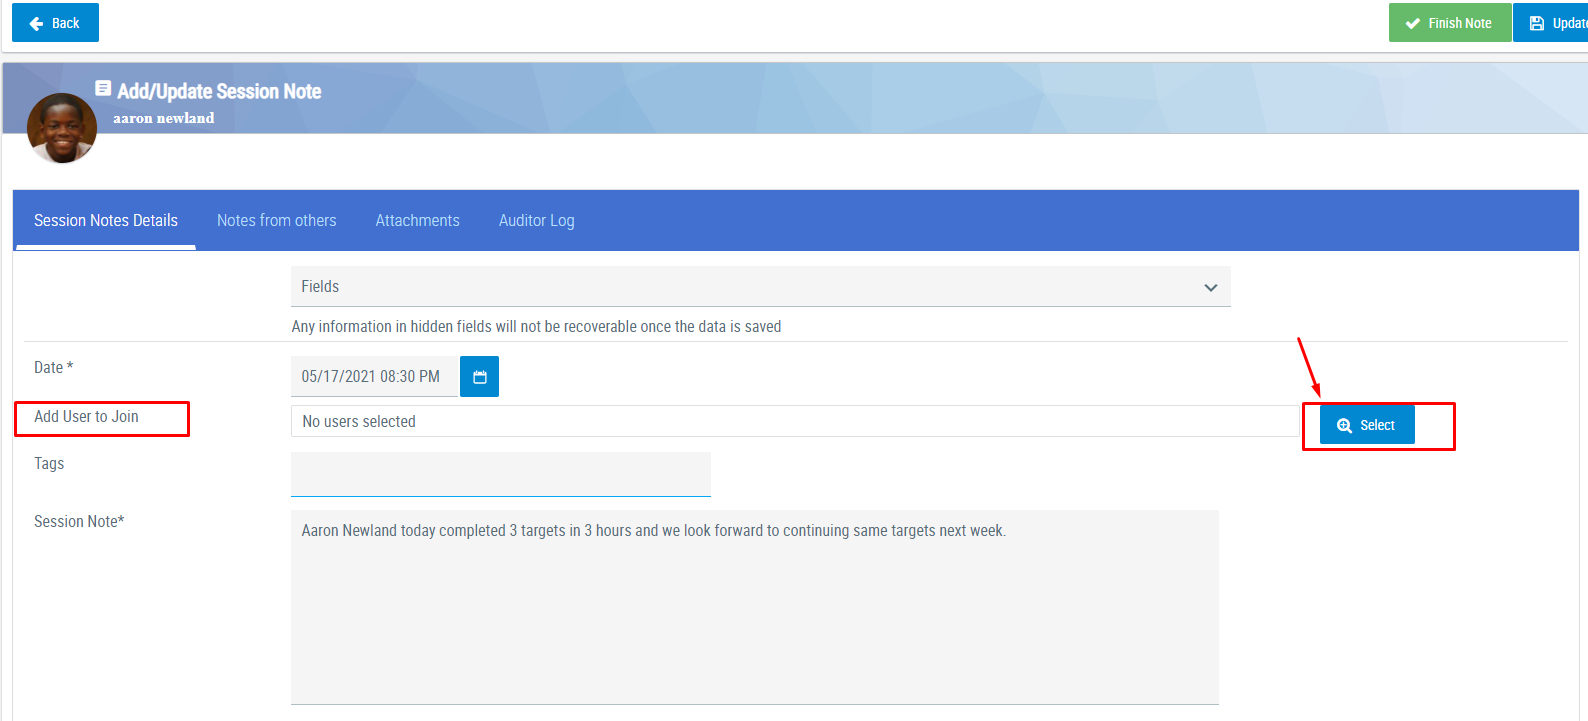
Users can invite team members to their note and assign them a specific role, such as supervisor, supervisee, parent, etc. To customize the role of each invited team member, go to the tab “Invited Users Info”:
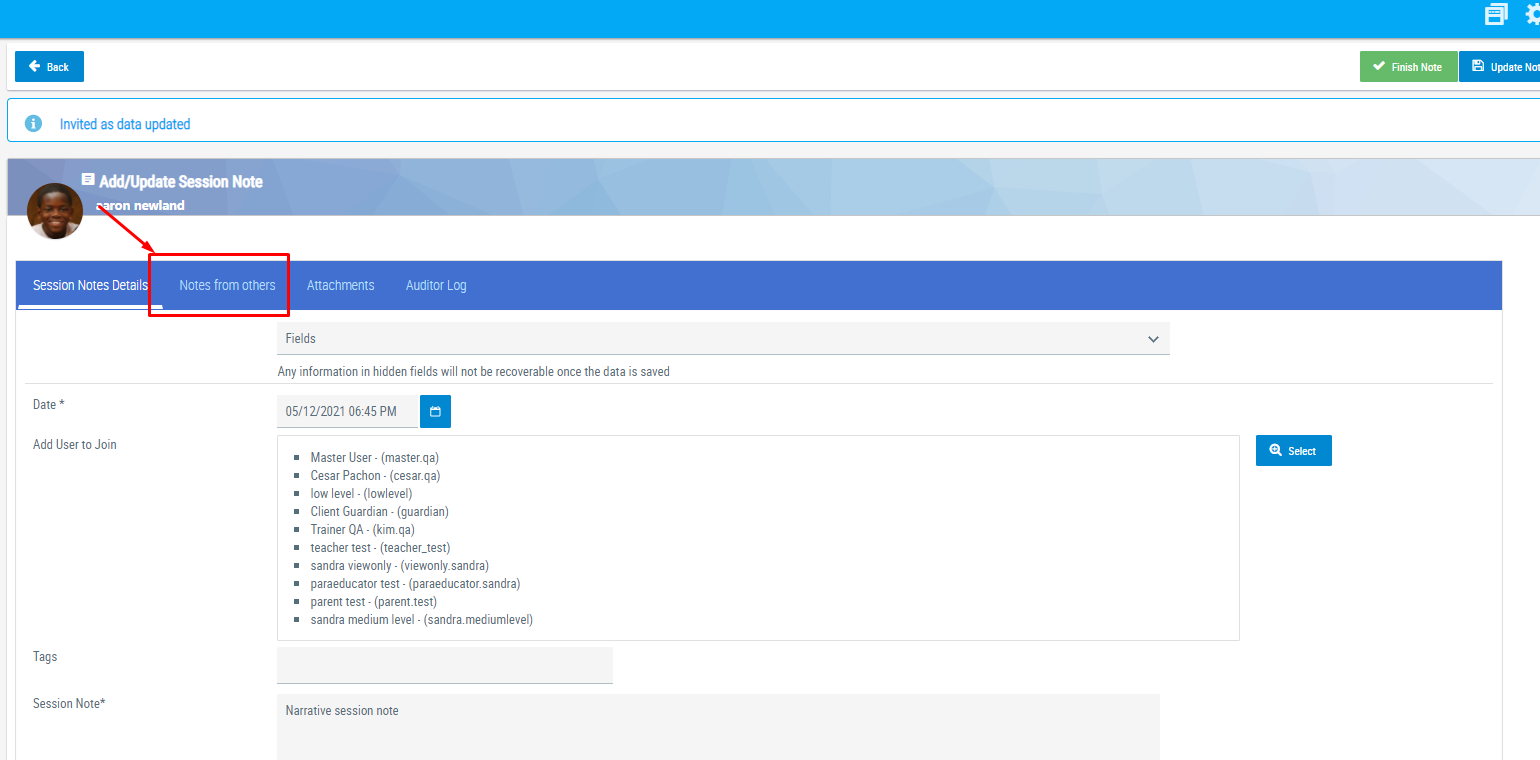
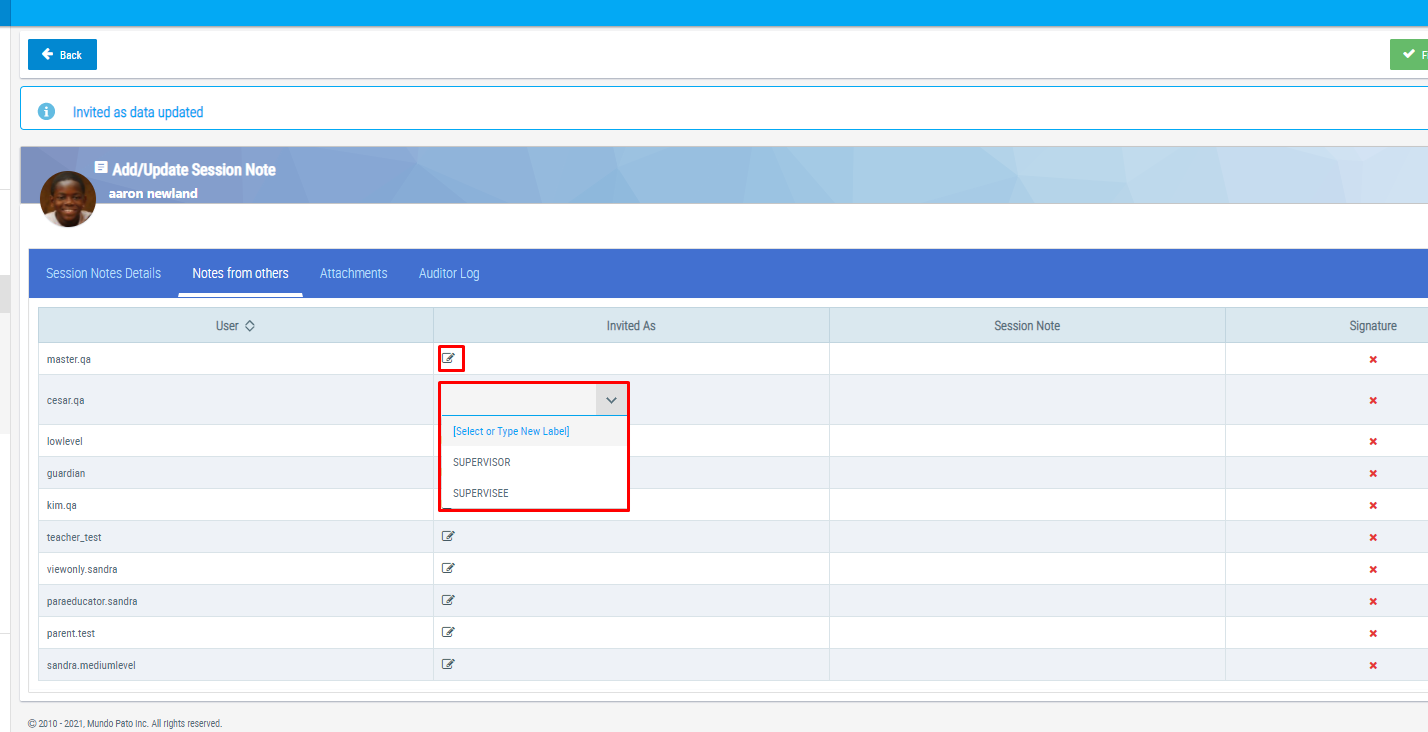
Click the icon
 under the column “Invited as…” to set the role for that invited user, users can choose:
- From the dropdown list Supervisor or Supervisee
- Type in a new role
- Leave blank
See the screenshot below for all the possibilities:
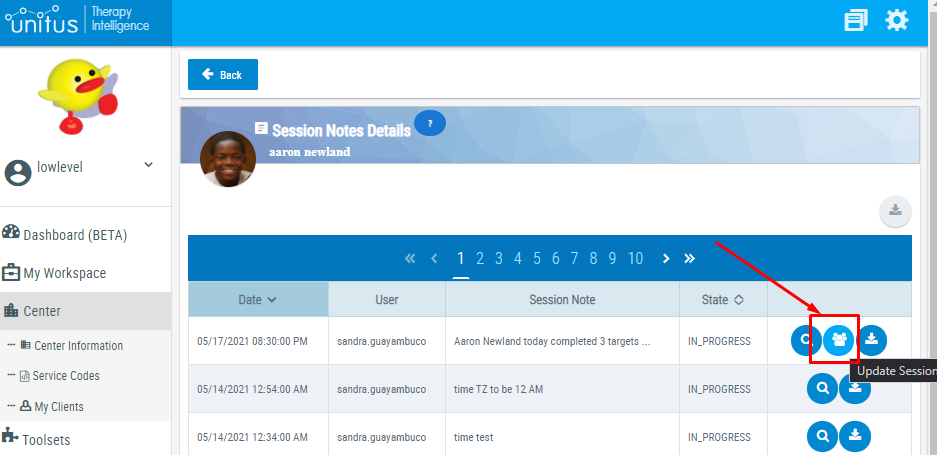
When the joined user logs into their account, they will see a new icon in their client’s Session Notes Details page, which indicates they have been invited to collaborate:
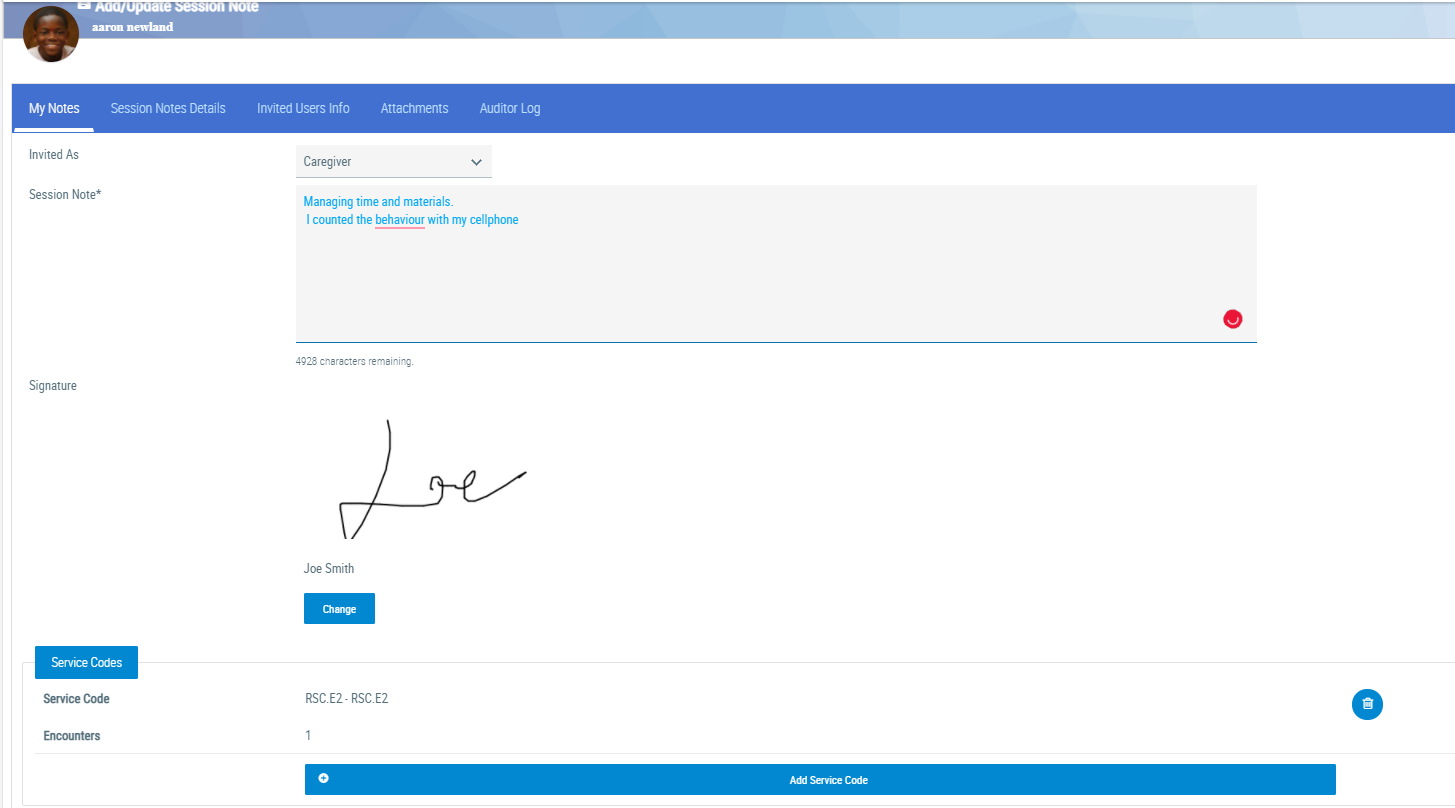
T he joined user can do the following:
- View and edit their role in the session note
- Add their session note
- Add their signature
- View the creator’s session note
- Download attachments from other joined users and add new attachments
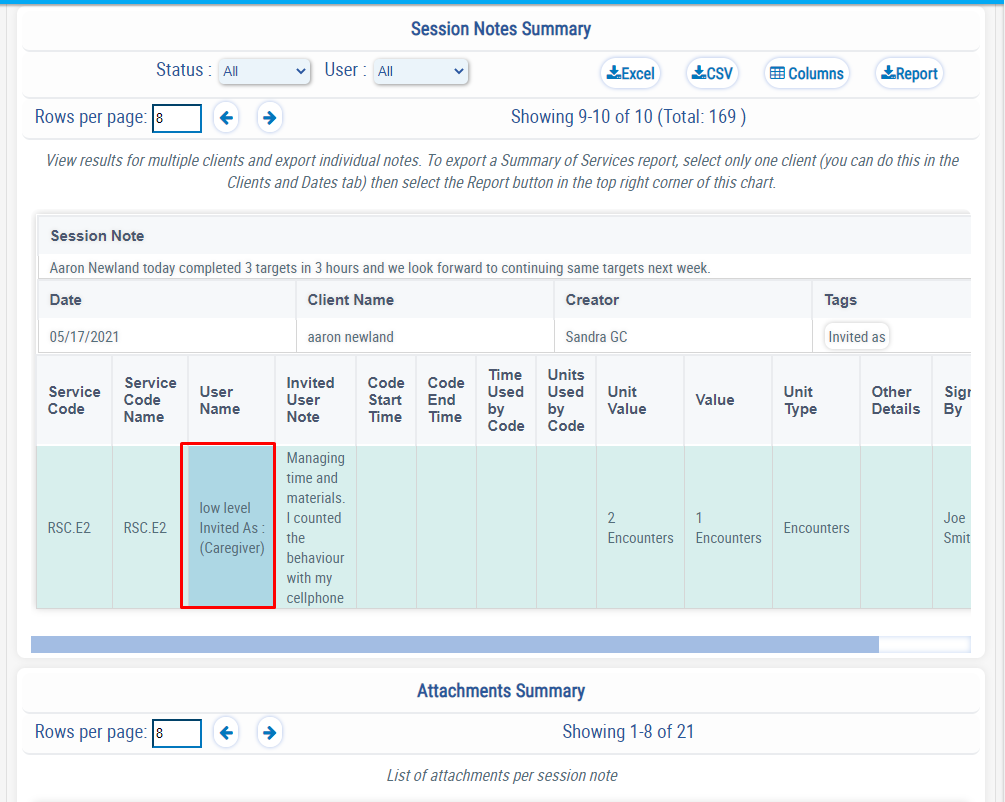
In the Session Notes Dashboard report, the joined user’s role for the note is also visible in the parenthesis in the User Name column:
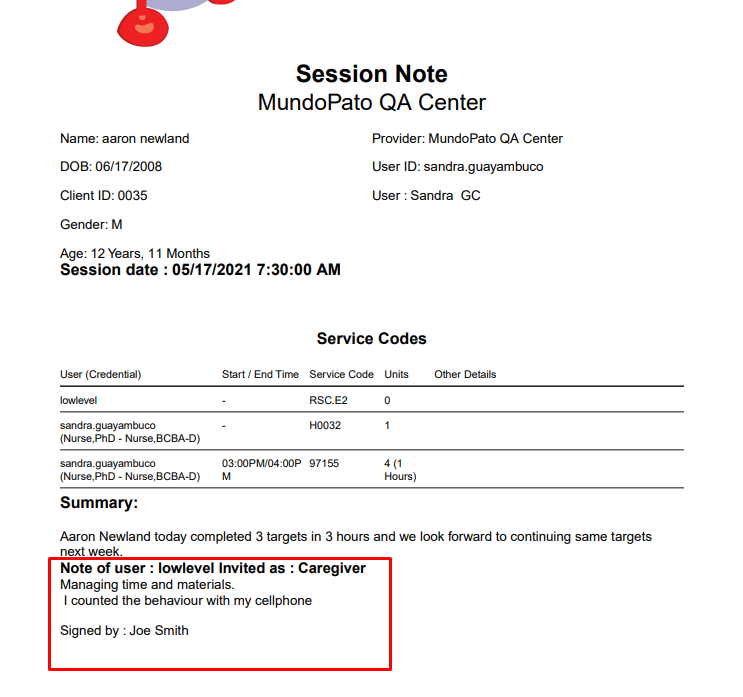
This information is also visible in the exported .pdf or .docx report with the text “Invited As” (see screenshot below):
Reports
Tracking and reporting statistics for your service codes and session notes is now available in the Dashboard menu area in the “Session Notes Dashboard”. The security roles that have access to the Session Notes dashboard reporting tool are:
- Administrator
- High Level
- Medium Level
- Session Notes Editor
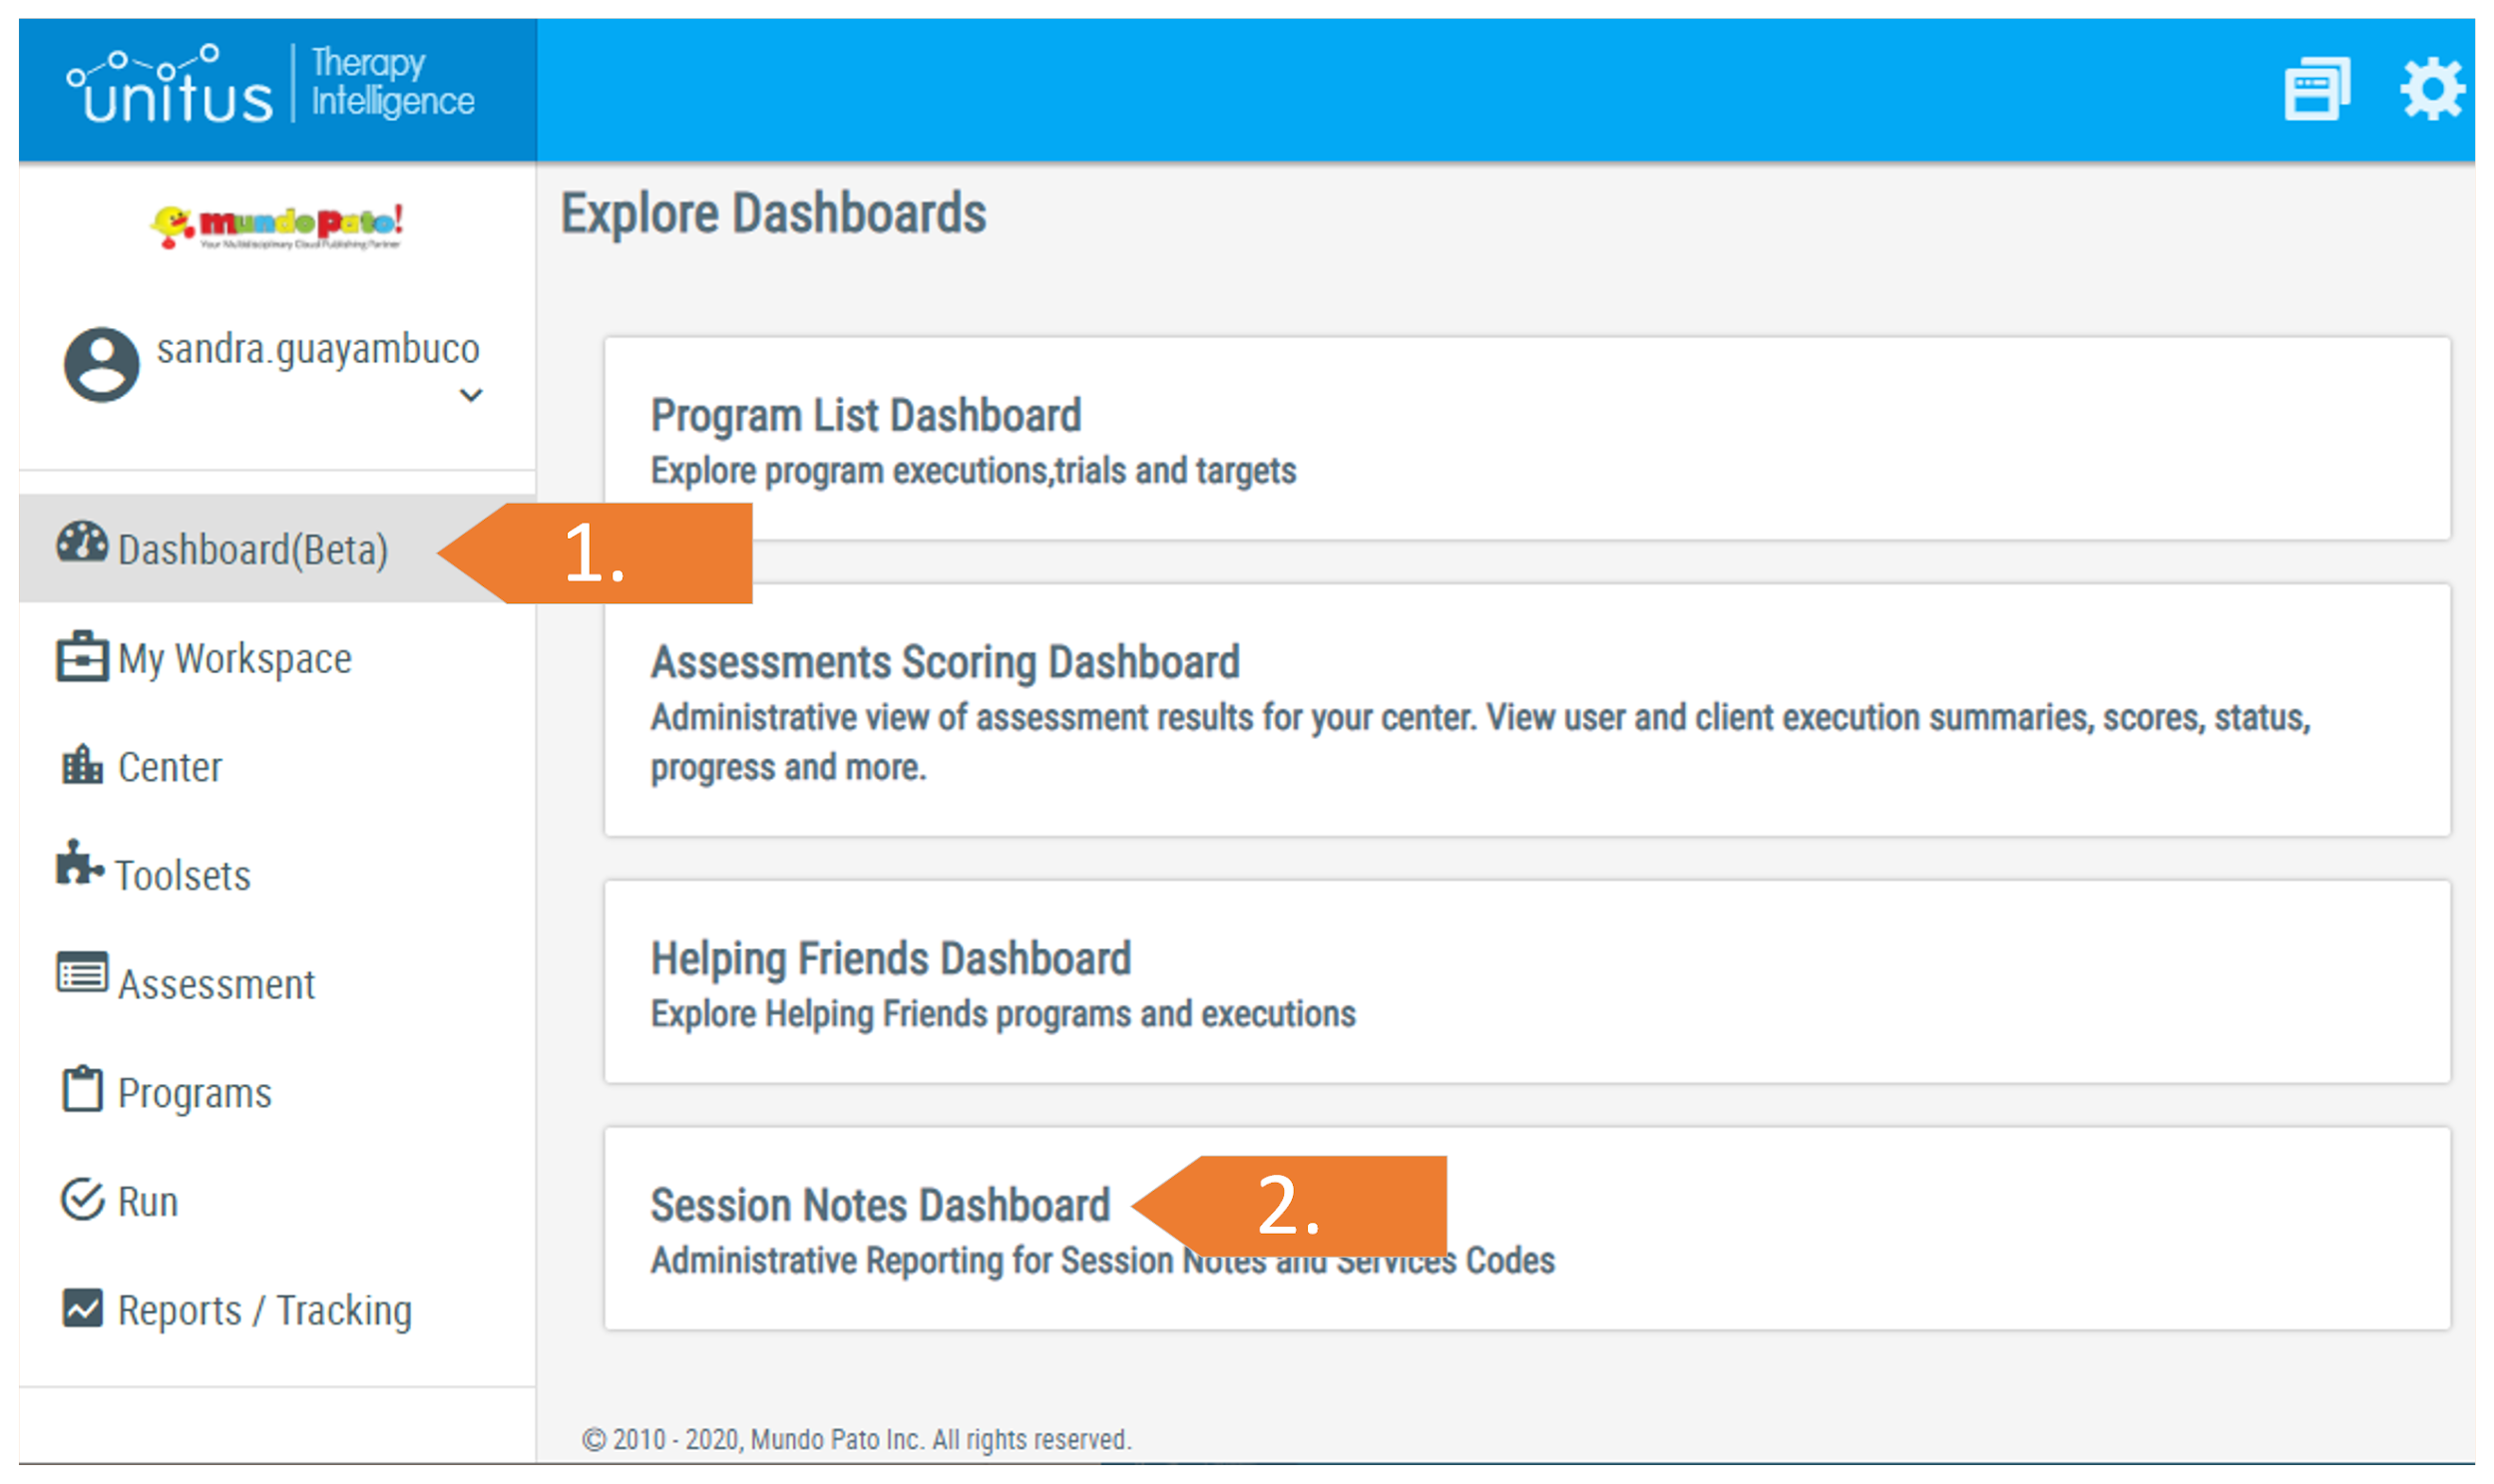
- Select the Session Notes Dashboard from the Dashboard page to initiate the reporting tool.
The reporting dashboard page will have up to three tabs at the top of the screen: “Clients and Dates” (the default tab), “Session Notes” and “Unit Balance”. (Visibility of these tabs may depend on your security role and/or the information available. You must be assigned to clients to view them in this area.)
Clients and Dates selection
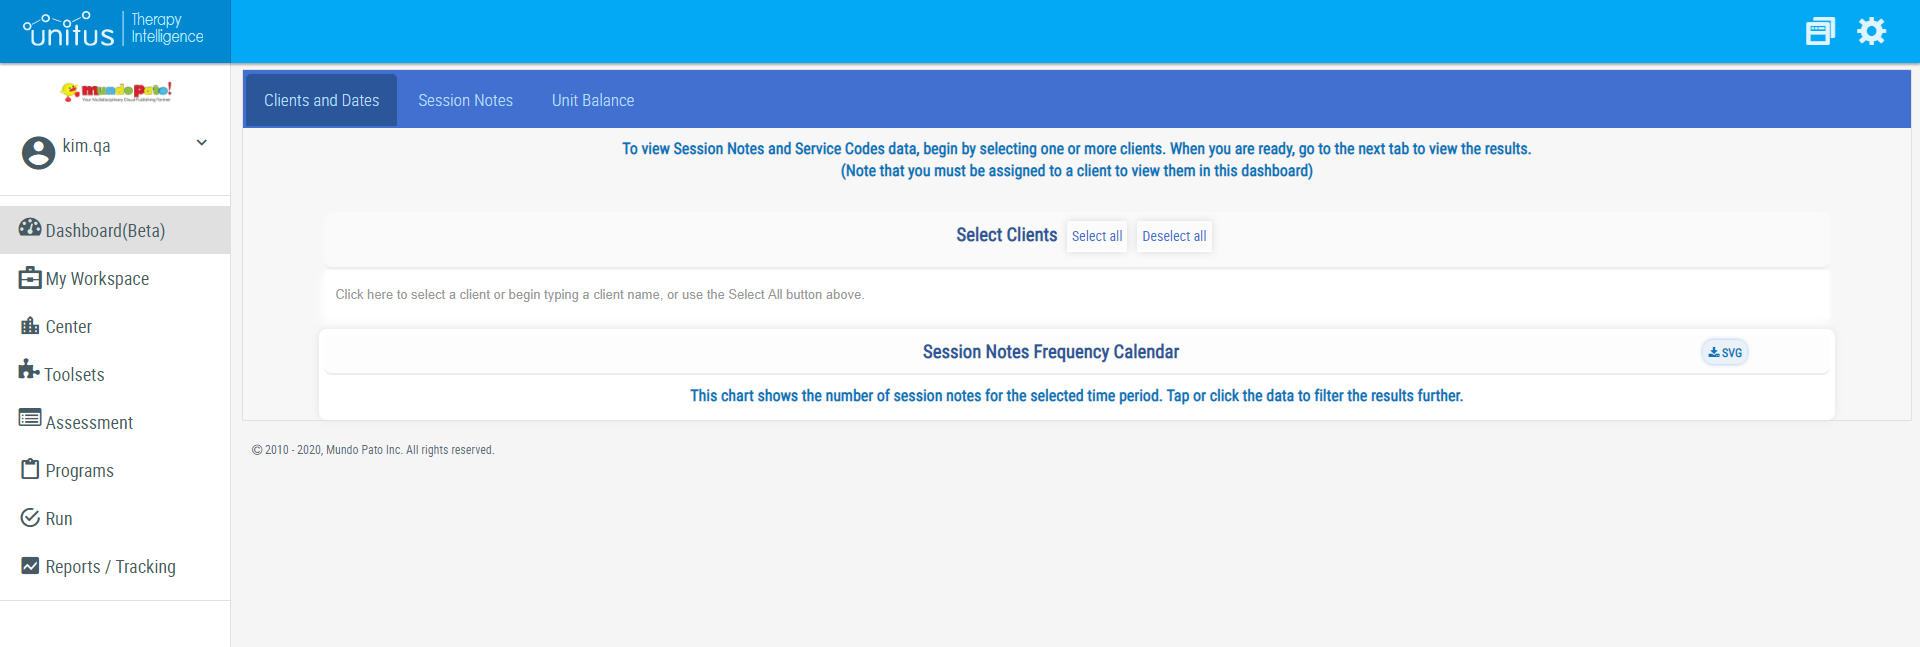
- Select Clients to view: To view Session Notes and Service Codes data, begin by selecting one or more clients that you are assigned to in the “Select Clients” section. Type the name of a client in the designated field or use the “Select All” button to choose all clients you are assigned to. (Tip: You may begin by selecting all clients and deselecting them individually using the “x” in the corner of their name.) When you are ready, go to the next tab (in the blue bar at the top of the screen) to view the results.
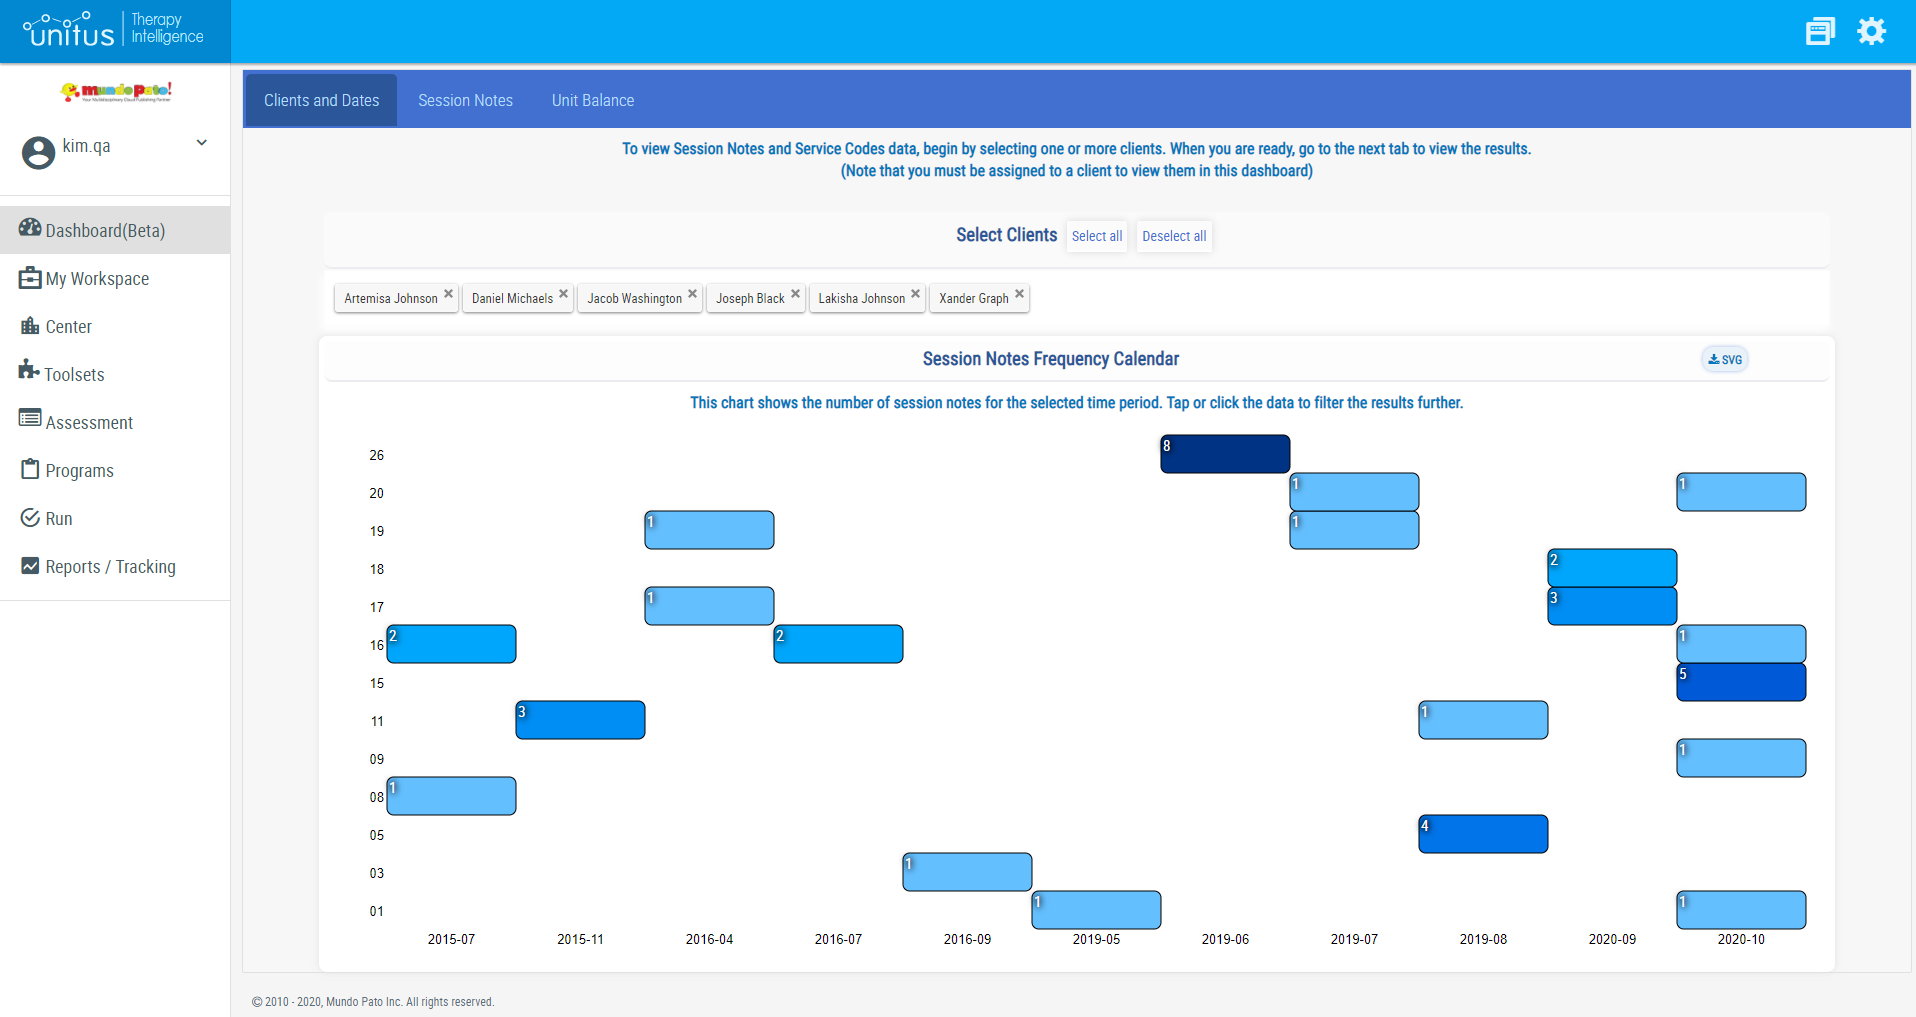
- Set Date/Time Period: Filter the dates you wish to view using the Session Notes Frequency Calendar (see screenshot below). The calendar will automatically populate based on the clients you choose in the “Select Clients” section. This chart shows the number of session notes for the selected time period and will automatically include all dates by default. Tap or click the data to filter the results further. (Note: the horizontal axis is the Year-Month; the Vertical Axis is the Day.)
(Note that you must be assigned to a client to view them in this dashboard)
Session Notes reporting
A summary of your assigned clients’ session notes can be found in this area. The clients you chose in the “Clients and Dates” tab determine the information you will see in this screen. You can select individual data in this area to filter the report details even further.
Filters for the Session Notes Tab
The filters at the top of the Session Notes tab let you control the information that is displayed in the summary section further down the page.
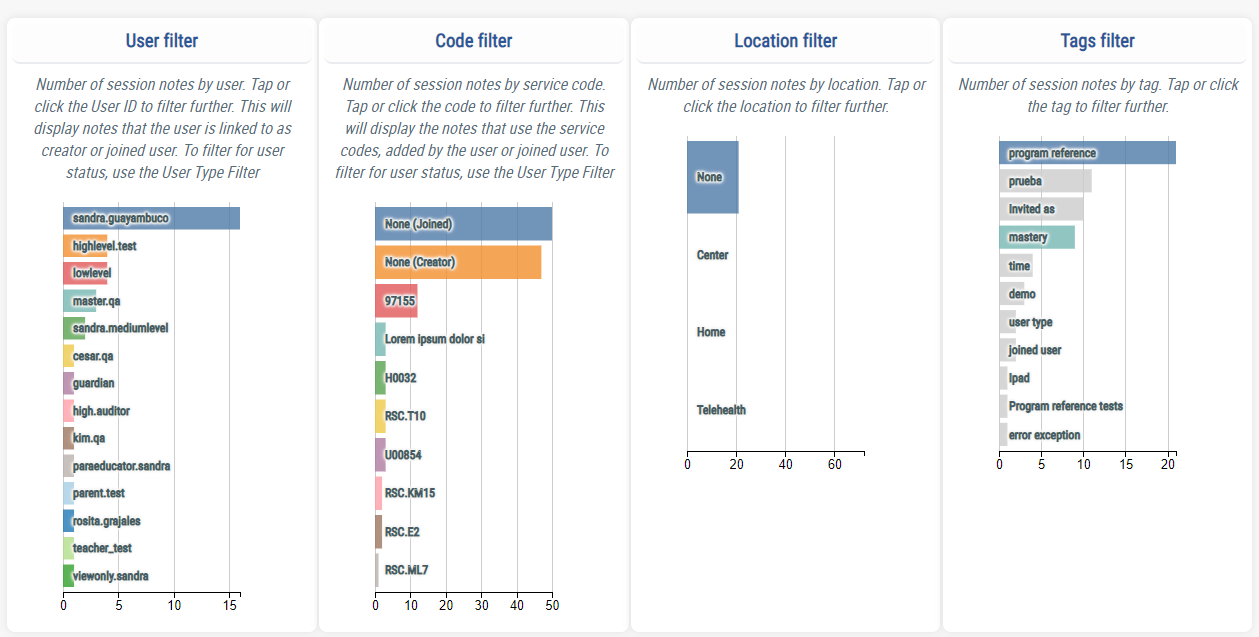
- User filter : Number of session notes by user. Tap or click the User ID to filter further. This will display notes that the user is linked to as creator or joined user. (Tip: you can filter users further by creator or joined status in the summary section, see below)
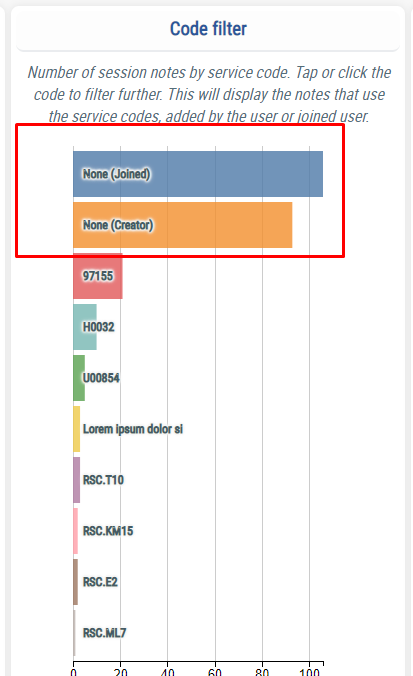
- Code filter : Number of session notes by service code. Tap or click the code to filter further. This will display notes that the code is linked to as creator or joined user. (Tip: you can filter notes where users did not add a service code, you can select by None(creator) or None(joined), see below)
- None (Creator): This option filters all the session notes where the creator did not add any service code.
- None (Joined): This option filters all the session notes where the joined did not add any service code.
- Location filter : Number of session notes by location. Tap or click the location to filter further.
- Tag filter : Number of session notes by tag. Tap or click the User ID to filter further.
Filters in the Session Notes Summary section:
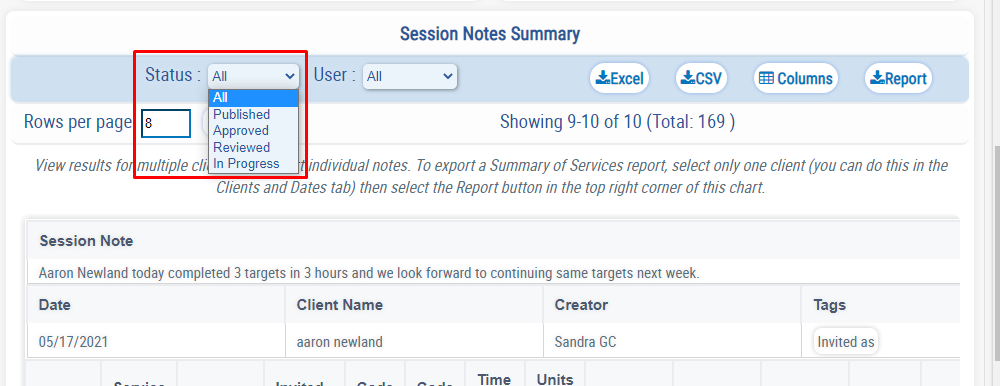
- “ Status” dropdown filter : Filter the session notes table, by the session note status, in the screenshot below, all the possible session notes status are displayed
- “User Type” dropdown filter : This setting filters the notes by user type (All, Creator or Joined User). The creator is the user who created the note and Joined User is a team member that the creator added to the note for the purpose of adding their own comments, a signature and/or service code(s). Filter allows the user to compliment the User and the code filters selected. The possible values are All , Creator and Joined User
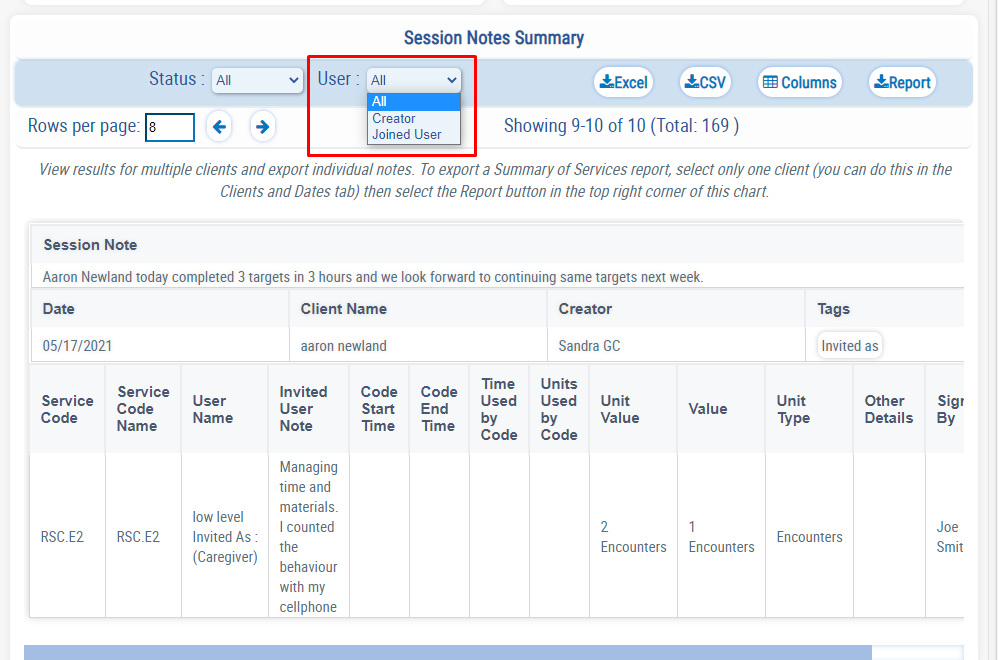
- Below are some examples of how this filter can be combined with the User Type filter
- If you select a specific User, let’s say User1, and select User status All . The session notes displayed are all notes where User1 is creator and joined user
- If you select a specific User, let’s say User1, and select User status Creator . The session notes displayed are the notes where User1 is the creator.
- If you select a specific User, let’s say User1, and select User status Joined User . The session notes displayed are all notes where User1 is joined user
- Below are some examples of how this filter can be combined with the Code filter
- If you select a specific Service code in the “Code Filter”, let’s say 97155 , and select User status All . The session notes displayed are all notes where the code 97155 was used by the creator and by the joined user
- If you select a specific Service code in the “Code Filter”, let’s say 97155 , and select User status Creator . The session notes displayed are all notes where the code 97155 was used by the creator
- If you select a specific Service code in the “Code Filter”, let’s say 97155 , and select User status Joined User . The session notes displayed are all notes where the code 97155 was used by the joined user
Charts for the Session Notes Tab
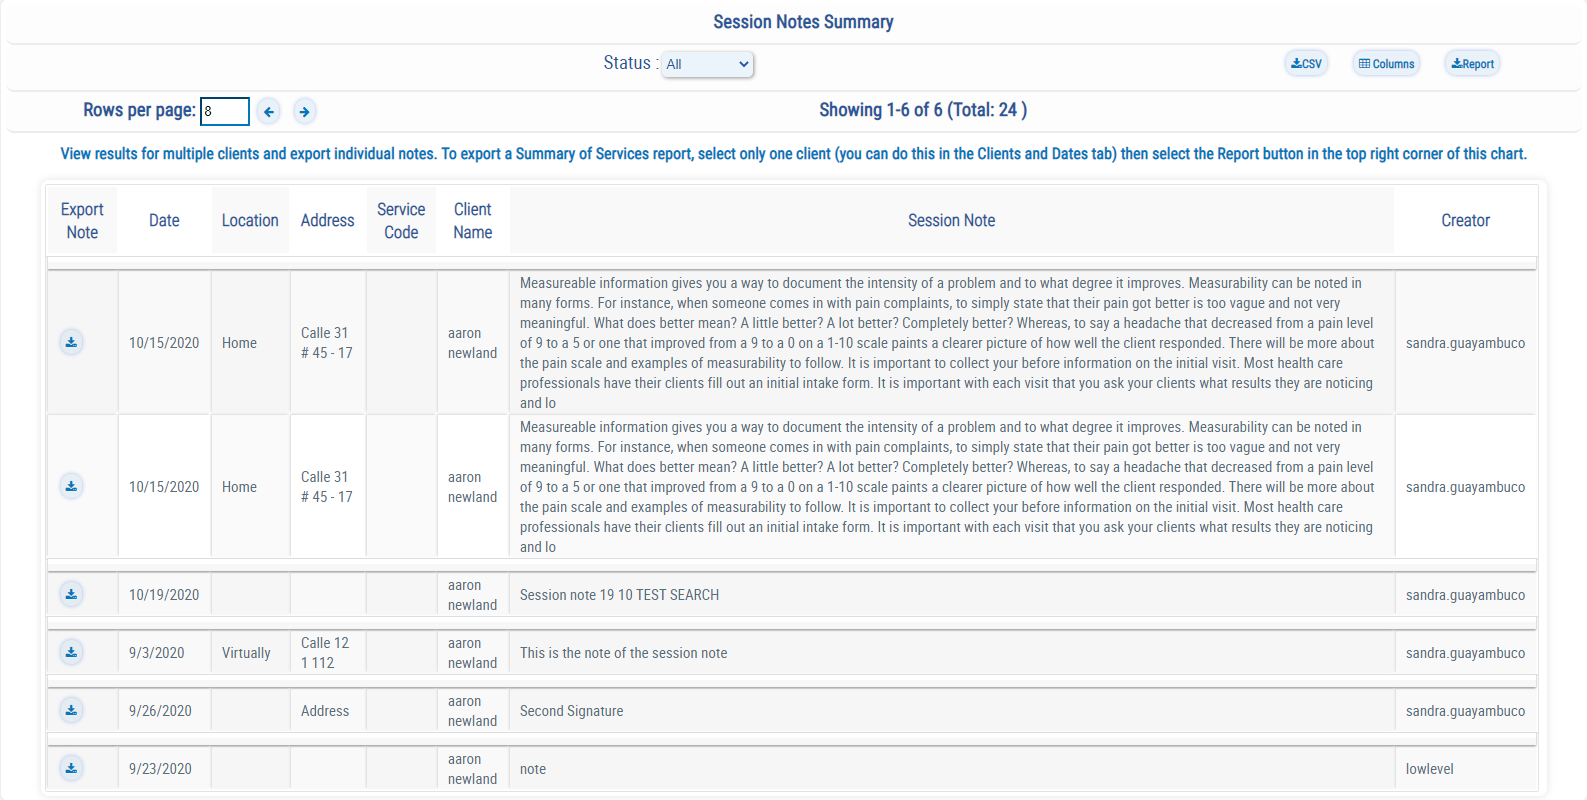
- Session Notes Summary : View and export session notes and their attachment codes for multiple clients. To export a Summary of Services report, select only one client (you can do this in the Clients and Dates tab) then select the Report button in the top right corner of this chart.
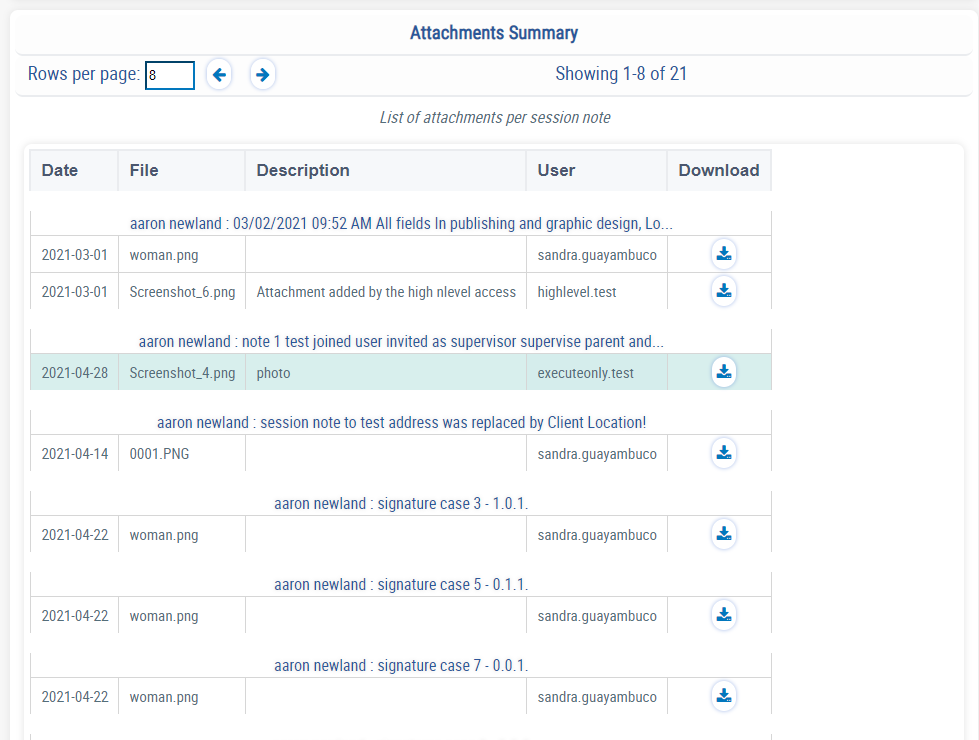
- Attachment Summary : View and download session notes attachments.
Unit Balance Reporting for Service Codes
A summary of service code usage can be found in this area. The clients you chose in the “Clients and Dates” tab determine the information you will see in this screen. You can select individual data in this area to filter the report details even further.
Filters for the Service Codes Tab
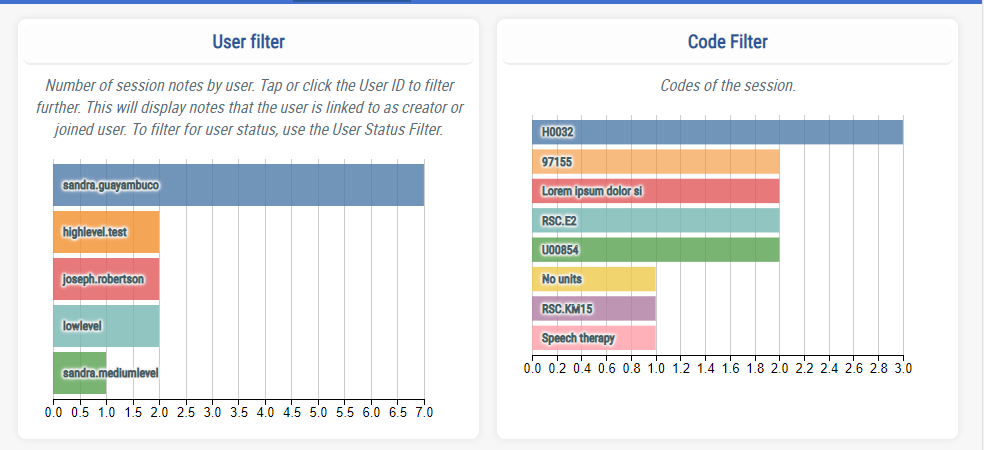
- User filter : Number of session notes by user. Tap or click the User ID to filter further. This will display notes that the user is linked to as creator or joined user. To filter for user status, use the User Status Filter
- Code filter : Number of session notes by service code. Tap or click the code to filter further. This will display notes that the code is linked to as creator or joined user. To filter for user status, use the User Status Filter
Charts for the Service Codes Tab
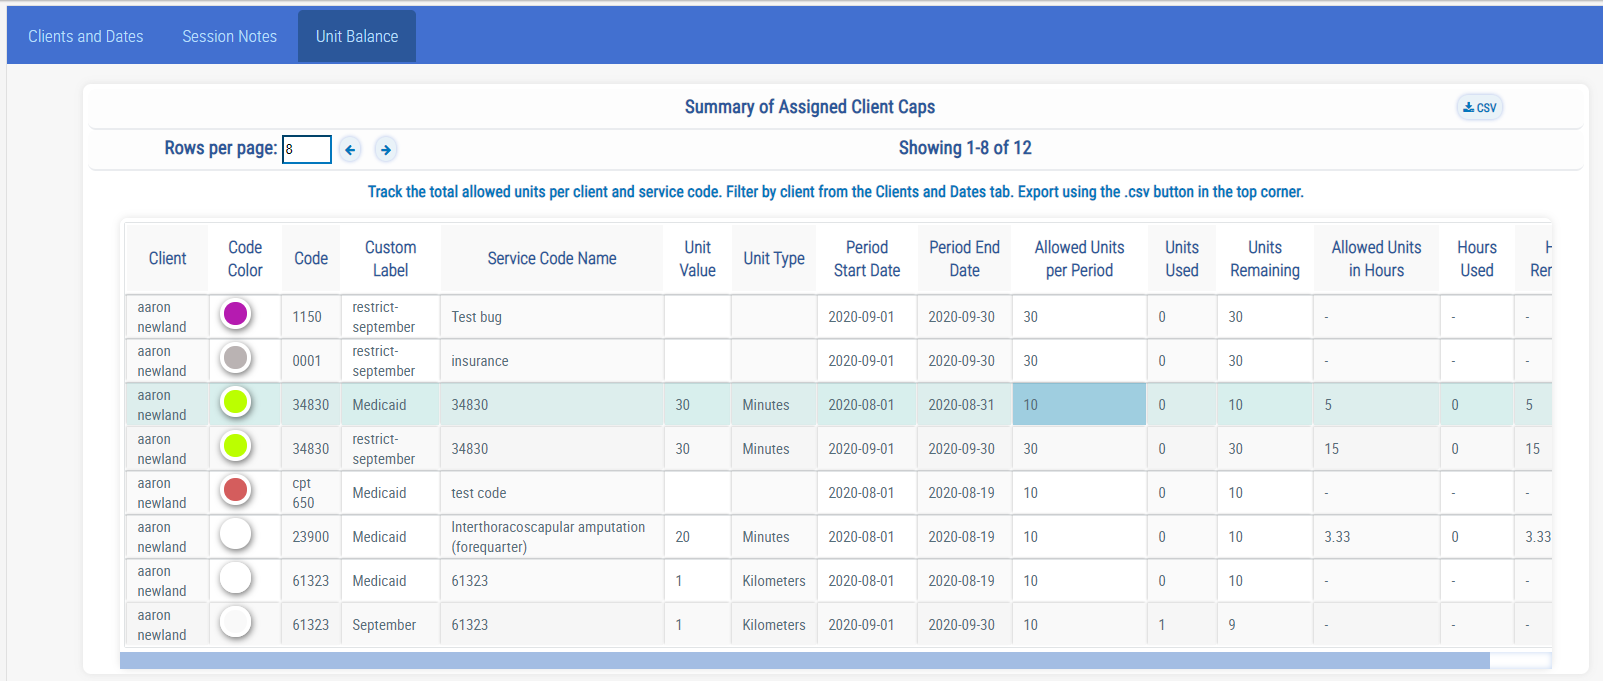
- Summary of Assigned Client Caps : Track the total allowed units per client and service code. Filter by client from the Clients and Dates tab. Export using the .csv button in the top corner.
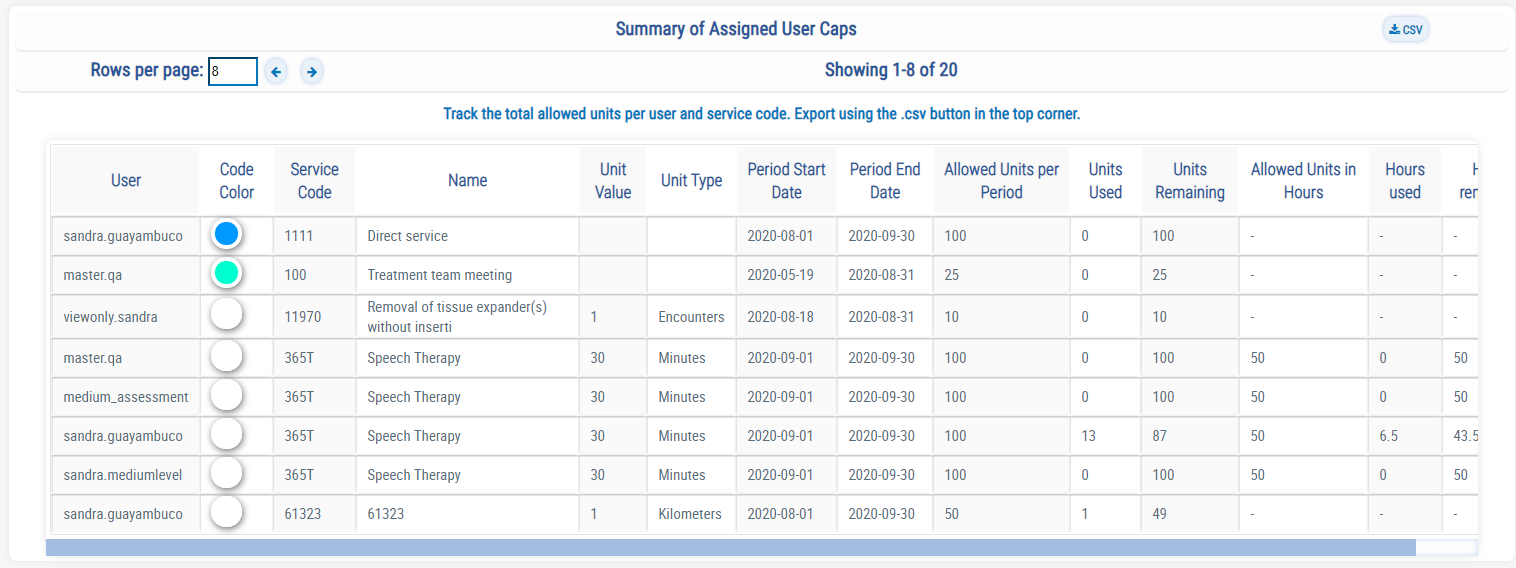
- Summary of Assigned User Caps : Track the total allowed units per user and service code. Export using the .csv button in the top corner.
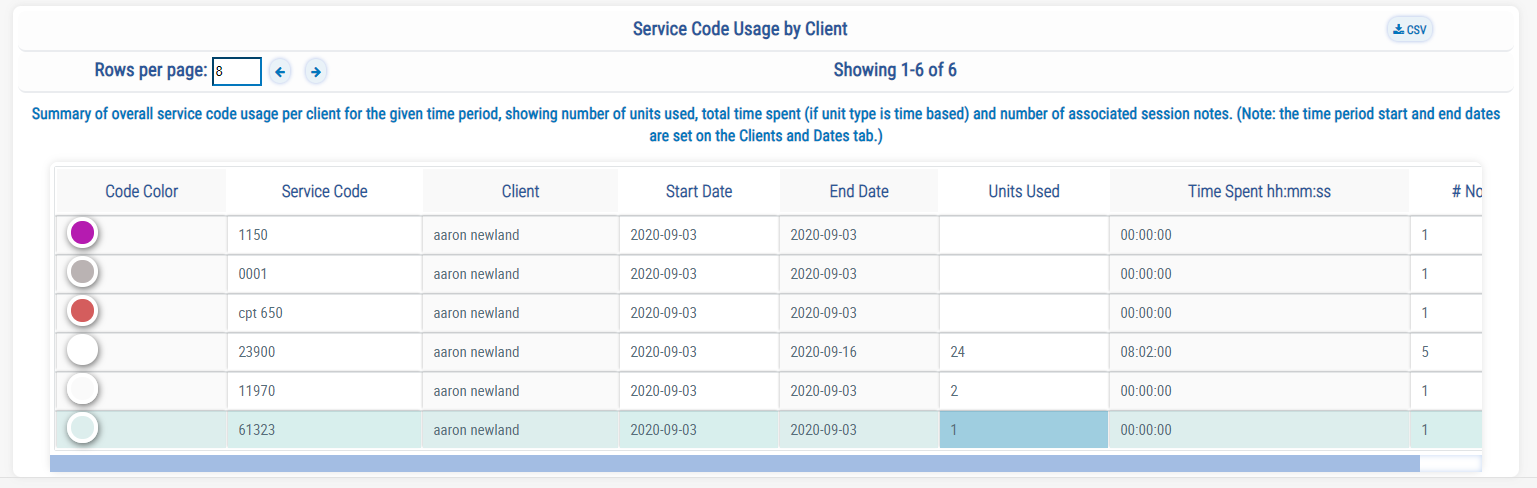
- Service Code Usage by Client : Summary of overall service code usage per client for the given time period, showing number of units used, total time spent (if unit type is time based) and number of associated session notes. (Note: the time period start and end dates are set on the Clients and Dates tab.)
Additional filters for the Session Notes Tab
Time Filter
This filter displays the number of session notes based on the associated service code start/end times. Adjusting the data in this filter will change the information displayed in other filters and the notes displayed in the Session Notes Summary section.
The filter defaults to a 24 hour span. Filter the time frame even further by zooming in or out and swiping using a mouse wheel or gestures.
Note: only session notes that are linked to service codes will be reflected in this filter. Start and end times are designated by the user when adding a service code to a session note.
Users can filter further the table of all session notes that uses service codes by their start time and end time recorded.
The charts in the screenshot below shows:
- The times on the x-axis
- The number of notes for each time on the y-axis.
- The topchart is for the start time.
- The bottomchart is for the end time.
Important: This filter only includes session notes that are associated with time-based service codes.
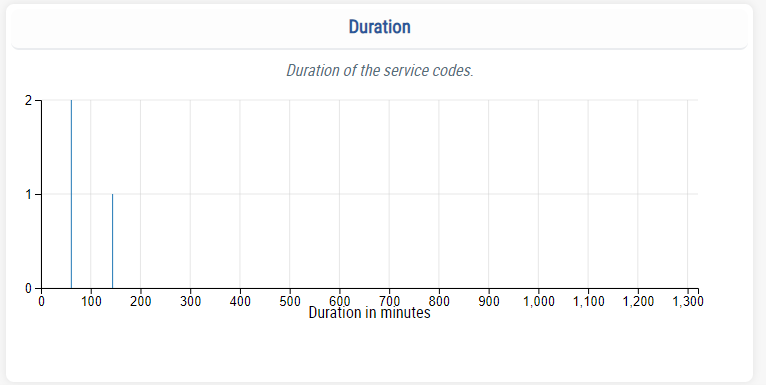
Duration Filter
This filter displays the number of session notes based on the duration of start and end times for associated service codes. Adjusting the data in this filter will change the information displayed in other filters and the notes displayed in the Session Notes Summary section.
The chart in the screenshot below shows:
- The duration on the x-axis
- The number of notes for each time on the y-axis.
Important : This filter only includes session notes that are associated with time-based service codes.
Session Notes Audit Module
UnitusTI offers an optional mechanism to implement auditing for your session notes. To learn more about how to enable and utilize this feature, please visit the Session Notes Audit Module article .